Efficient Vegetation Simulation and Layout using Auto-rigged Agents in Houdini (Part 2/2)
Welcome to part 2 of this two-part series of Efficient Vegetation Simulation and Layout using Auto-rigged Agents in Houdini!
This second part will cover taking the rigged vegetation agents we generated last time and using them to layout a scene. Following that, I'll show how to extract individual vegetation pieces and use their skeleton to efficiently simulate collision with Vellum and layer animation on top of our existing layout using UsdSkel.
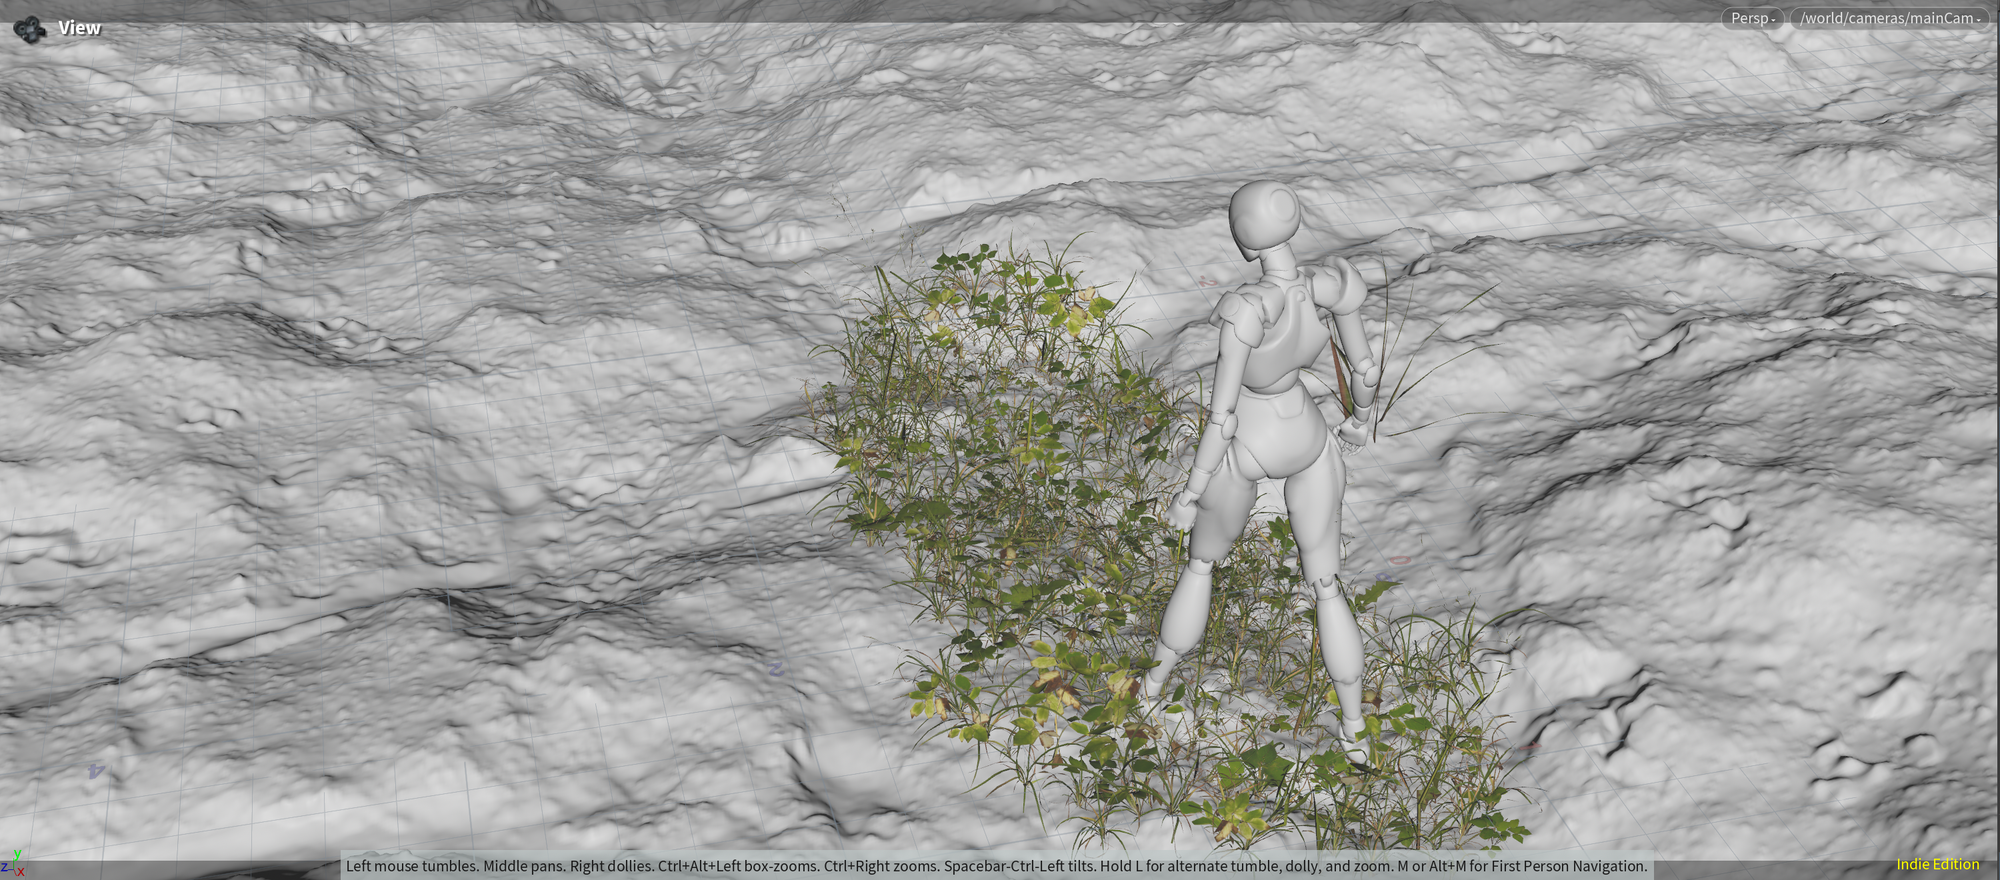
Final composited shot.
If you missed Part 1, you can check it out here:
Let's jump into it!
Layout Asset Gallery
Adding our assets to the Layout Asset Gallery
Starting where we left off, the first thing we need to do is to add our assets to the Layout Asset Gallery (or Asset Catalog in Houdini 21). We do this to help us have a nice overview of all our processed assets, and to enable us to visually pick which assets we want to use in our scene.
If you're not familiar, the Layout Asset Gallery is a catalog of assets stored in a database on your server or local storage. It can be really useful for environment work where you're often dealing with many different kinds of assets that need to be placed in the same scene. The Layout Asset Gallery gives you a nice overview of all your assets while providing an easy way to drag and drop them into your scene.
When adding an asset to the Layout Asset Gallery, the Layout Asset Gallery requires you to follow the USD file structure that is generated by the component builder. You can read more details in the link below. Luckily, we don't need to worry about this since we already exported everything using the Component Builders in Part 1 - so we already have the structure on disk that the Layout Asset Gallery requires: https://www.sidefx.com/docs/houdini/ref/panes/assetgallery.html#asset_dirs
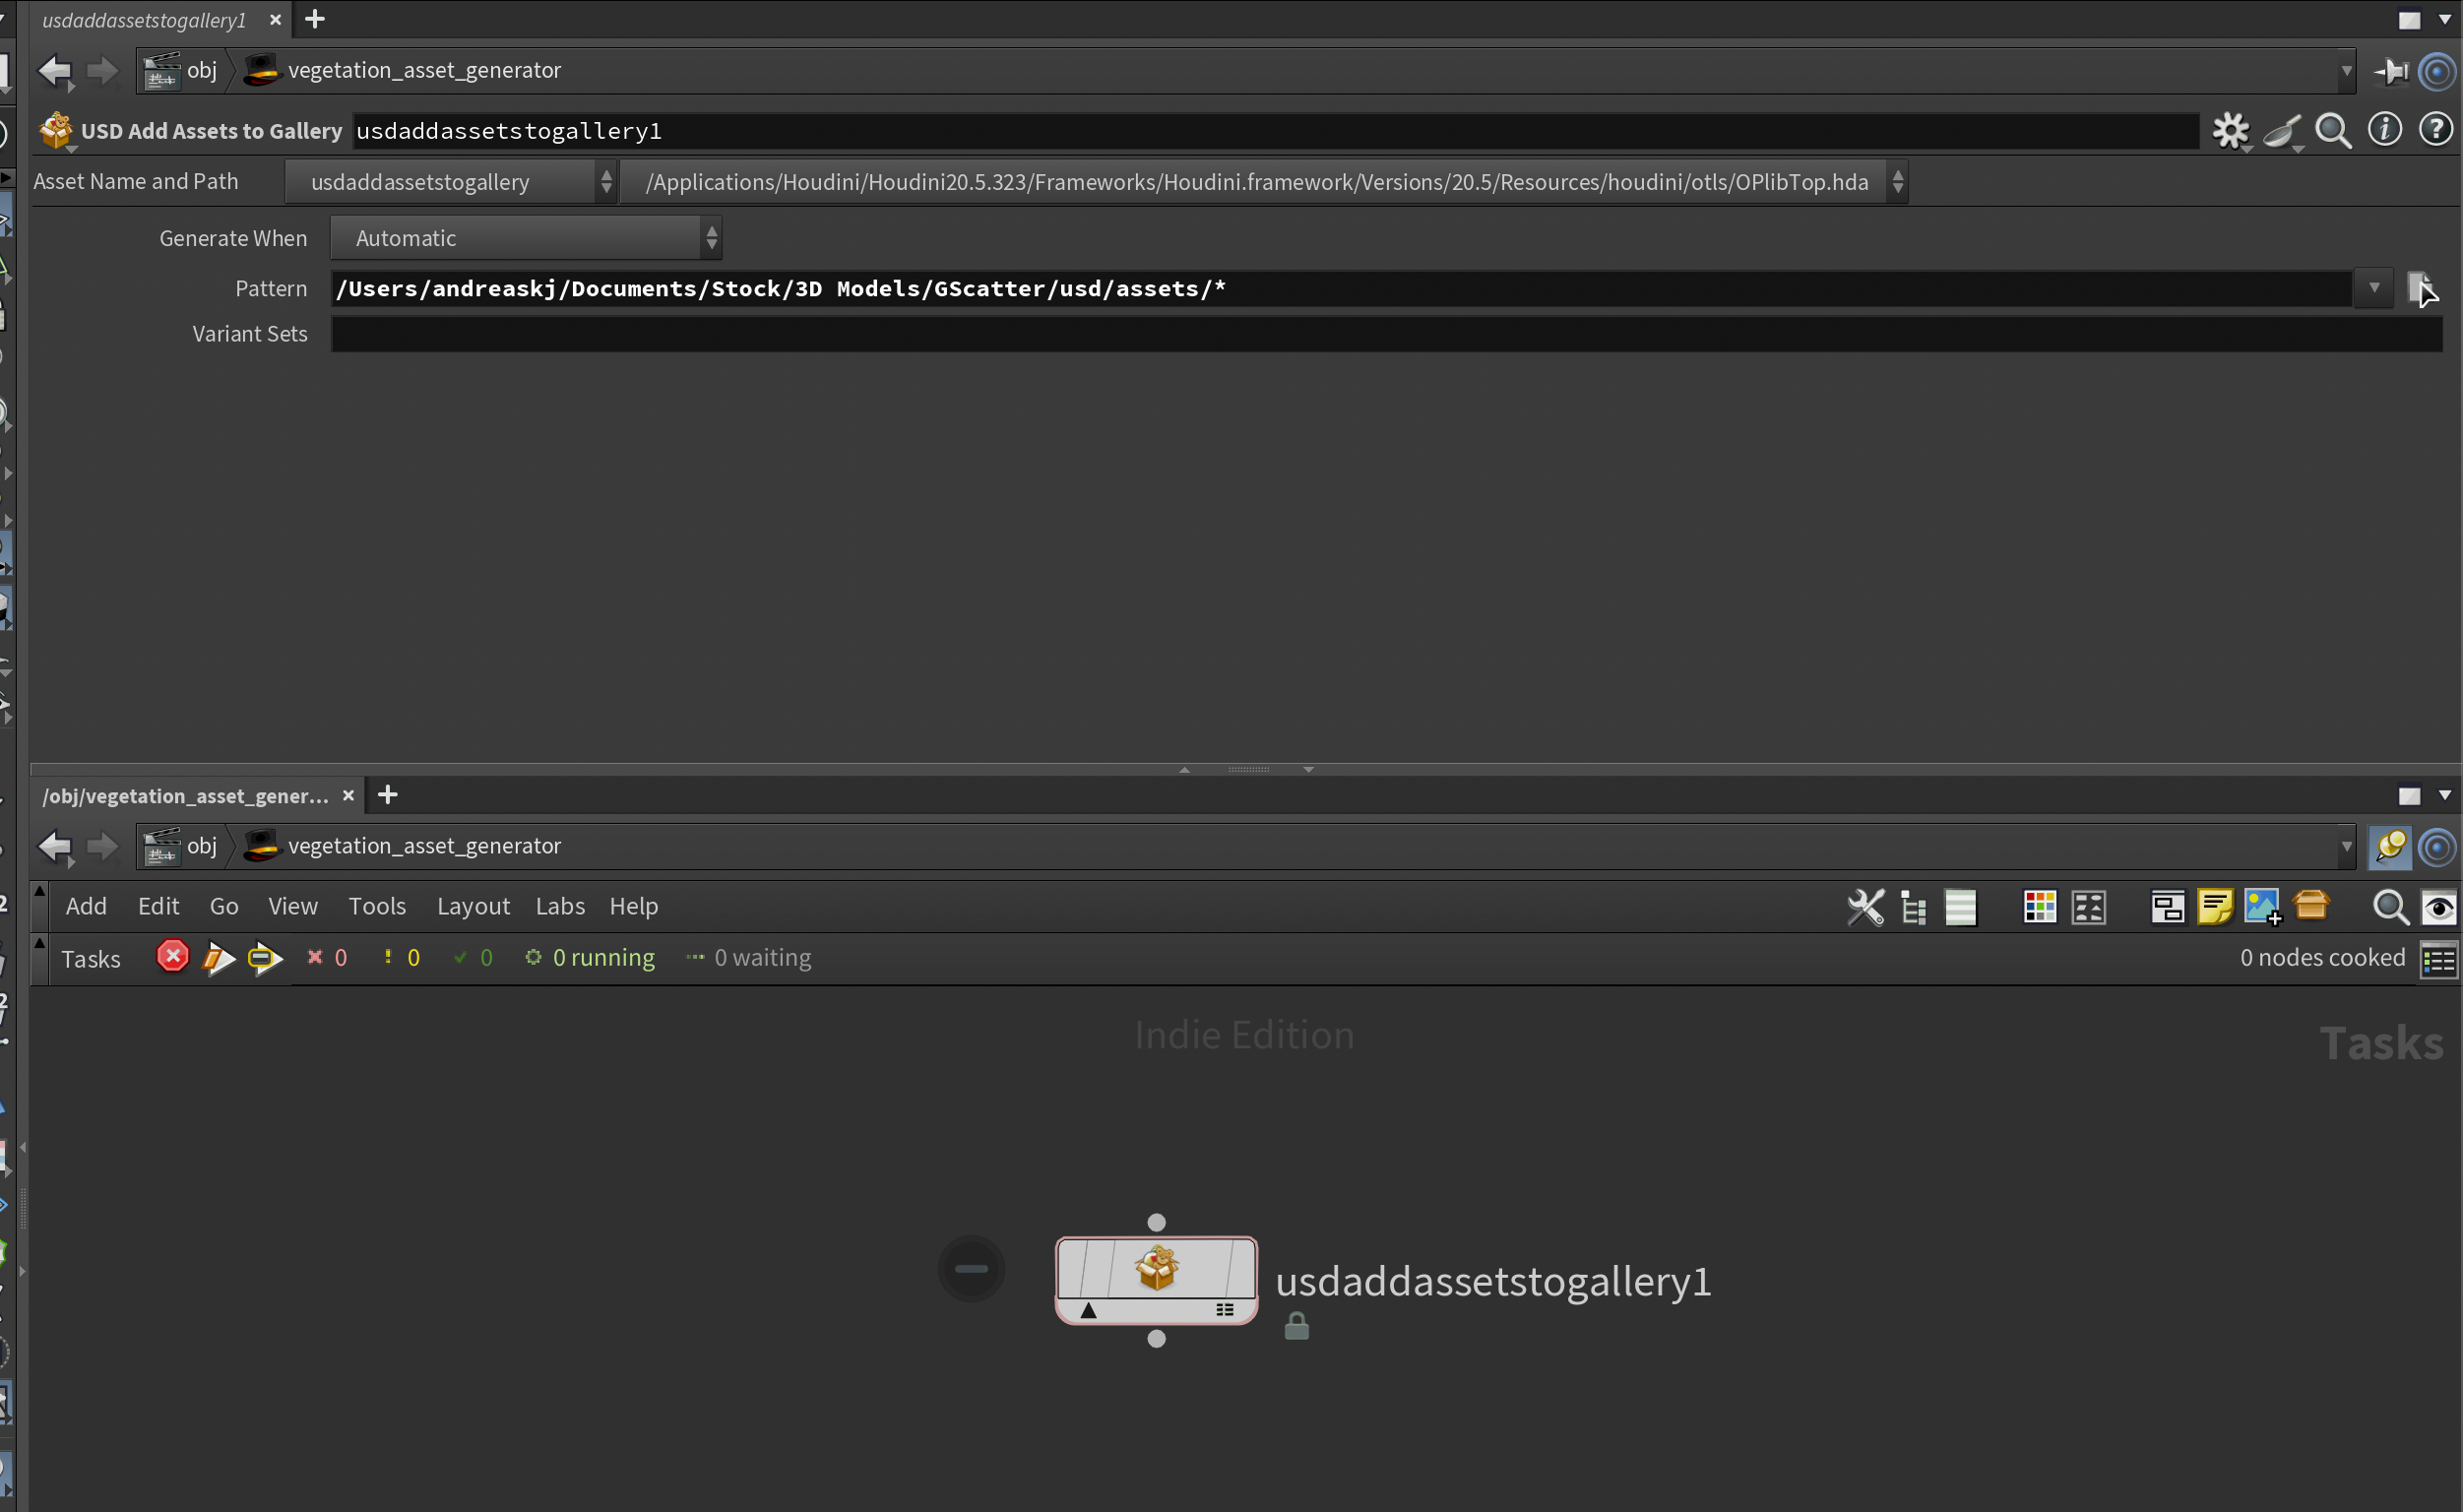
There are multiple ways to add assets to the Layout Asset Gallery, but since we're already in TOPs, the easiest by far is to use the USD Add Assets to Gallery node. This node allows you to specify a root directory with all your assets (in our case, the /assets folder generated from the component builder setup) and add all of the nodes to a Layout Asset Gallery database.
The node will always pick the currently active Asset Gallery database. So let's create a fresh one for this collection of assets before executing the node.
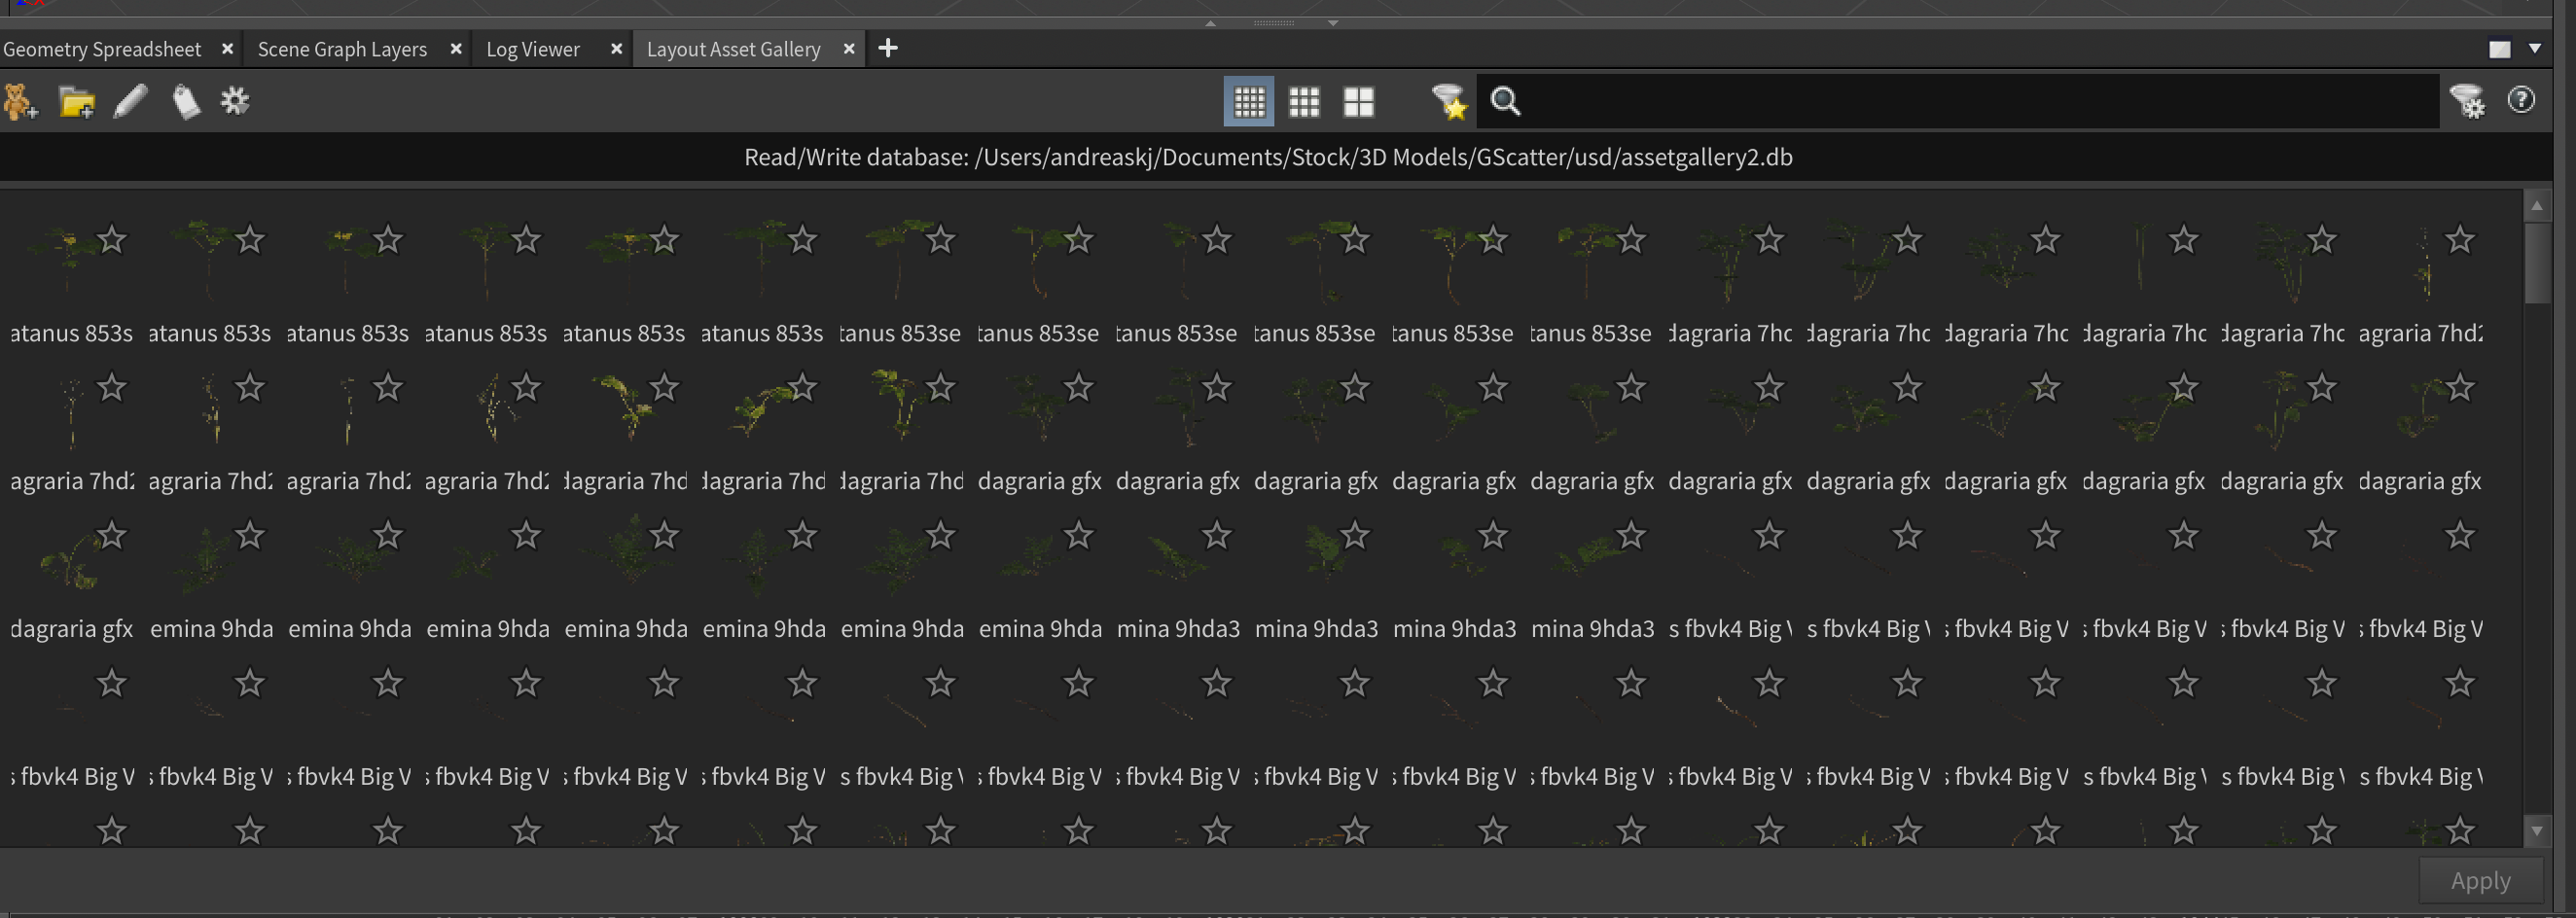
First, open the Layout Asset Gallery (or Asset Catalog in Houdini 21+) by adding a new pane and choosing it under the Solaris submenu (see below). Then, click the little gear icon and press Create New Asset Database File to create an empty database.
Now, if you execute the USD Add Assets to Gallery node with SHIFT+V in TOPs, your database should populate with all of your vegetation assets and variants like you see below:
Creating the Layout
Setting up our vegetation layout.
Before jumping into the layout, I loaded in a bit of motion capture I recorded for this demo and attached it to Electra. I also created a simple ground to scatter vegetation on top of. If you'd like to use this as a base for your own tests, I've provided a hip file with the setup below, as well as the motion capture data (ground + motion capture + camera).
It's free to use, but please leave a link to this article if you share anything you've made with it 😄:
I won't go into detail on how to process motion capture in this particular tutorial, but feel free to poke around the file above.

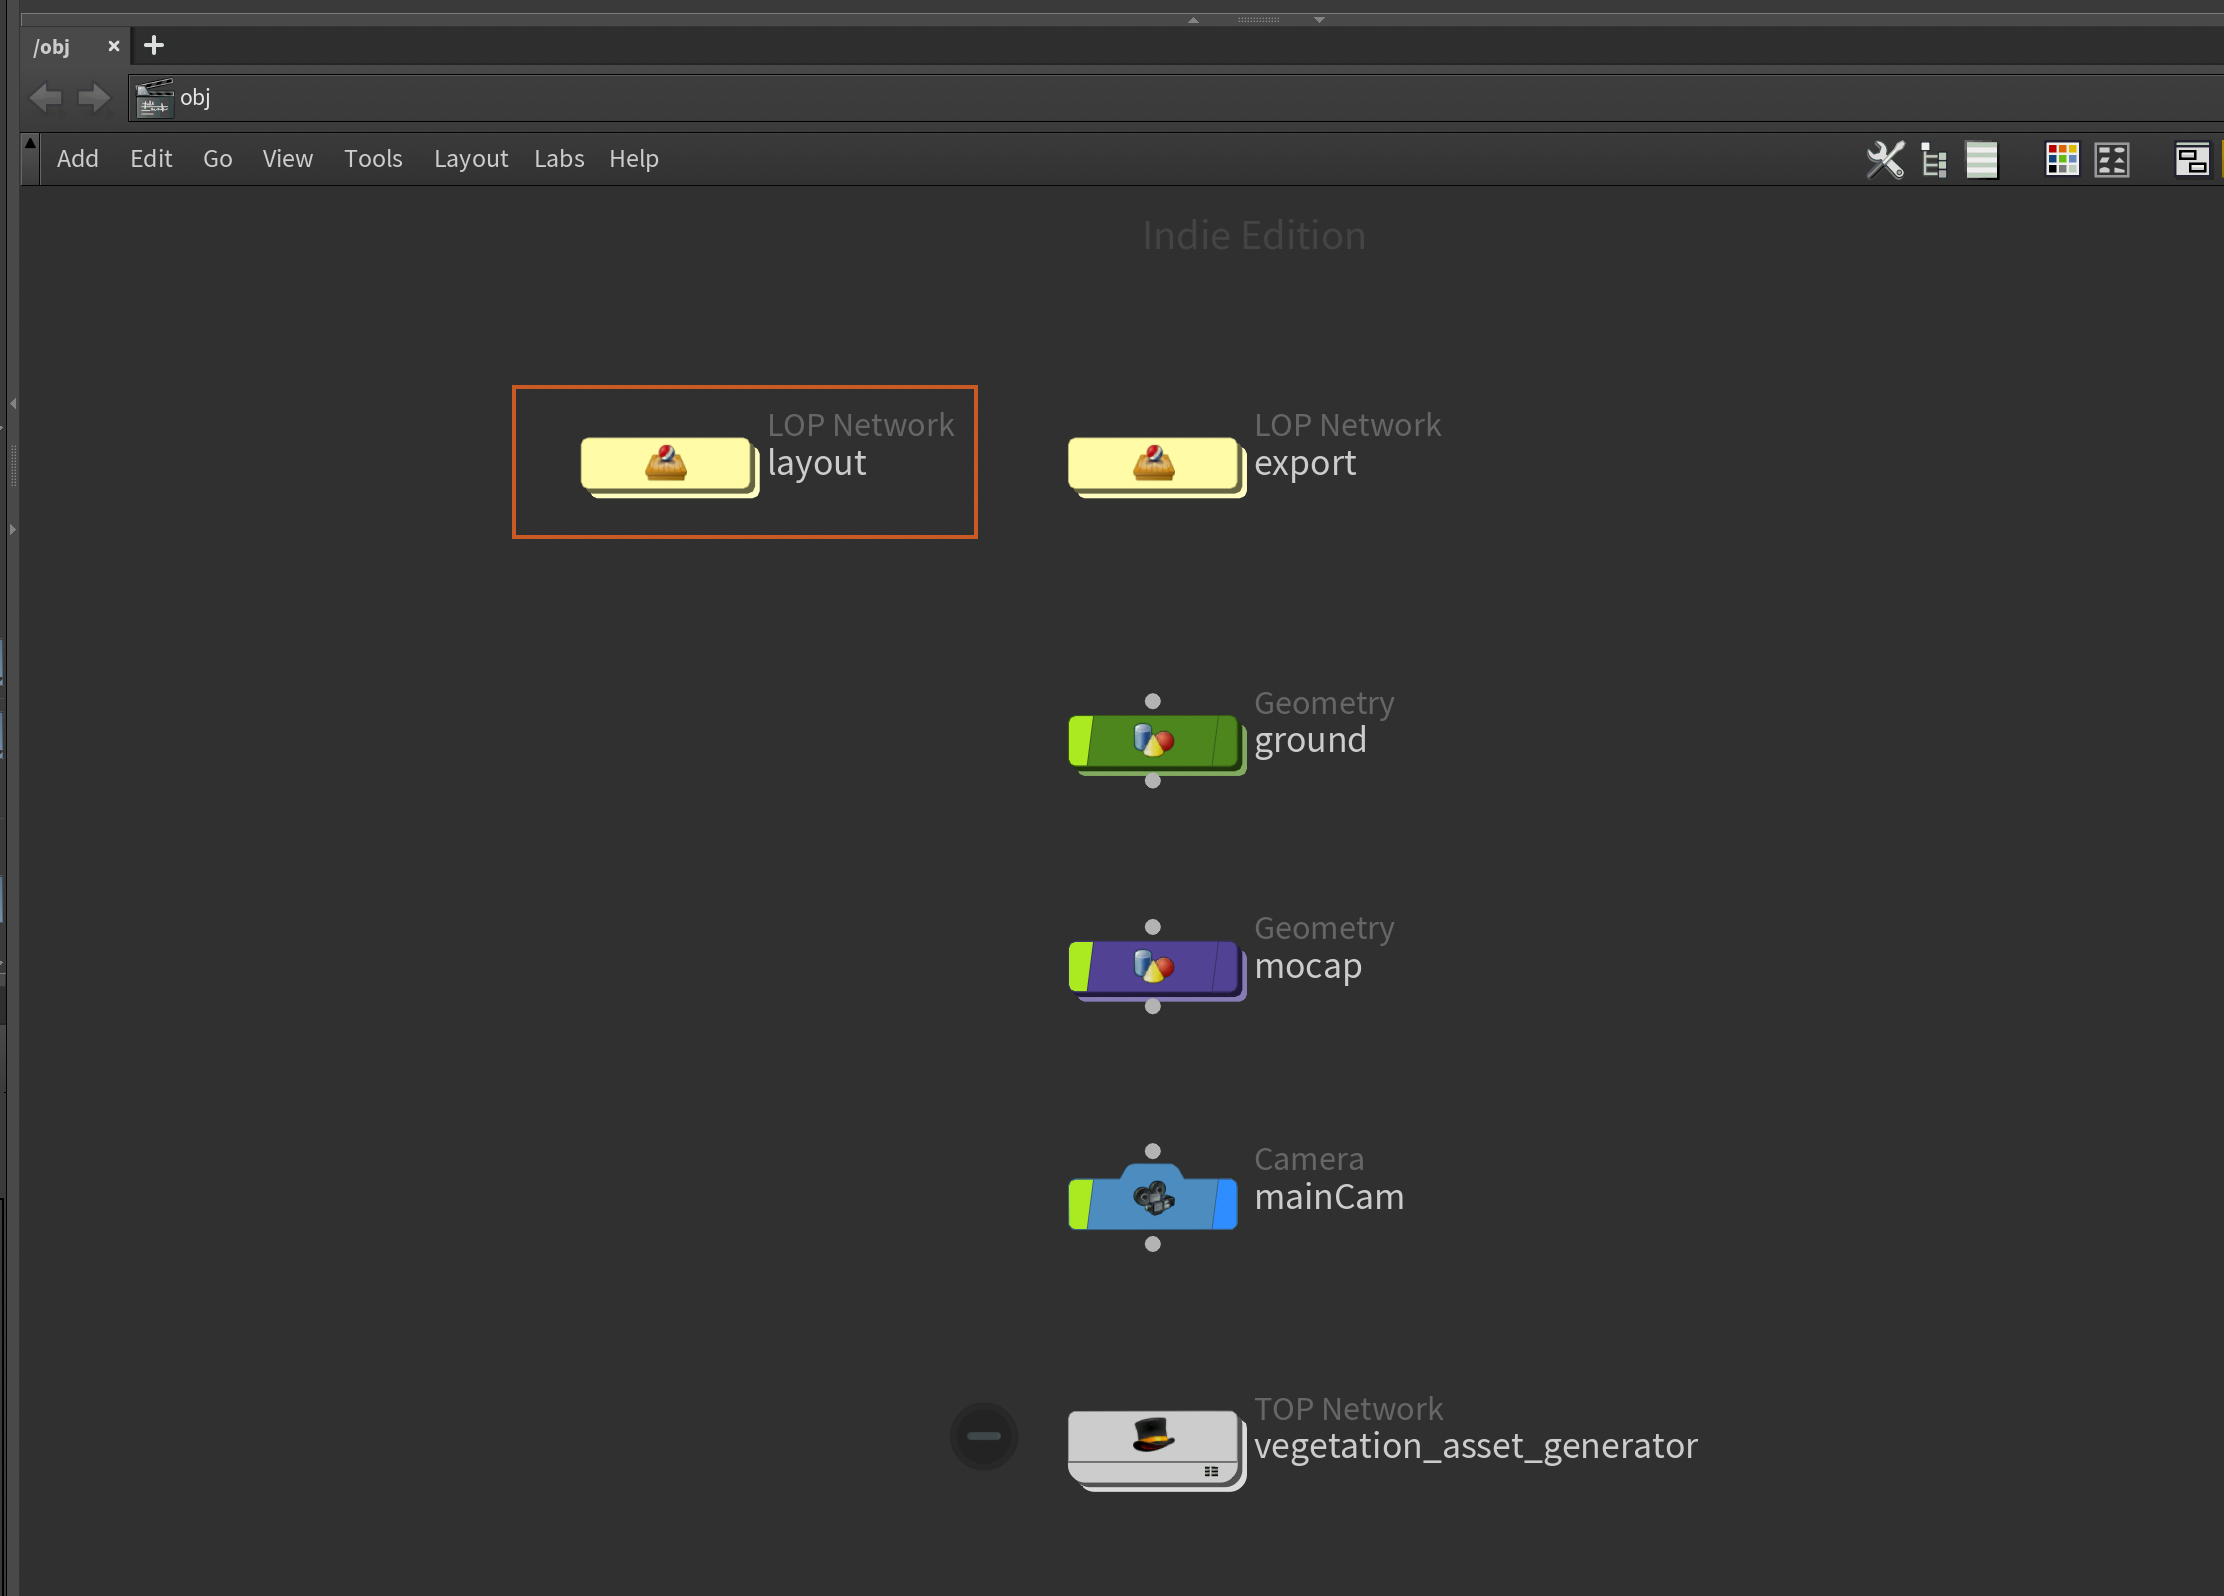
Please note that I exported all 3 elements (ground, character, and camera) to a USD file called main.usd before continuing. As seen in the export LOP network in /obj of the file above.
Vegetation layout in LOPs
Now let's jump into the vegetation layout for our final scene. Based on the scene above, I created an additional LOP network called layout in /obj. In real productions, you'd likely have separate hip files instead, but in this case, I tried to work within a single scene, creating separate LOP networks instead.
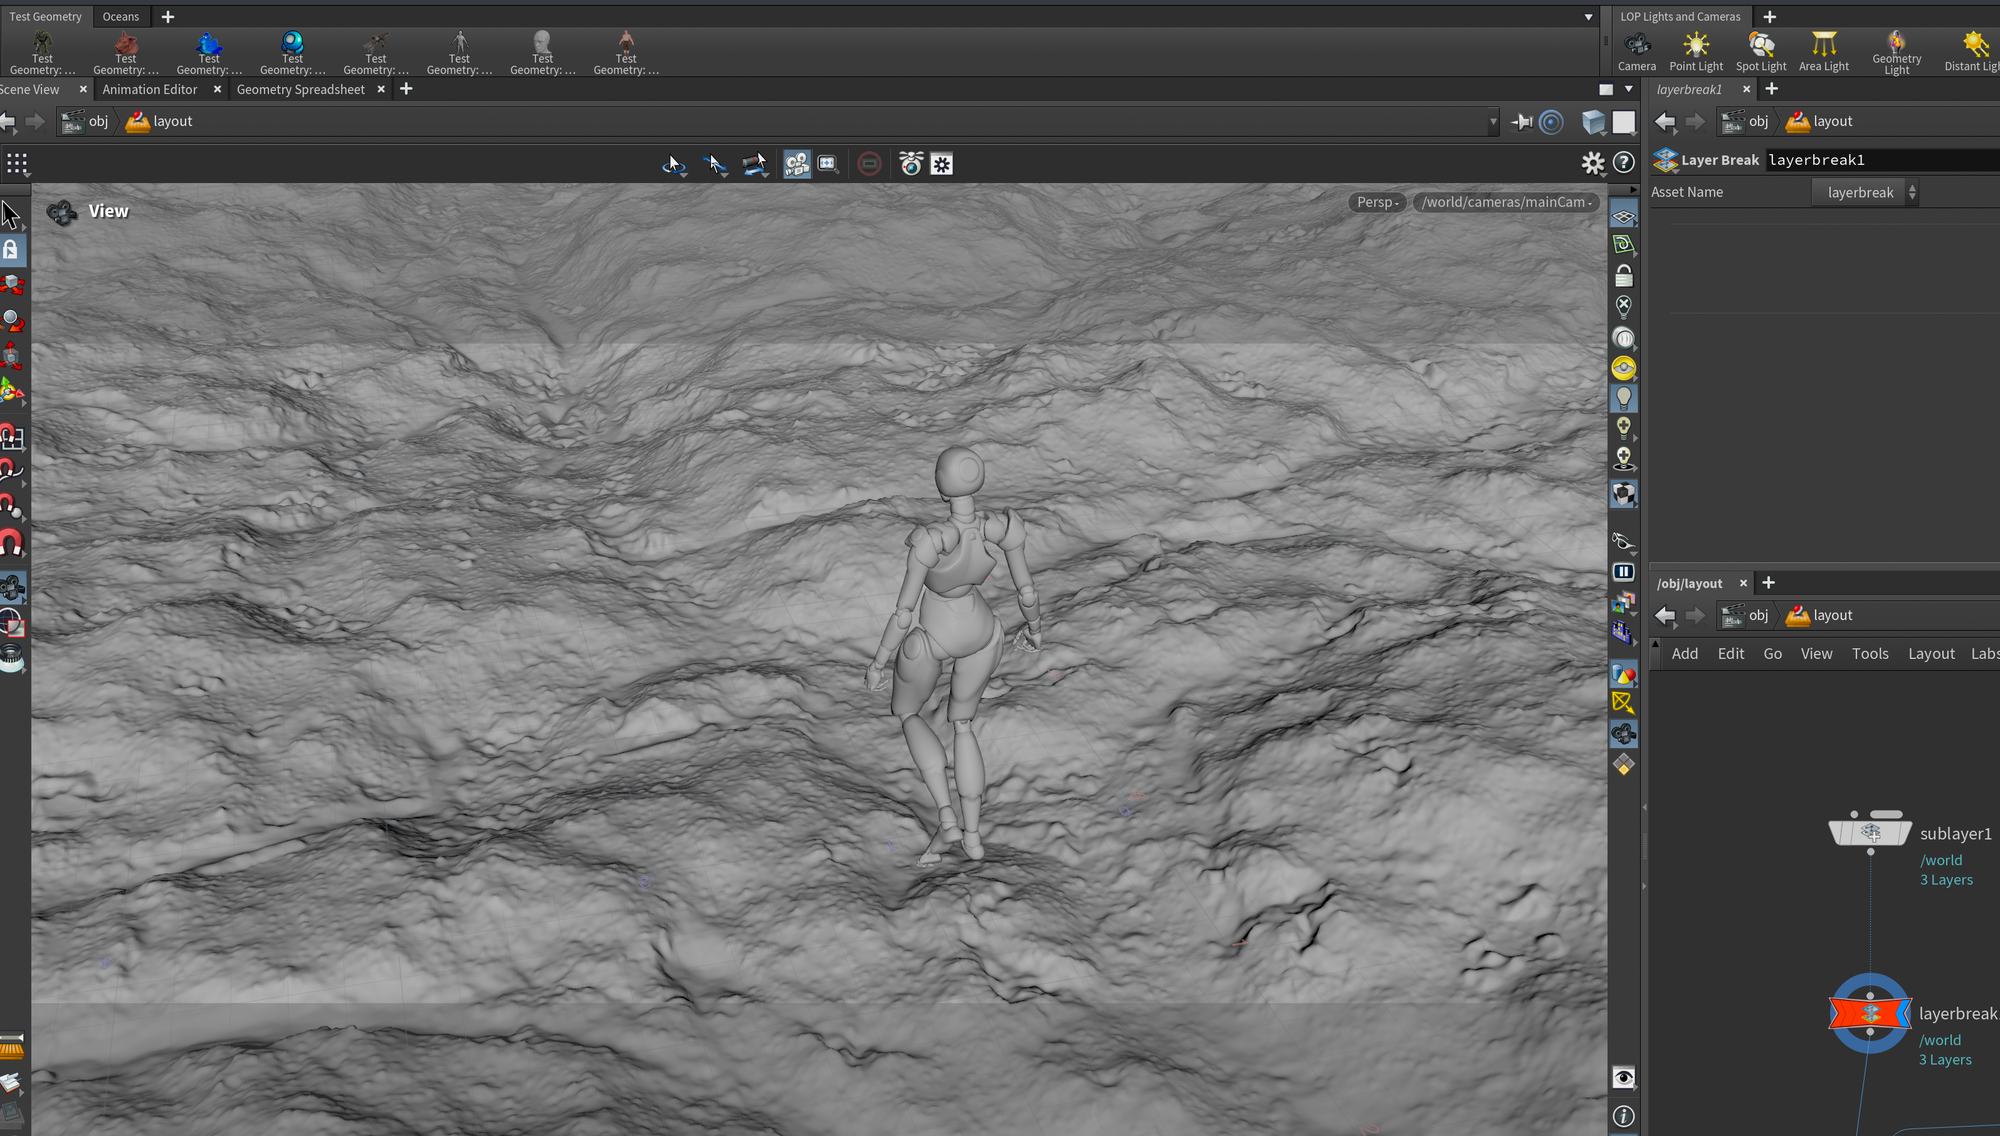
To start, load the character, camera, and ground from the scene you can download above. I followed that with a Layer Break since we want to only include the layout itself in the USD export at the end.
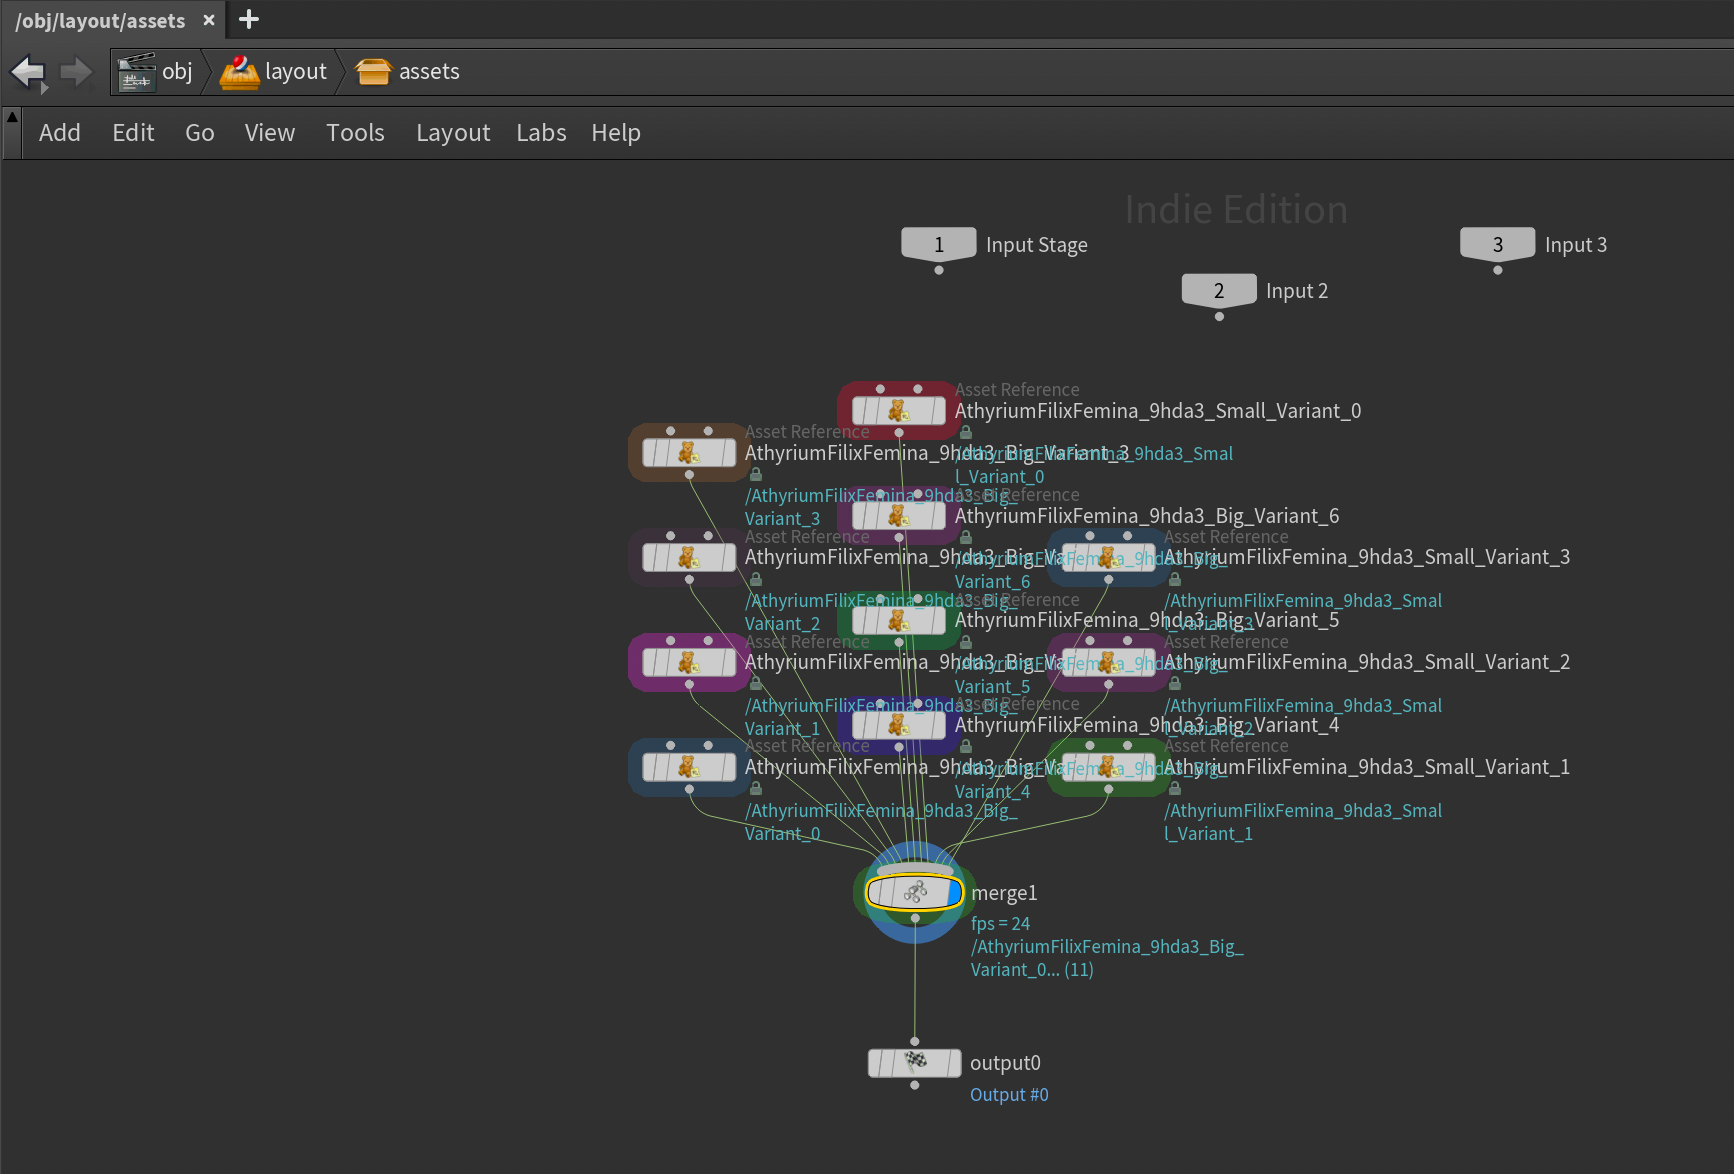
After the Layer Break, we can start doing our layout. I created 6 different instances, all with different types of assets. For each instance, the assets are stored inside a subnetwork.
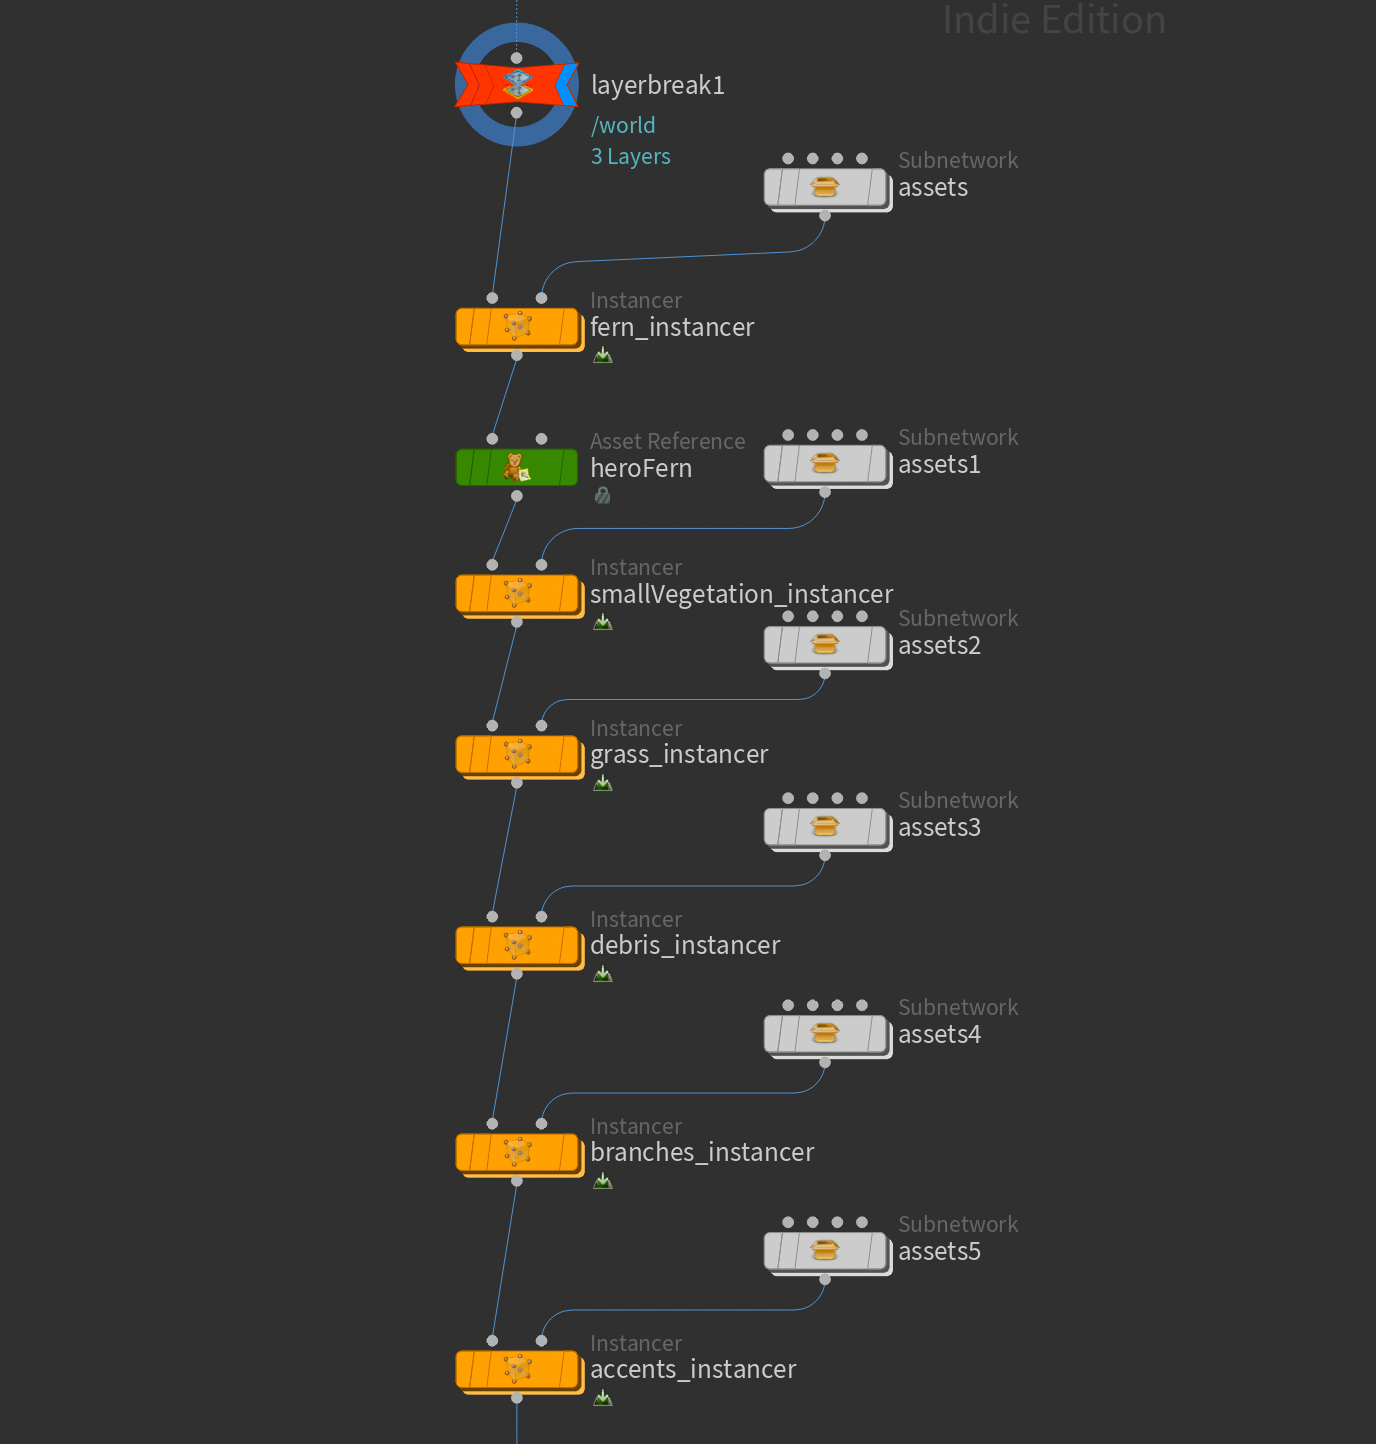
Each asset subnetwork looks something like below, and is simply all of the assets loaded into a merge. This is honestly quite a messy look, but it's the simplest way I've found to add multiple assets from the Layout Asset Gallery in Houdini without relying on the Layout LOP (which I didn't end up using in this case). If you wanted to be cleaner, you could load each asset manually and do a for-each to split out the variants (similar to my previous article: https://www.andreaskj.com/coming-soon/#layout-amp-rendering-with-karma ), but then you lose the drag-and-drop functionality.
In this case, I went for the more brute-force drag-and-drop approach. I hope in the future Houdini will provide smarter ways of interacting with the Layout Asset Gallery outside of the Layout LOP.
In order to load the assets from the Layout Asset Gallery into your scene like above, you simply select the assets you want from the Layout Asset Gallery and drag them into the viewport.
To quickly merge them all together, you can add a merge node, select all nodes, and drag the output of one of the nodes onto the merge node like below.
From there, you can use the output of the merge (in my case, I kept the above inside a subnetwork to reduce clutter) and plug it into the second input of an Instancer node. The only parameters you need to modify are the path of the Point Instancer (I always use /world/environment/instancers/$OS) and set the Prototype Primitives to /* to include each primitive in the second input.

Inside the instance nodes, the layouts are pretty simple. Most of them just consist of different variations of what you see below. I load the ground using a LOP Import, unpack the ground, scatter points on top using Scatter and Align, and finally adjust the pscale with an Attribute Randomize.
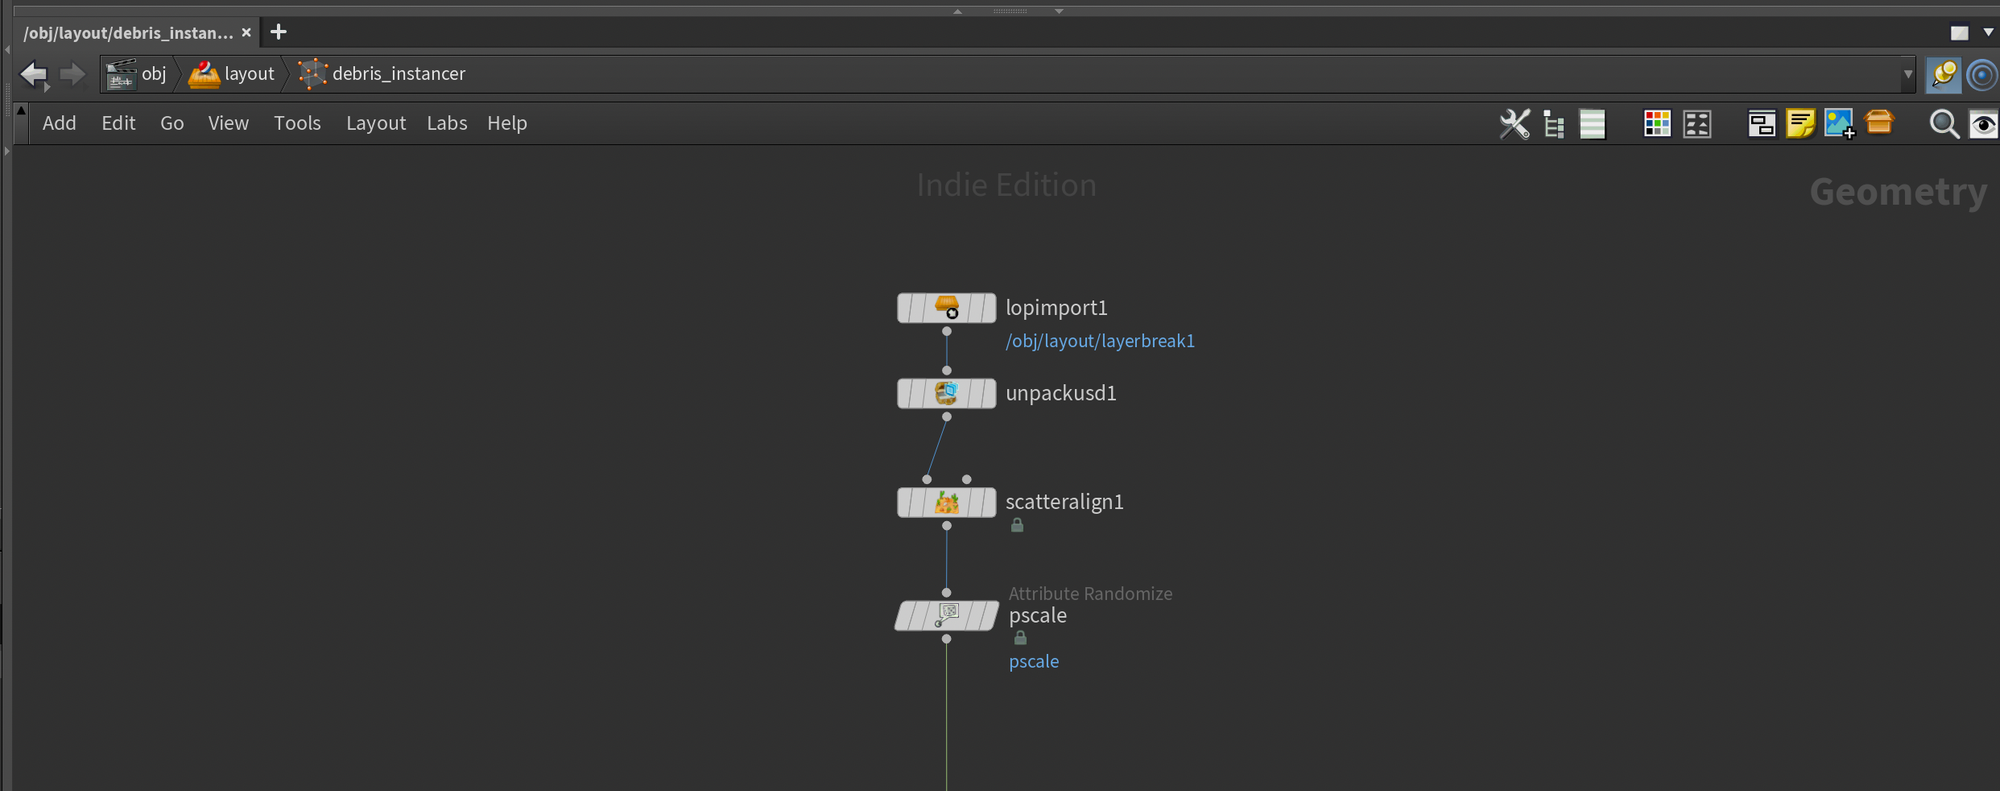
I repeat this for every type of instancer I want to build, with different adjustments to vary the look.
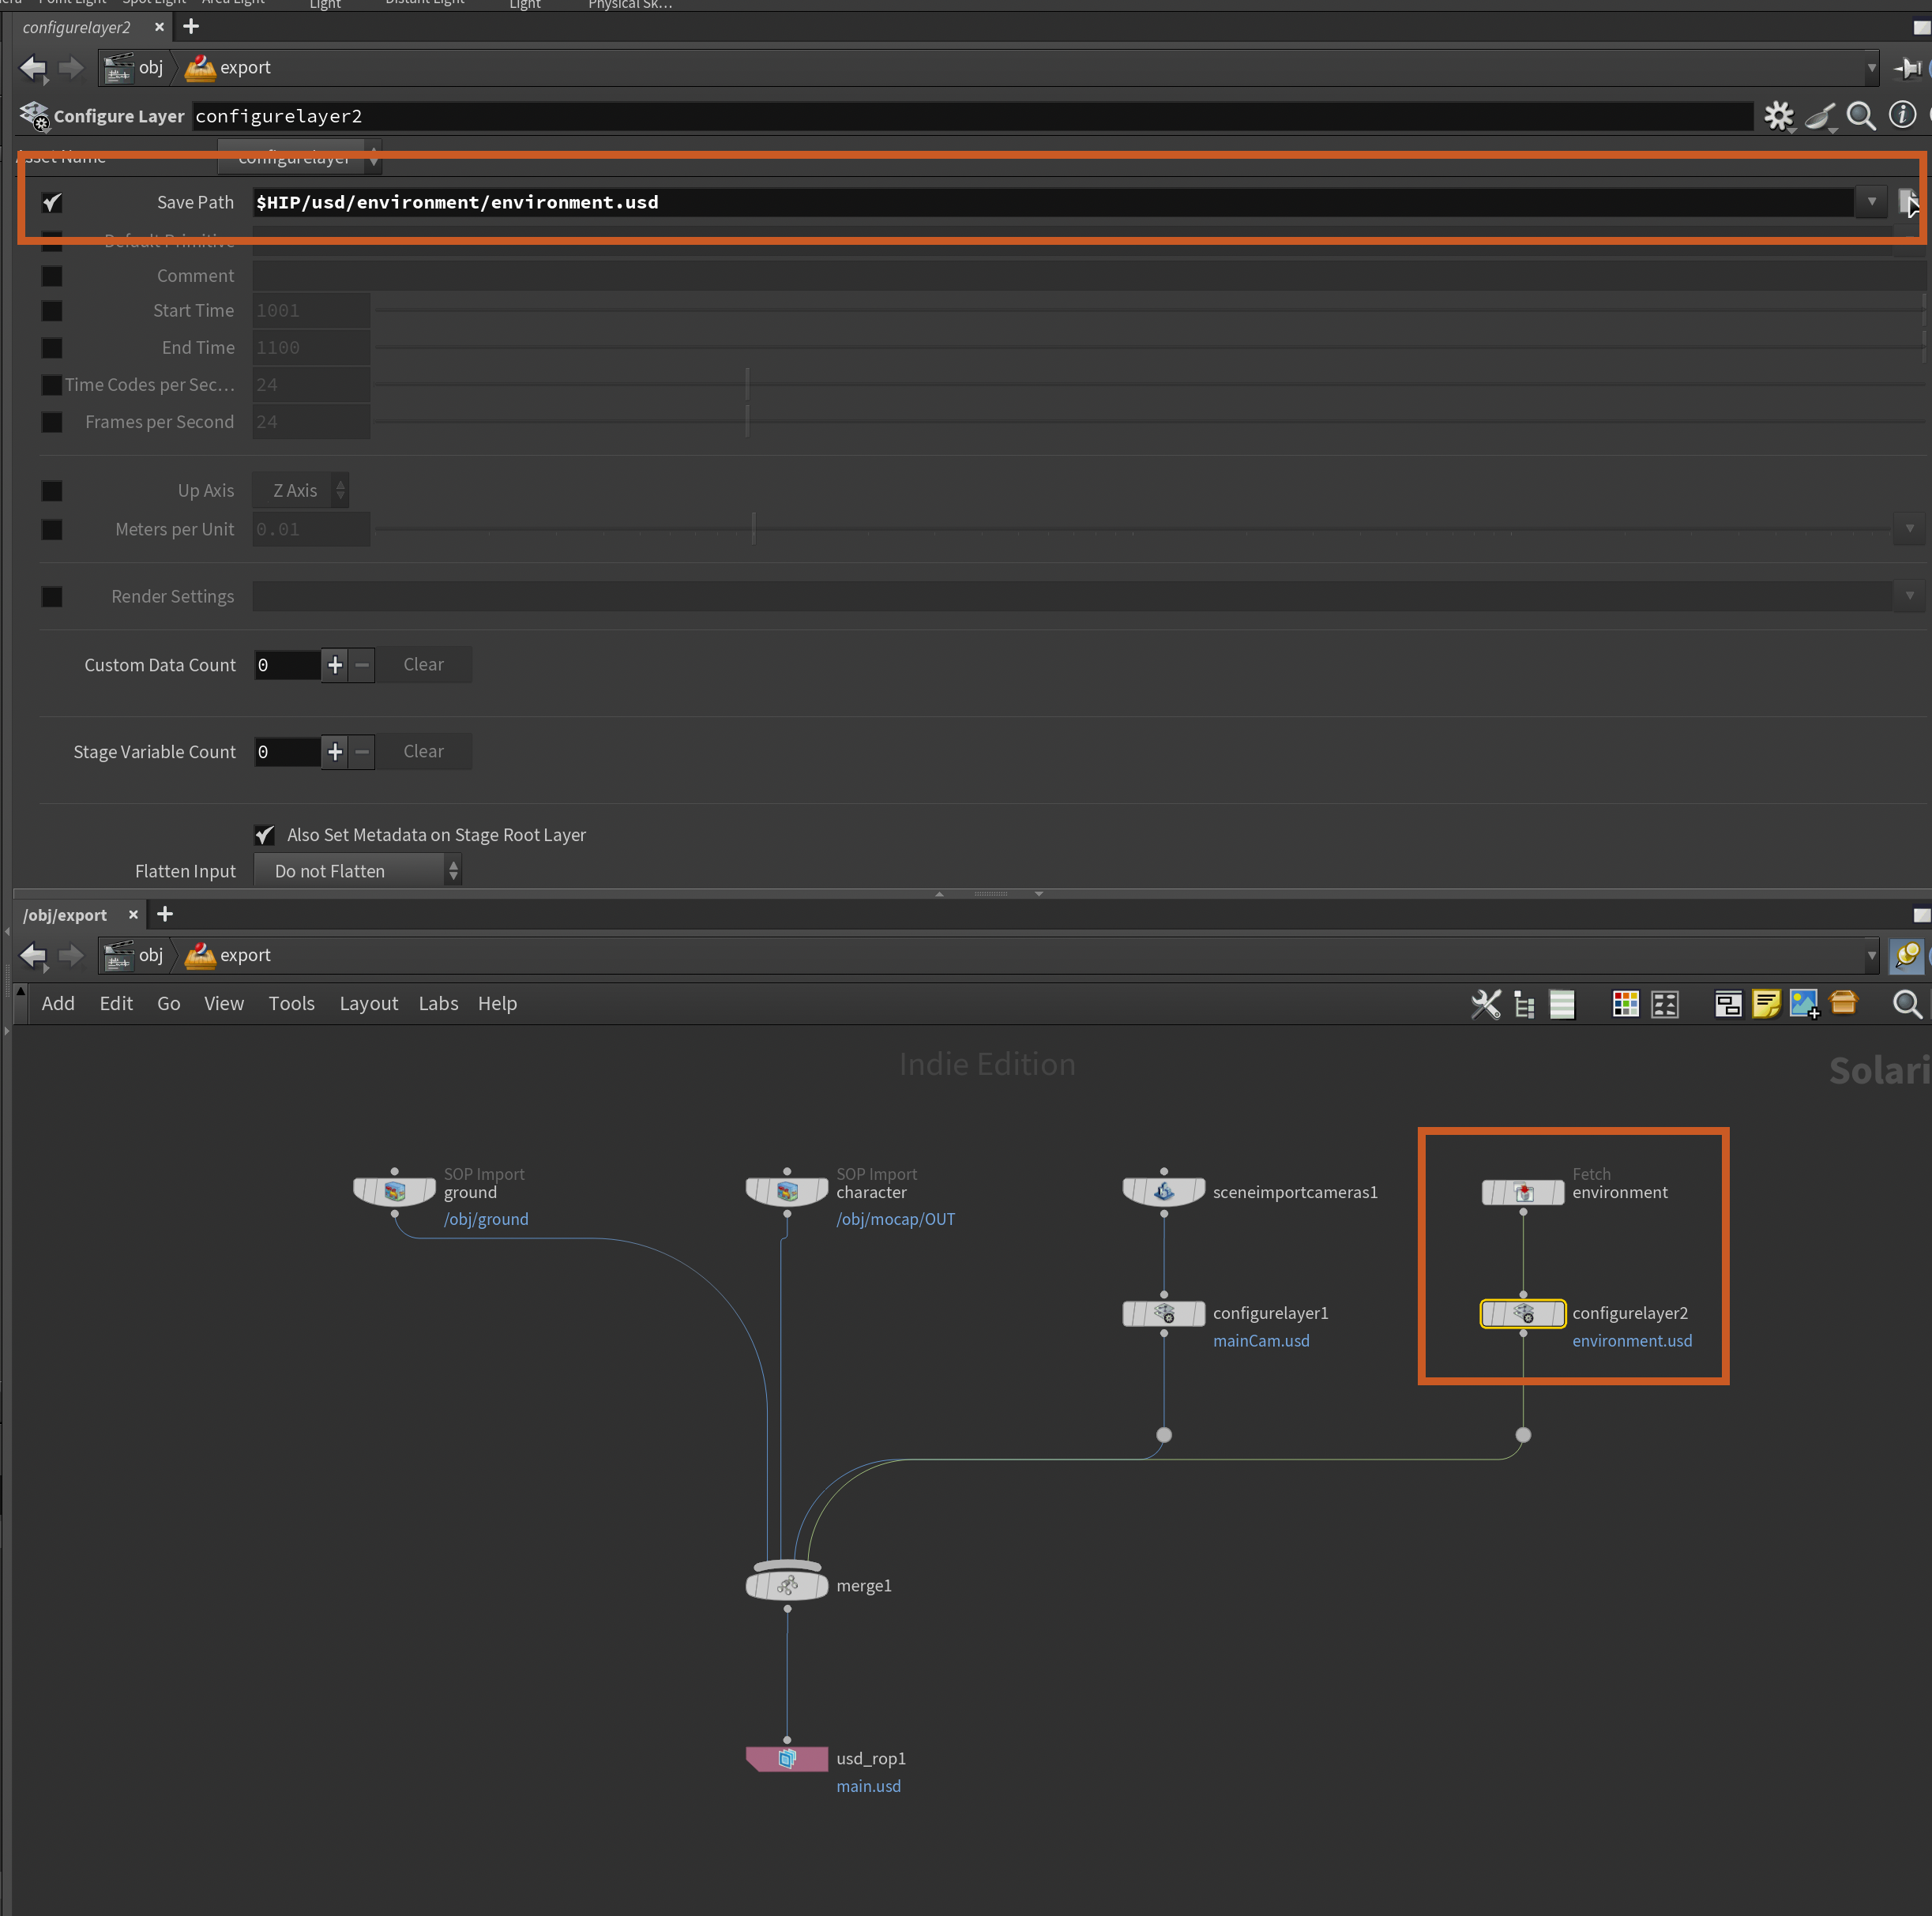
Finally, after adding all my instancers, I created a null called OUT_LAYOUT at the end of the network and referenced that into the export network like you see below (this is from the scene you can download above). I then used a Configure Layer to give this layer its own path and plugged it into the merge. You could also export all of this separately, but I like to be able to export all of my changes with one click when working on smaller scenes like this. And I also don't have to composite any USD layers in my lighting scene, as the main.usd at the bottom contains sublayers for everything already.
Let's move on to the meat of the tutorial - simulating our vegetation based on the skeletons we created in part 1!
Vegetation Simulation using Vellum
Simulating our vegetation with Vellum using skeletons
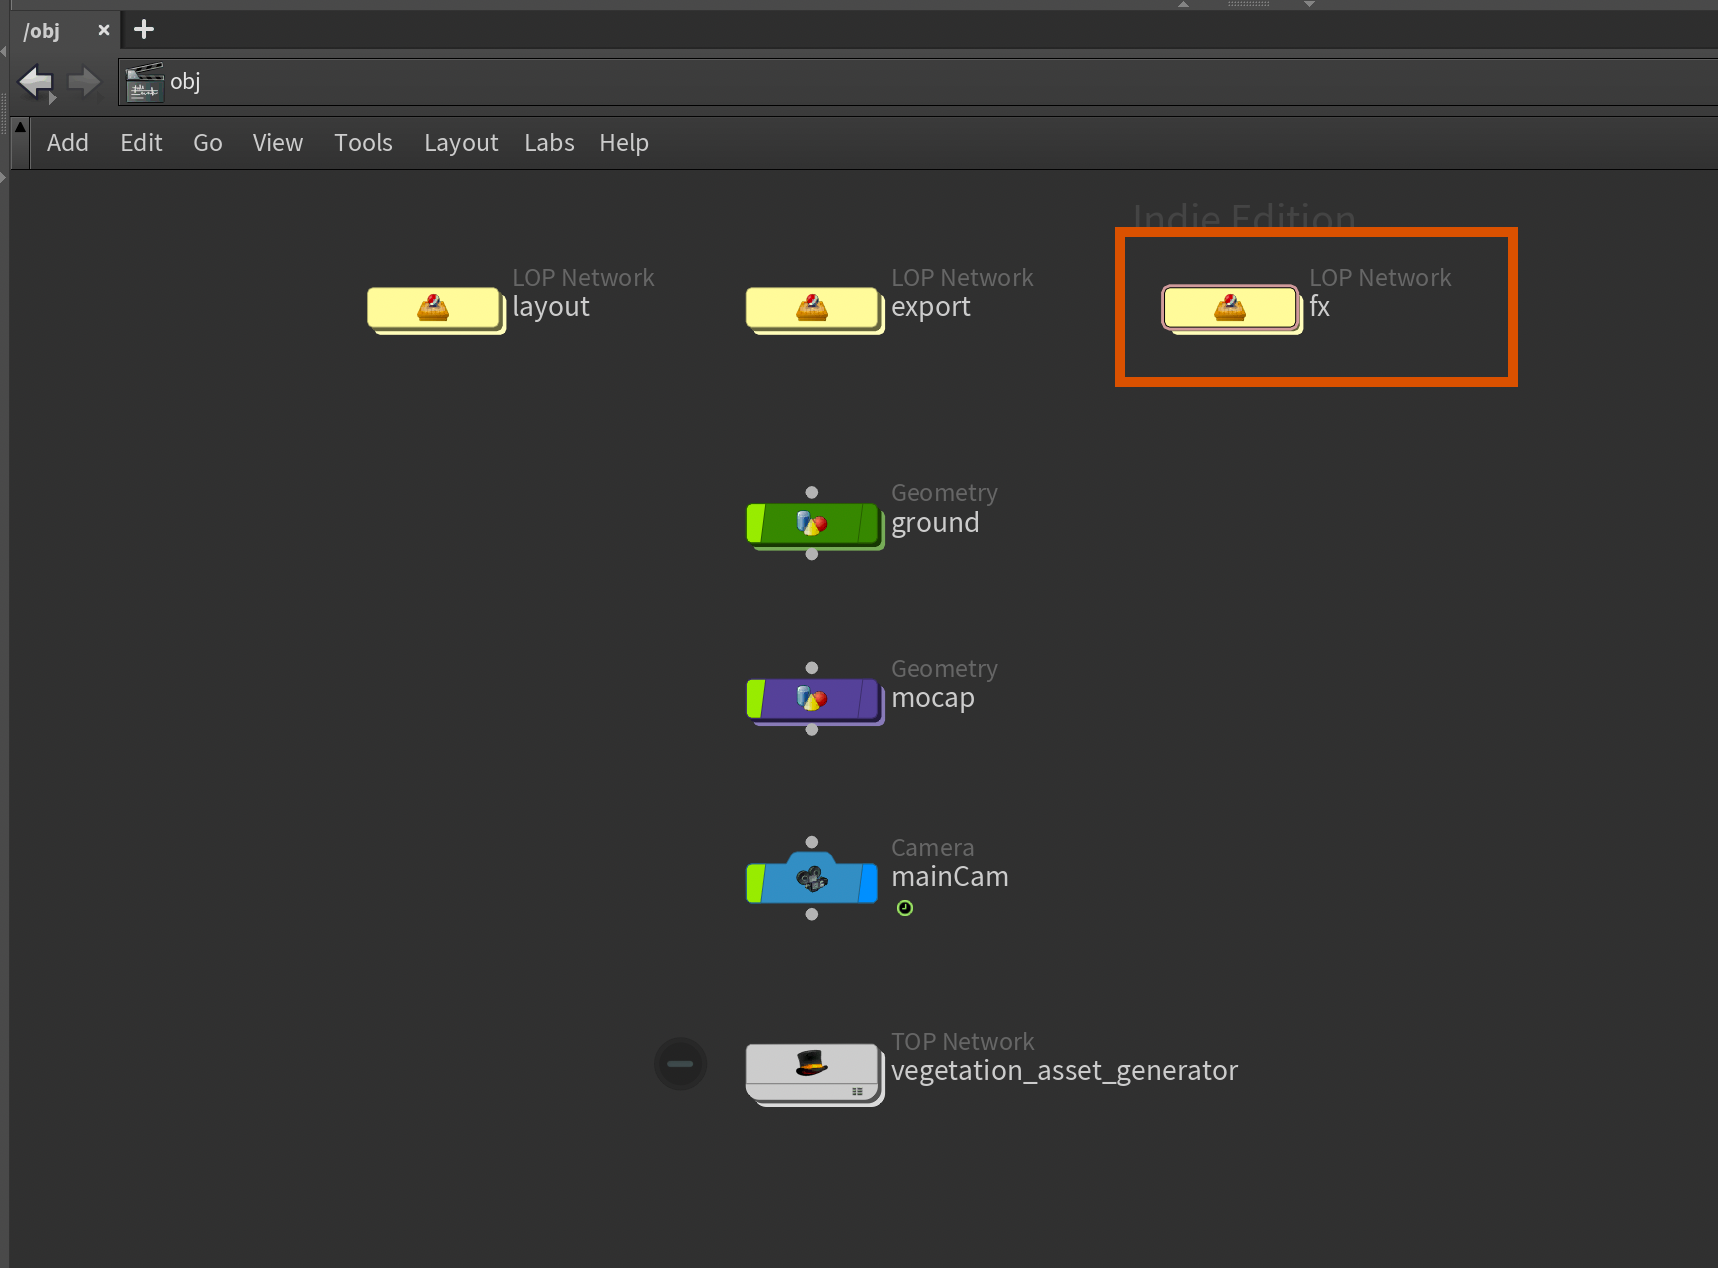
To start off, and to keep things organized, I'm going to create another empty LOP network in our /obj context. This is where we'll load in our vegetation layout, extract the pieces of vegetation we want to simulate, simulate them with vellum, and layer everything on top using UsdSkel.
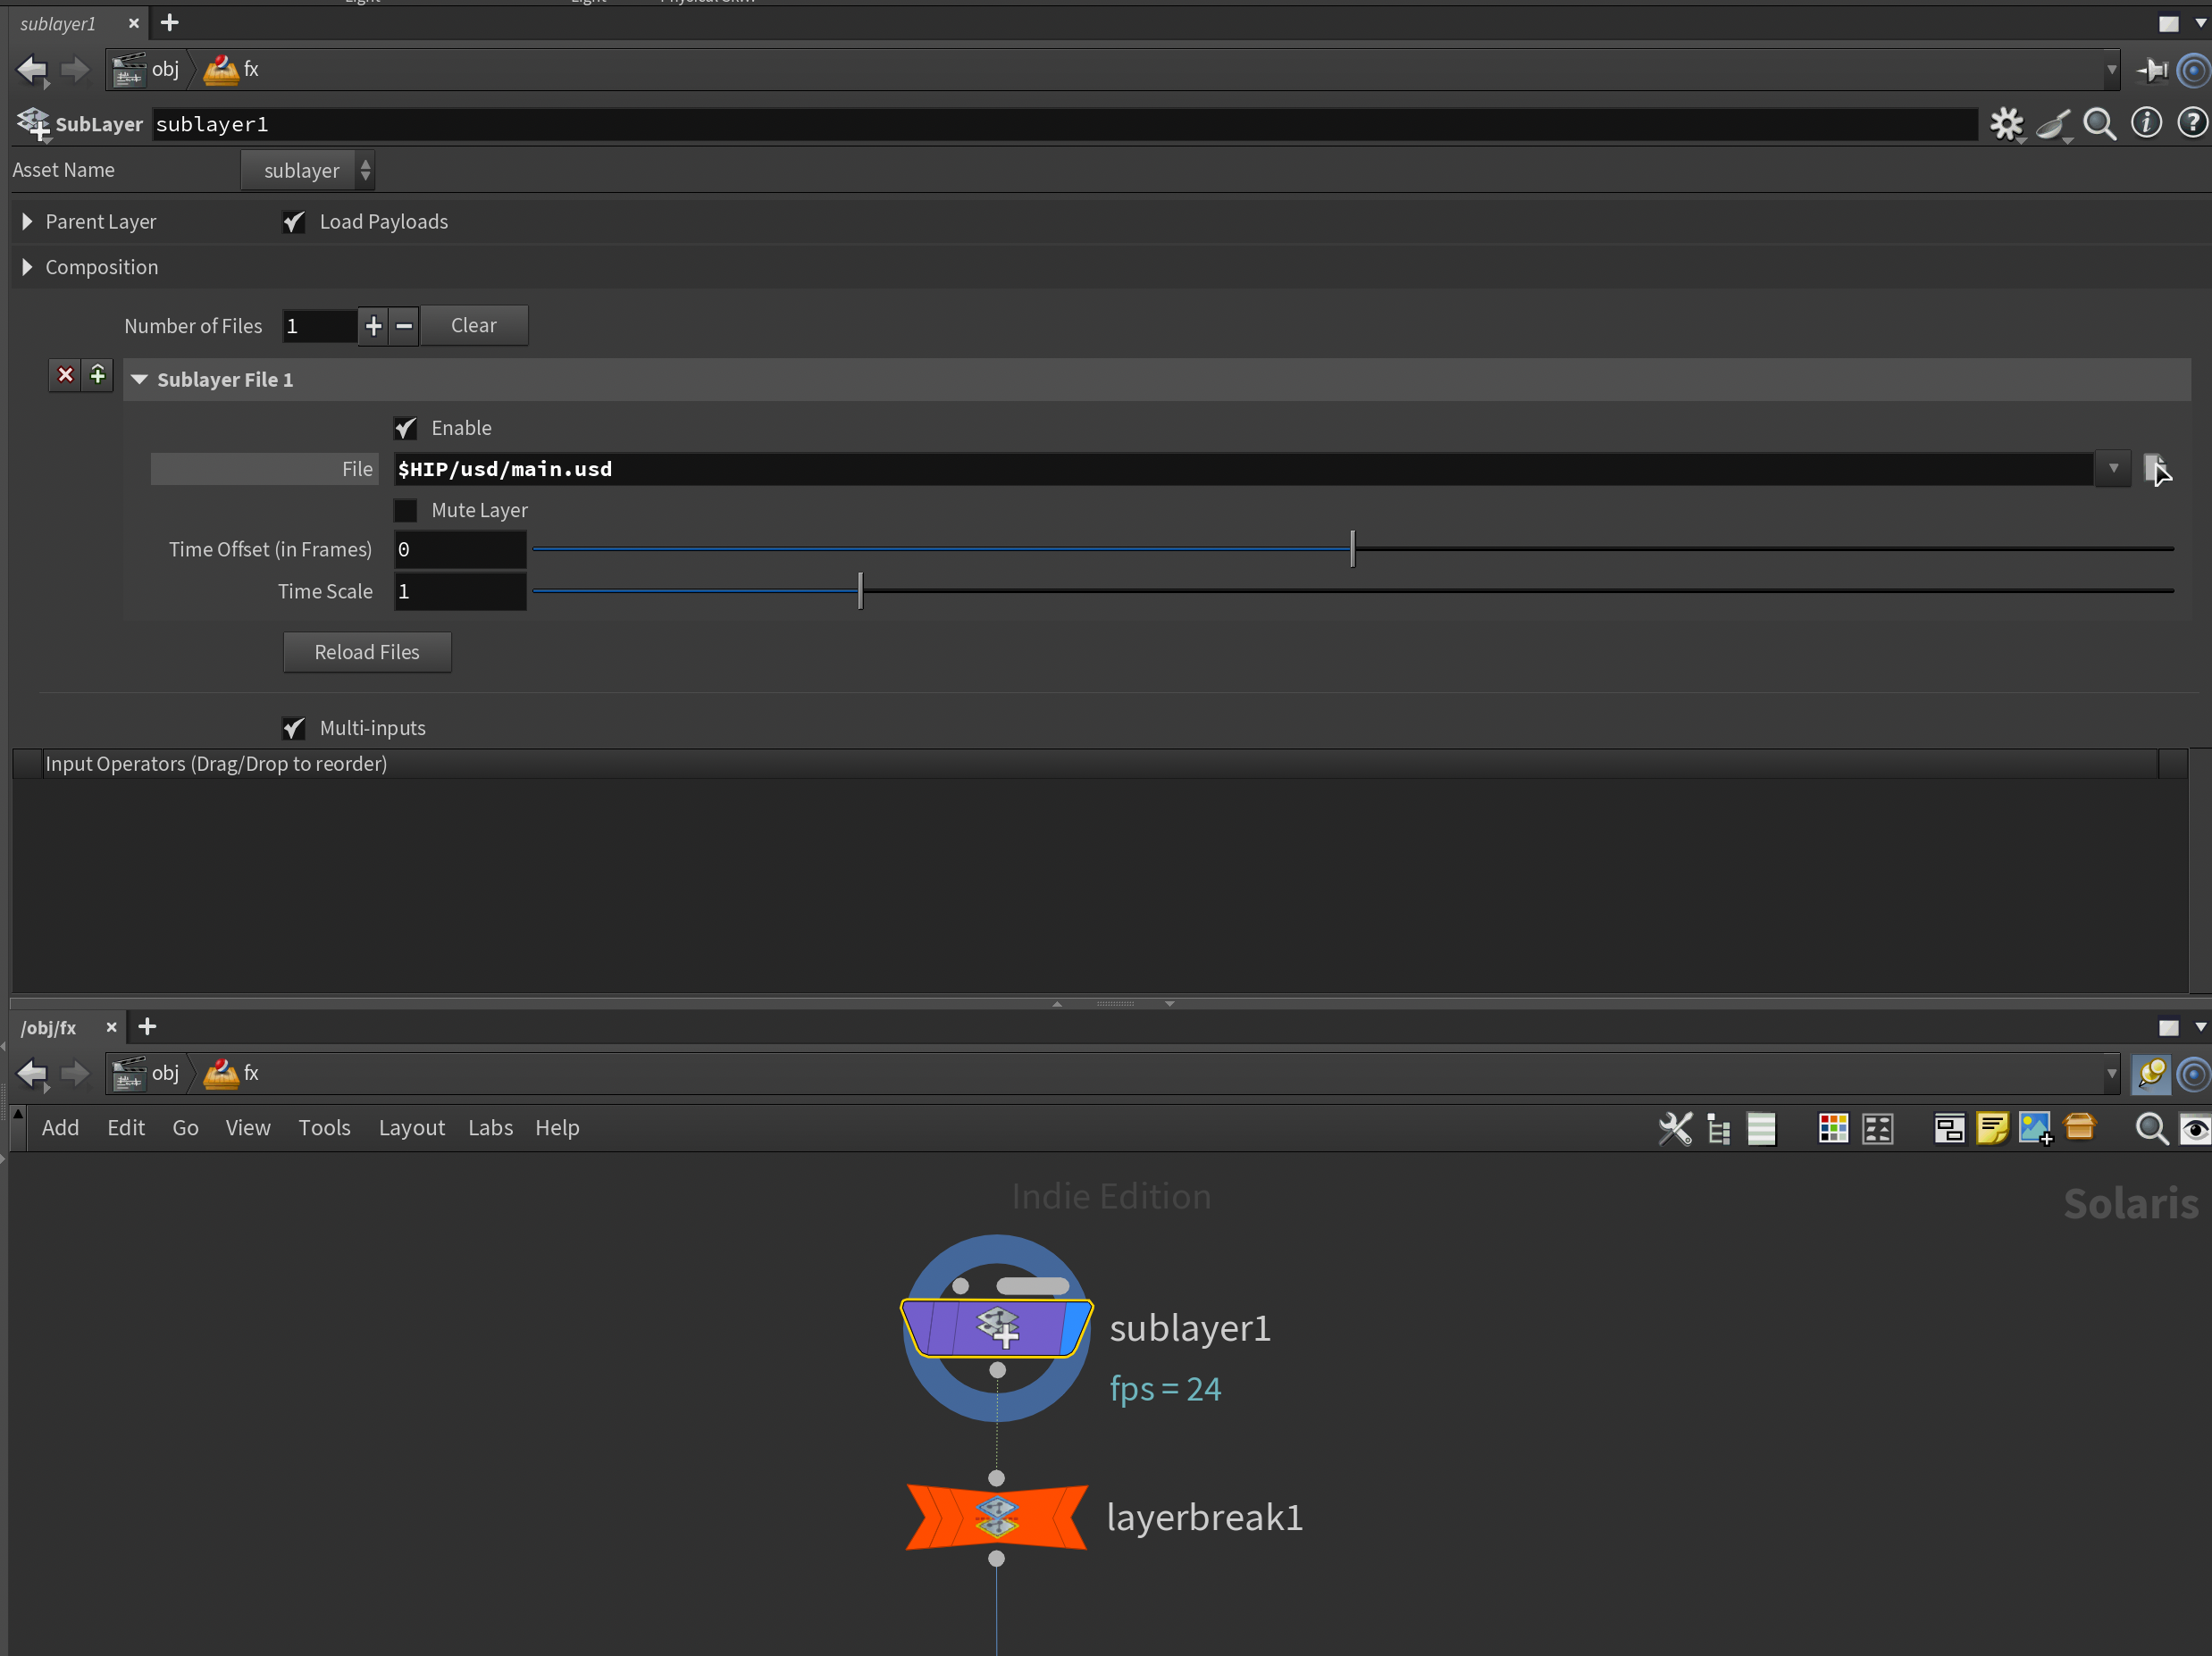
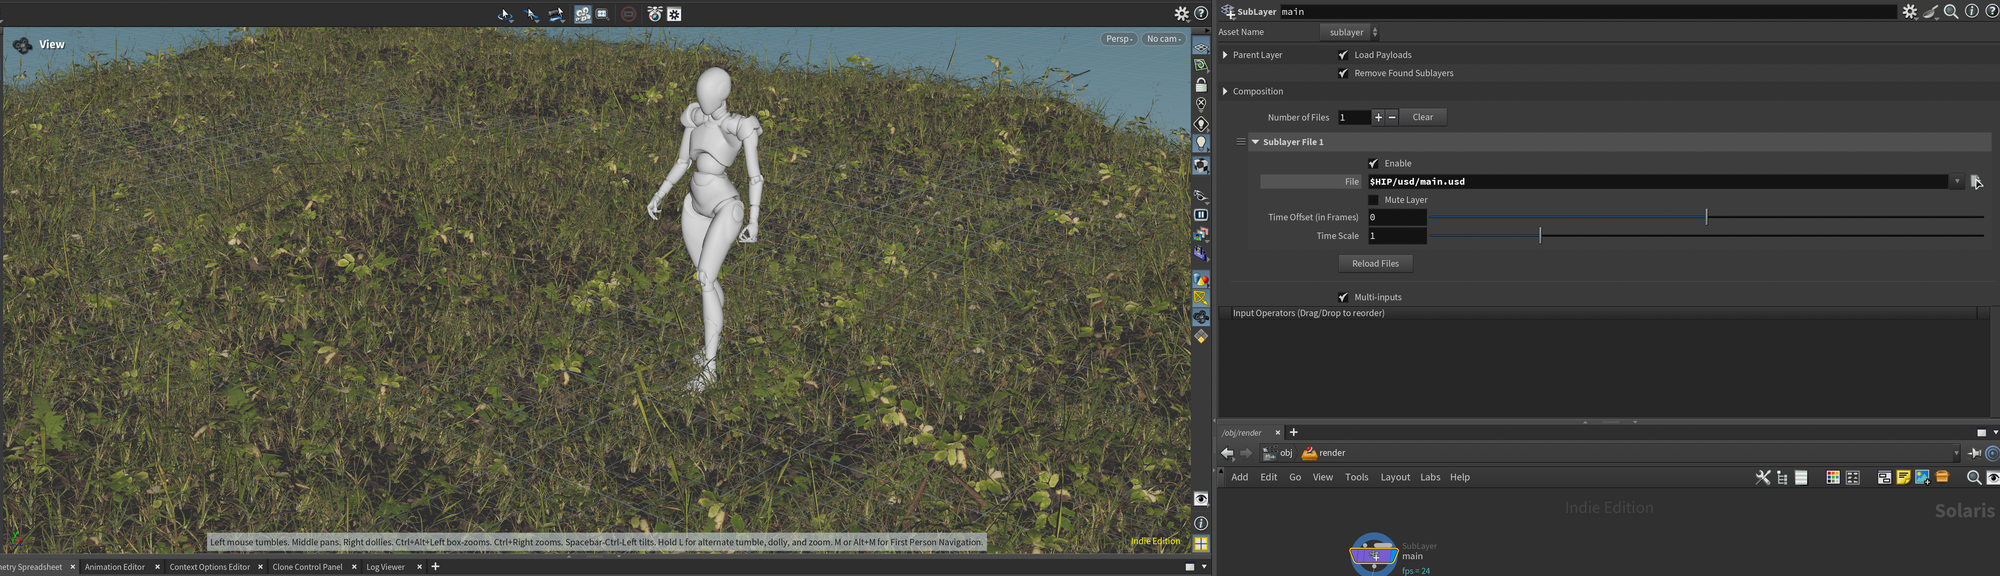
Step one is to load in our main.usd, which contains links to everything we've done. If you haven't created a main.usd, like you see in the previous section, you can also create a sublayer for each part of your scene and load it in manually.
After that, we add another Layer Break to ensure the data from the main.usd doesn't get exported together with our FX layer. We want to layer only our changes on top of the existing files to keep things efficient and clean.
Things can get a bit heavy when you have a lot of instancers in the viewport. In order to speed things up I recommend using the "Populate Mask" by unchecking Populate all primitives in viewport like you see below. This allows you to toggle which parts of the scene you want to load.
Load all payloads in viewport, this will show everything as bounding boxes by default unless toggled to load.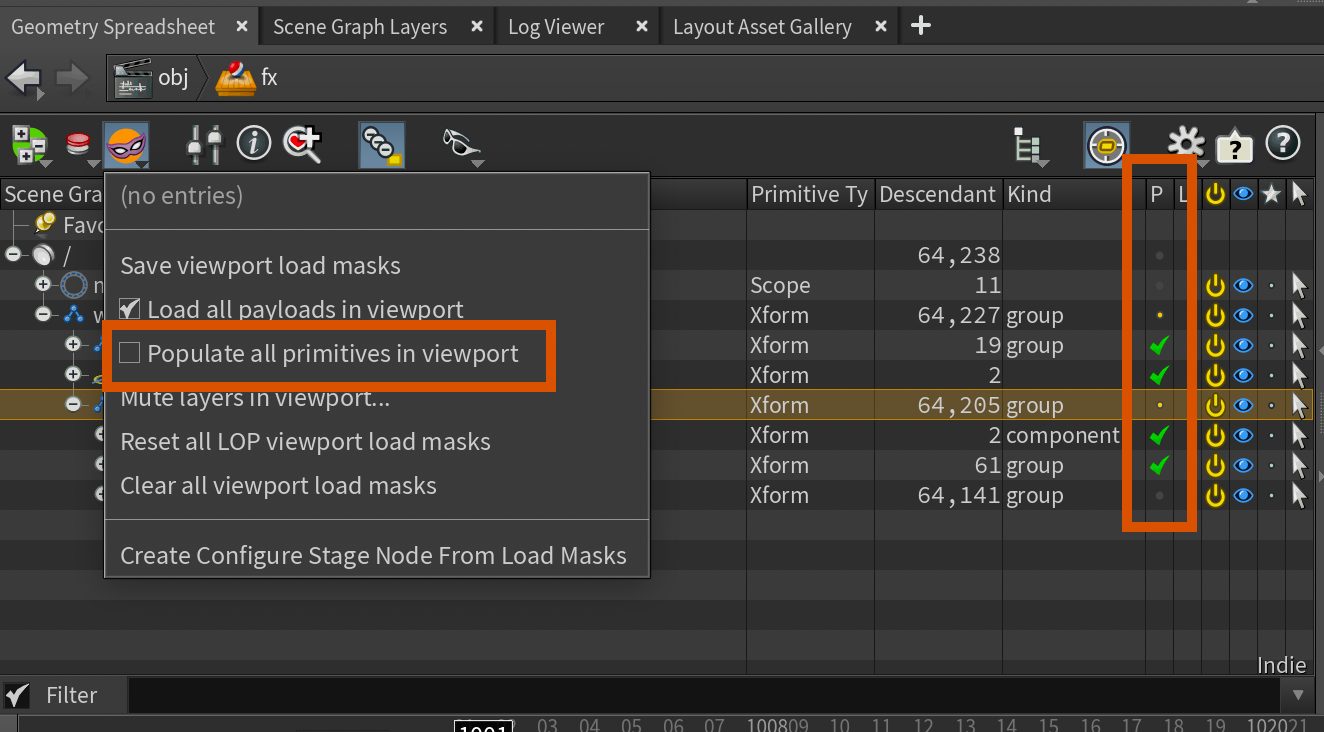
Creating mask for simulation
First step is picking which elements of the point instancers we want to simulate. We need to do this because we have to extract our Agents from the point instancer in order to layer unique animation on top.
If you wanted to do more global animation (like trees waving in the wind), you could have a prototype with each animation on its own Agent (inheriting or instanced from a "definition" Agent).
In order to achieve this, I first added a Modify Point Instances node to add a mask consisting of the vegetation instances we want to simulate. Please be advised that this node is a little slow to work with - if you're lucky, your studio might have a faster node for modifying point instancers.
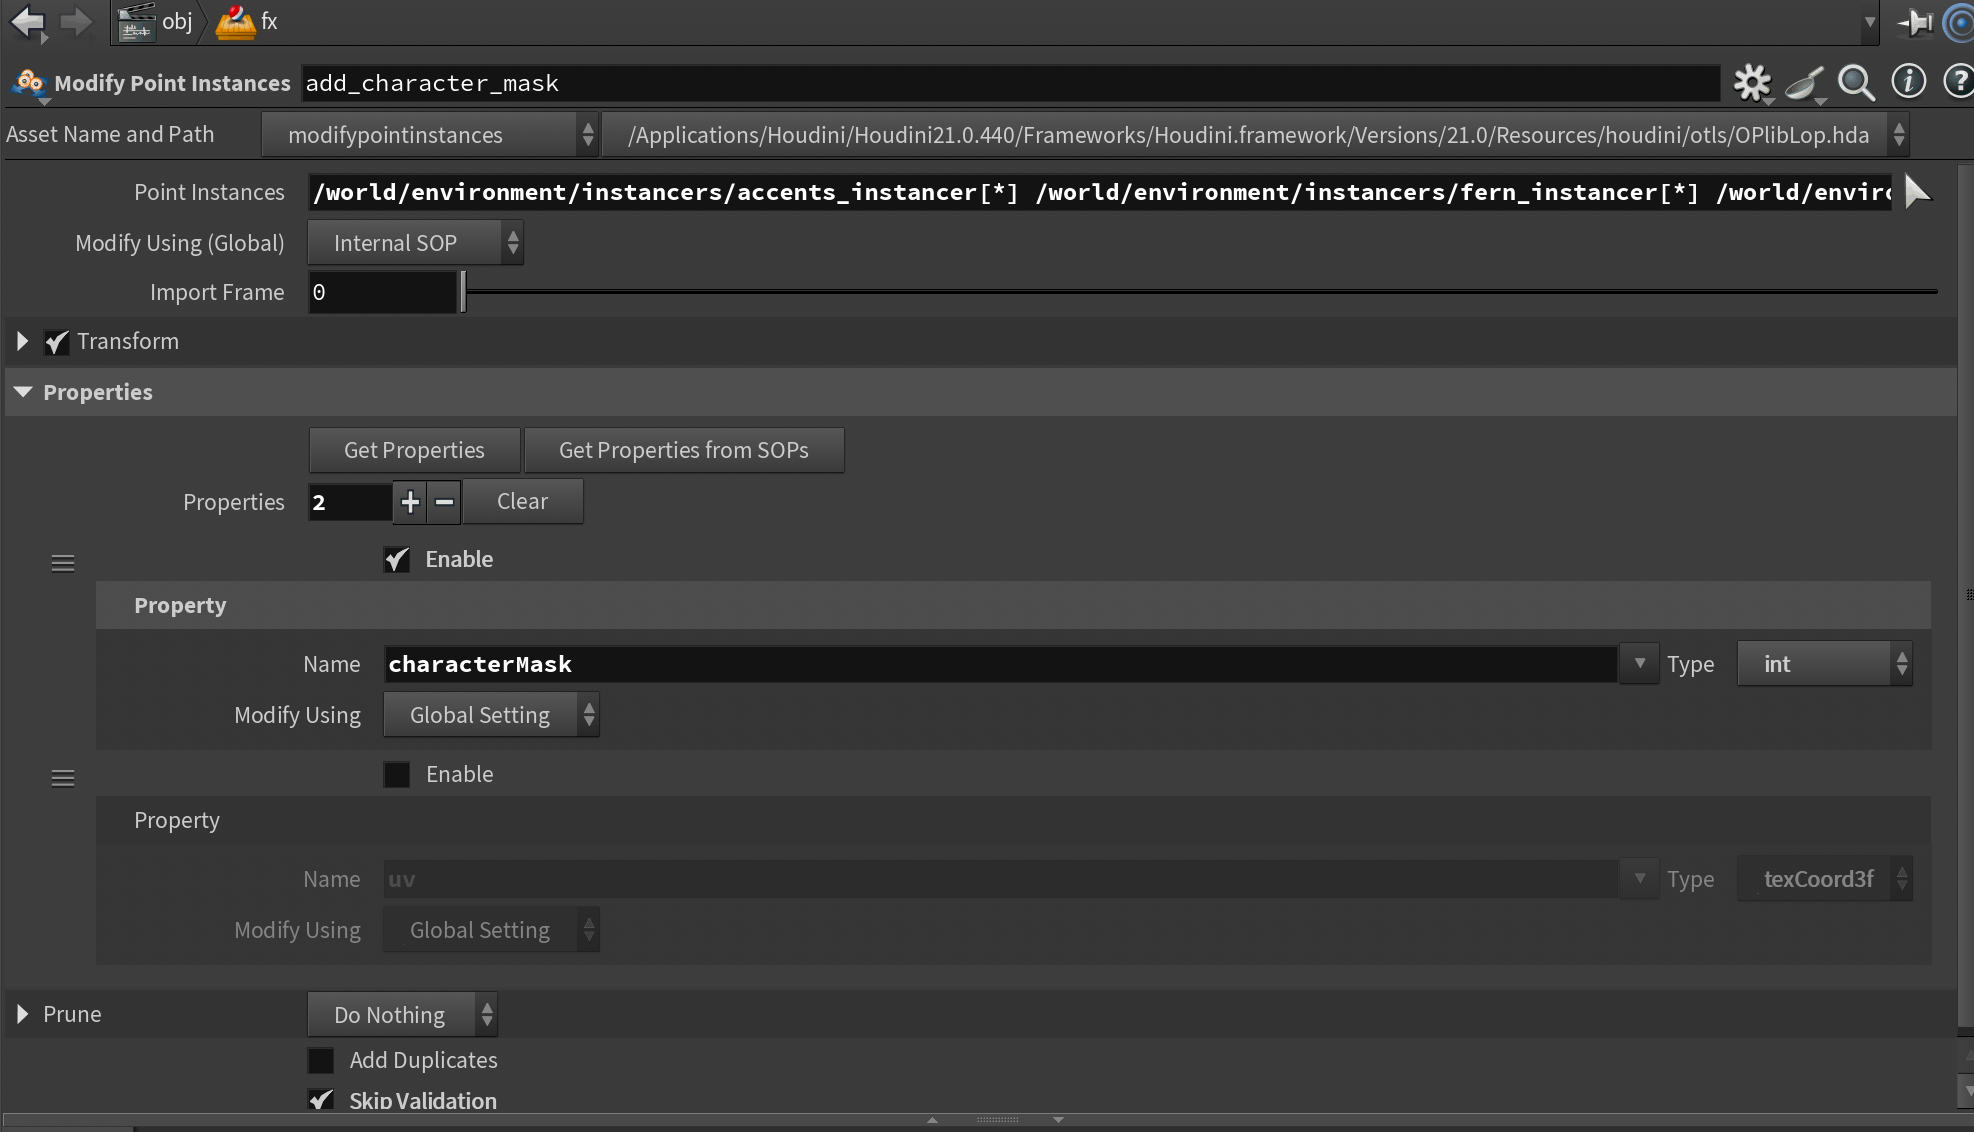
On the Modify Point Instances I added the point instances I waned to load in. Remember you need the little [*] at the end of each prim path to select all instances in the given instancer. I also added the property characterMask to make sure the mask is exports. Note that it's of type int since I either want it on or off (0 or 1).
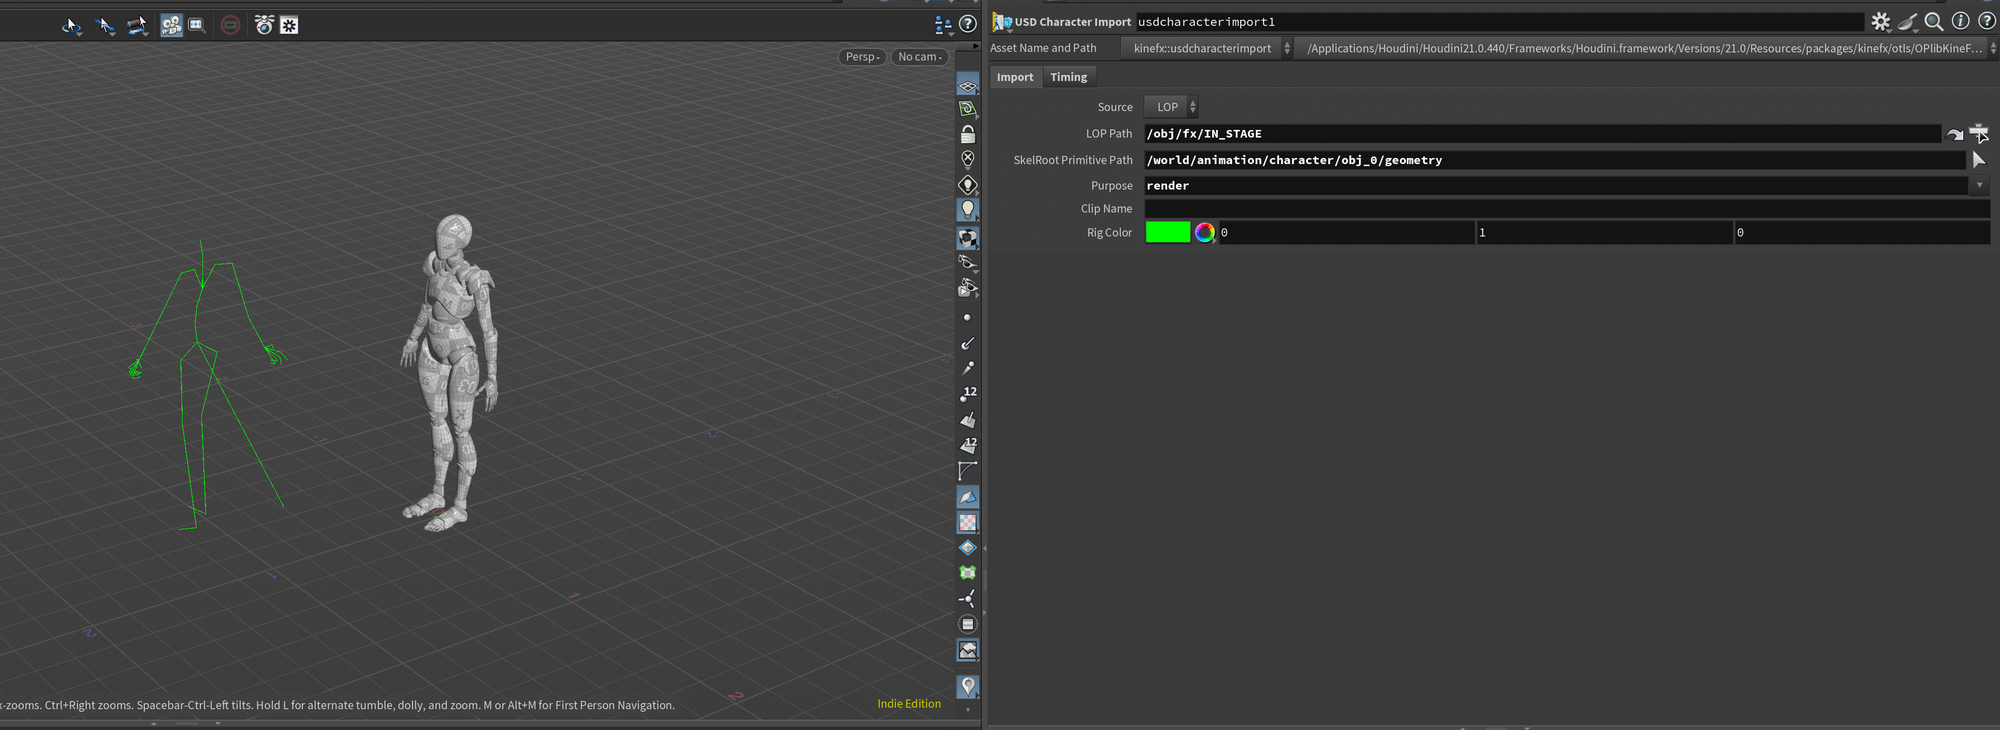
Inside the Modify Point Instances , in the SOP context, I added a USD Character Import node to load our animation from LOPs to SOPs with the following parameters. The LOP Path and Primitive Path might be different depending on your setup.
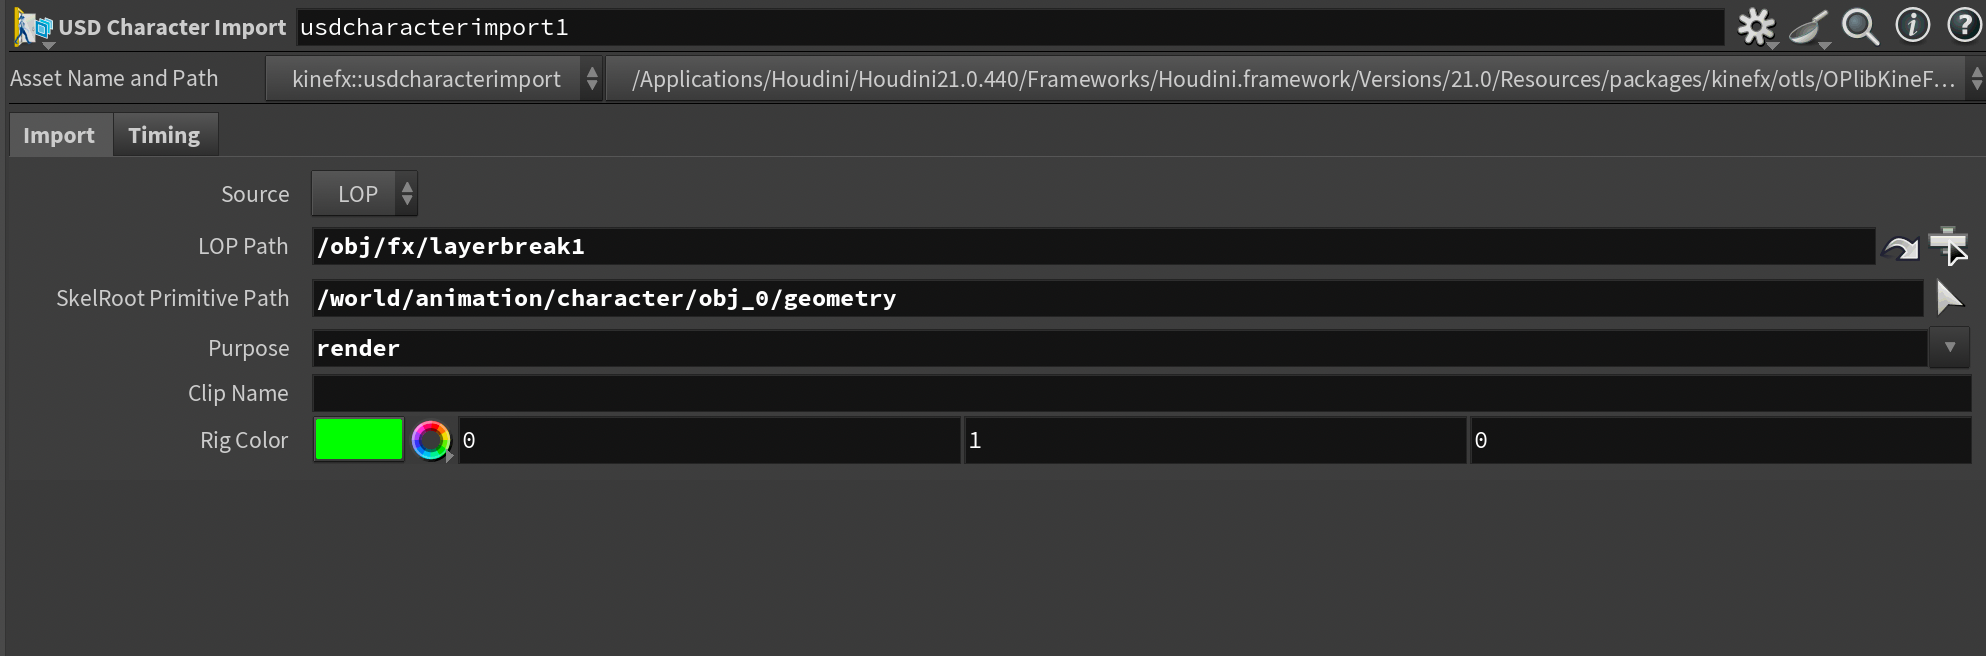
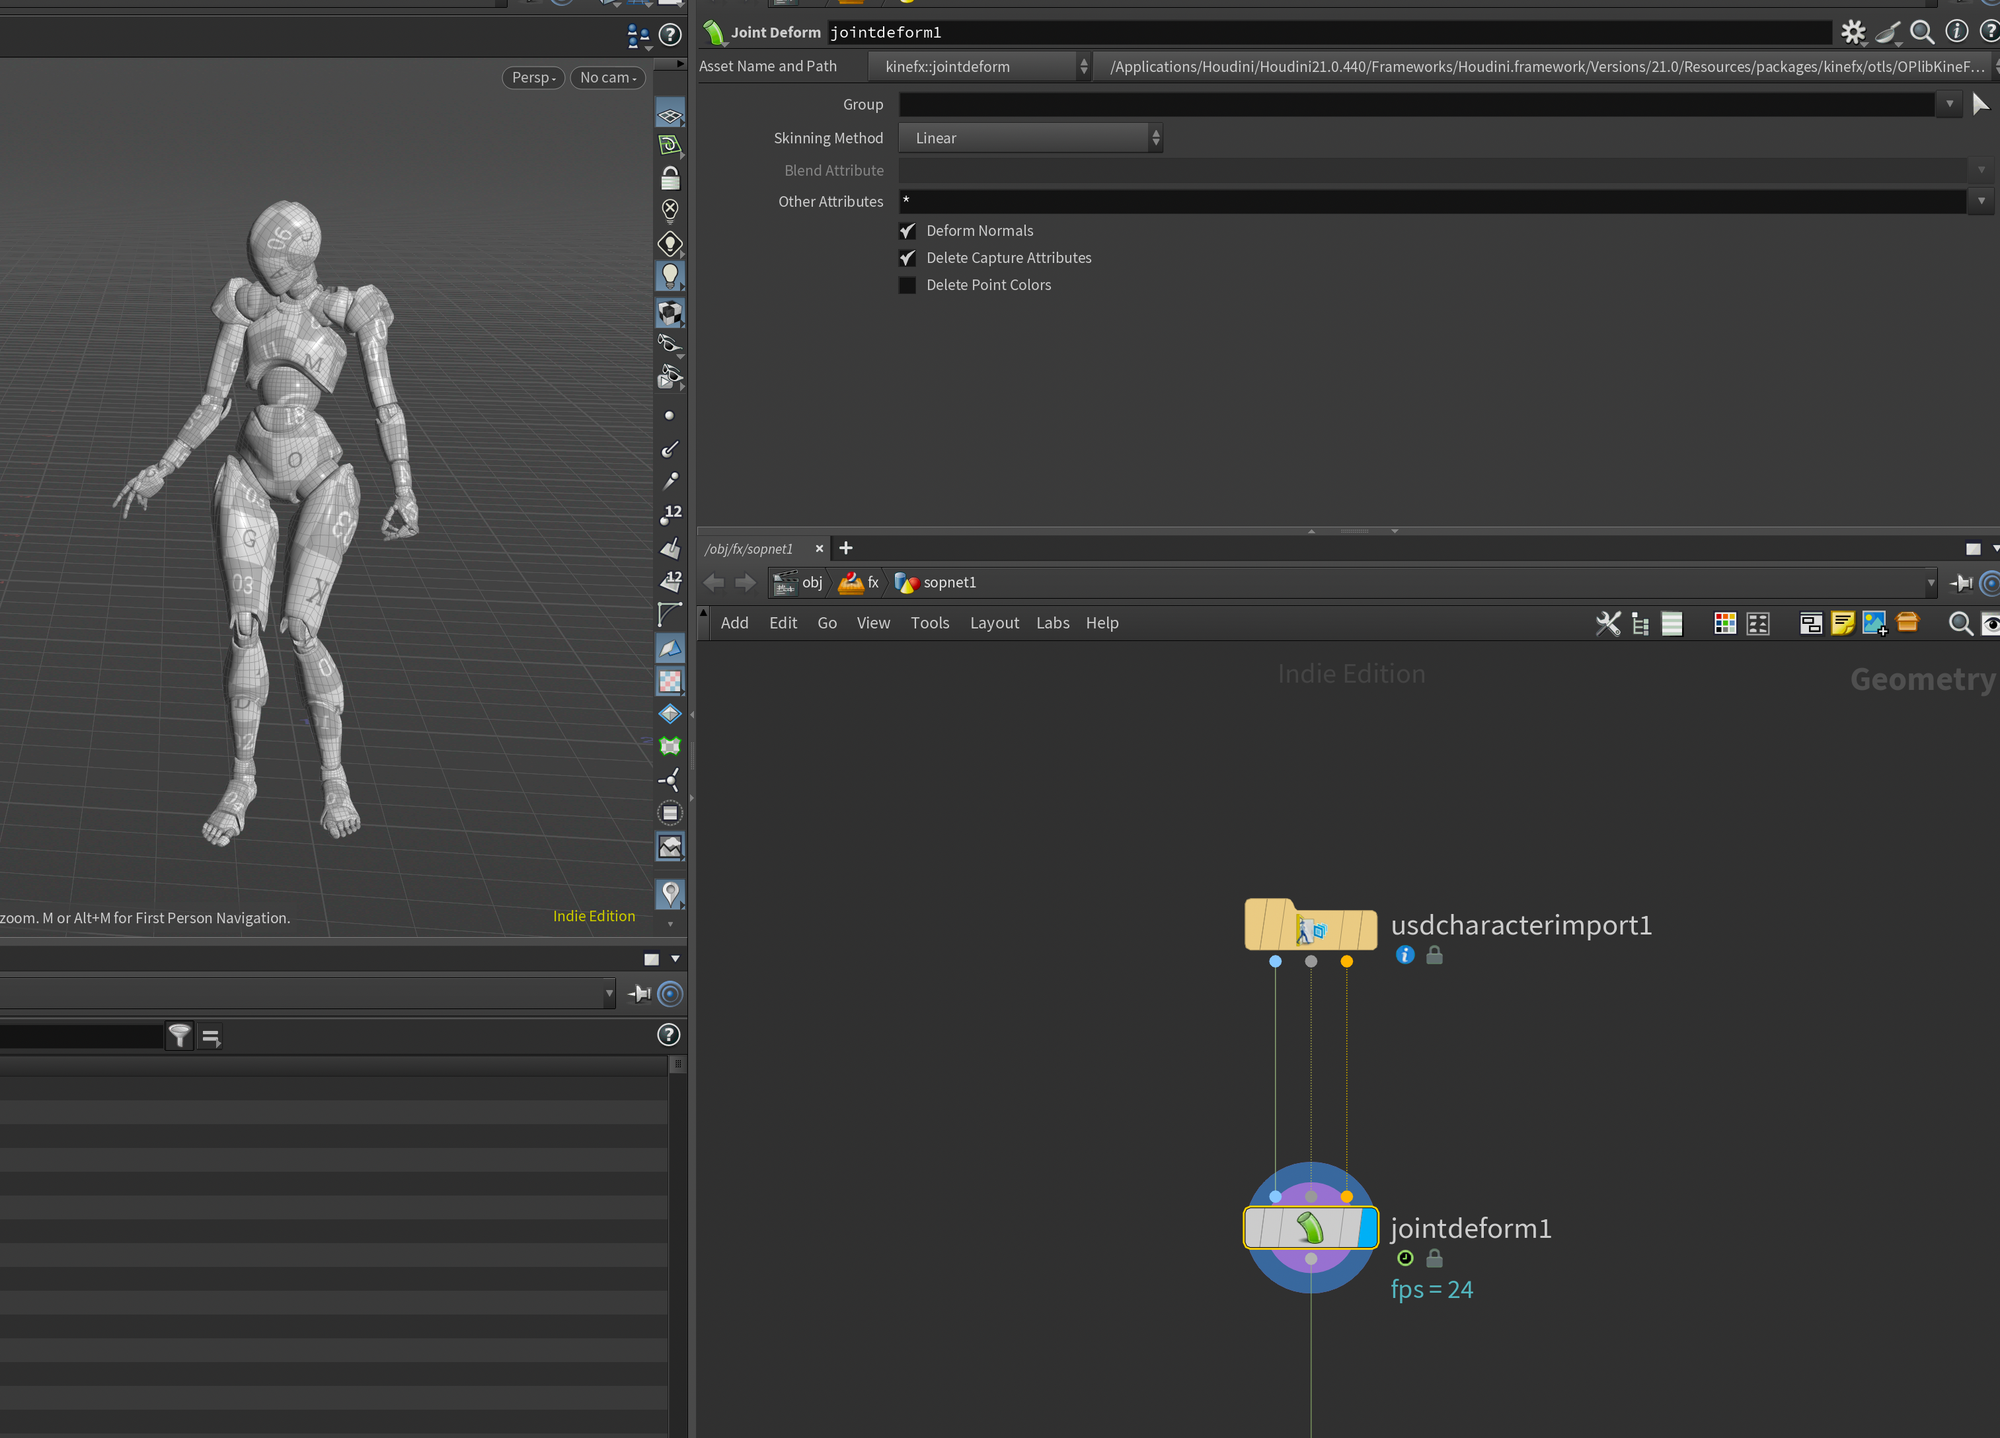
I then chain the 3 outputs of the USD Character Import directly into a Joint Deform. This will enable us to work with the animation as deforming meshes.
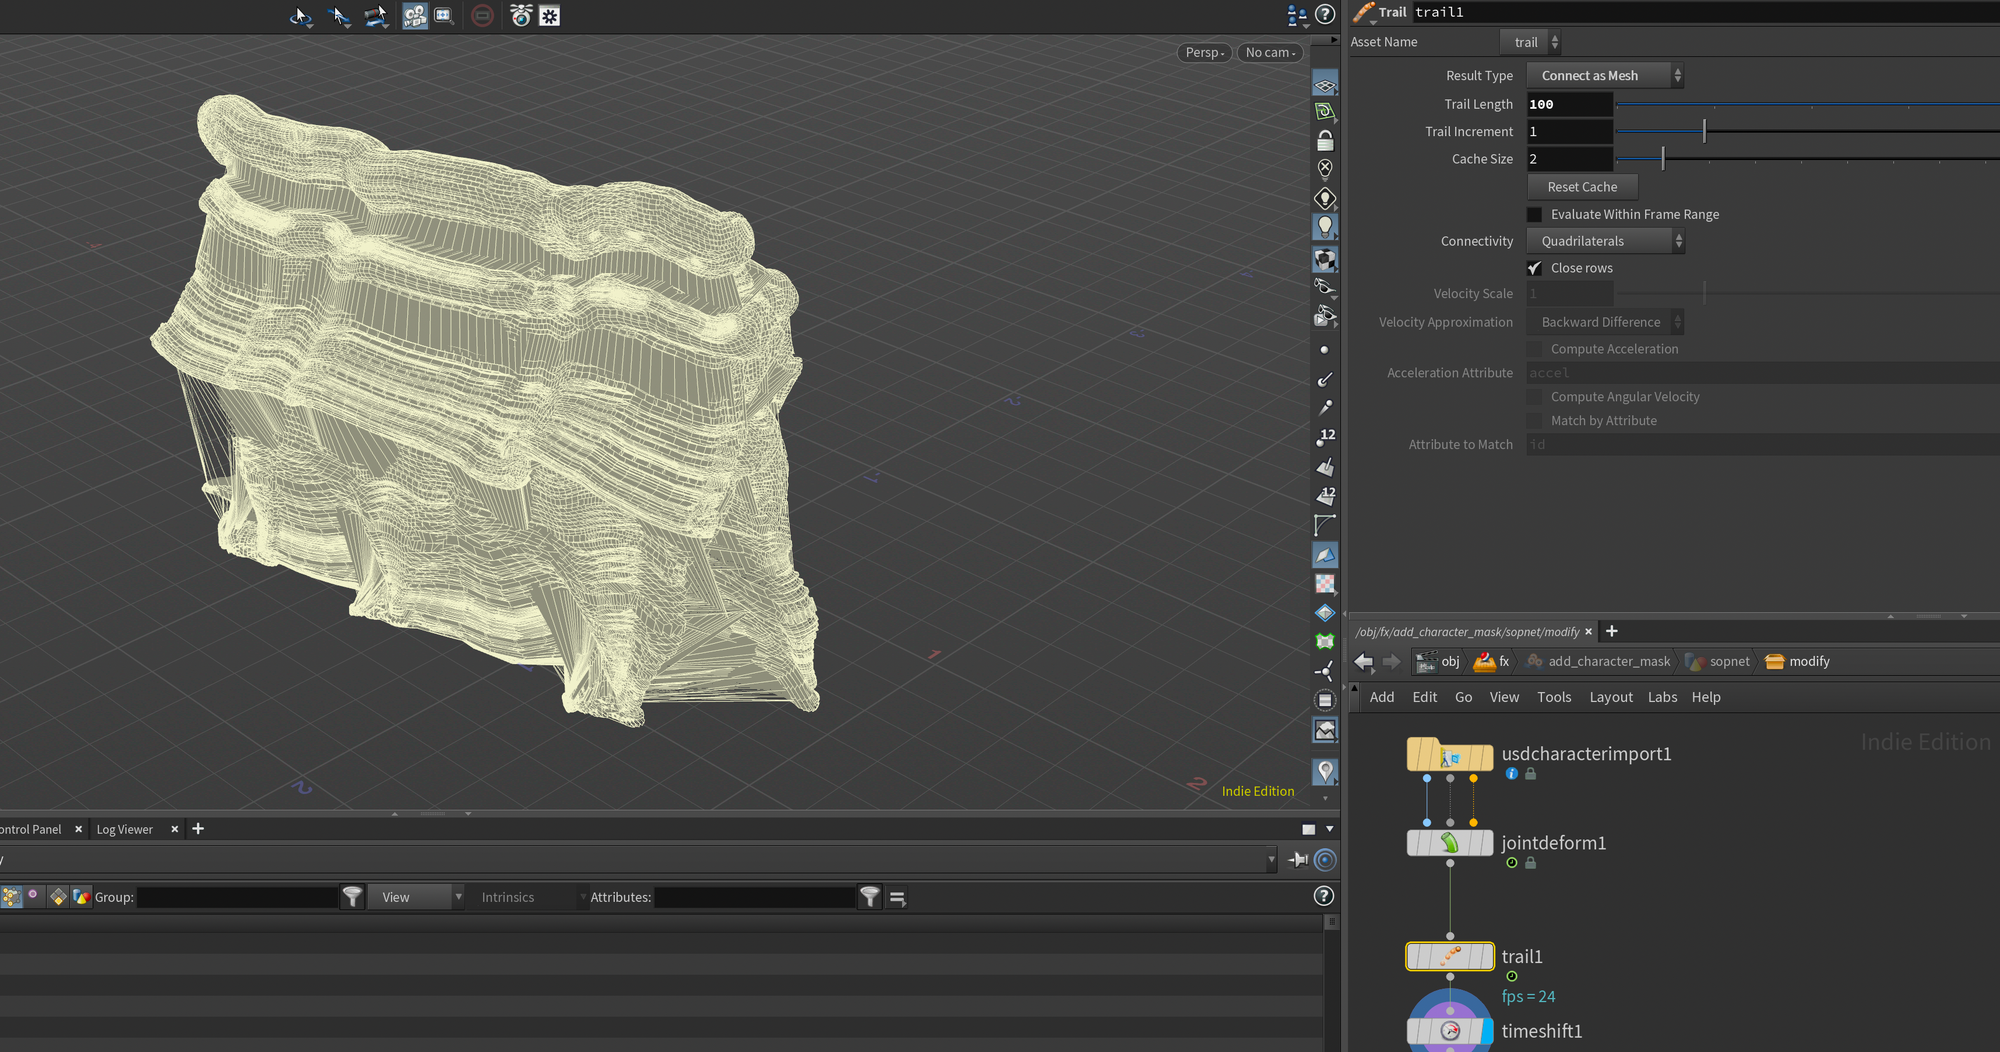
Following that, I plug the output of the Joint Deform directly into a trail node set to Connect as Mesh with a trail length of 100. I then take that output and plug it into a time shift set to 1100 (our end frame). This gives us the mesh you see in the screenshot below, allowing us to see where the mesh is throughout our whole range. If you wanted to make this faster you could increase the Trail Increment.
Finally, I pipe in a Peak node to push things out a bit and finally a VDB From Polygons to create this blob that I'll use as an input in a group node to mask the instances that come into contact with our character throughout our shot.
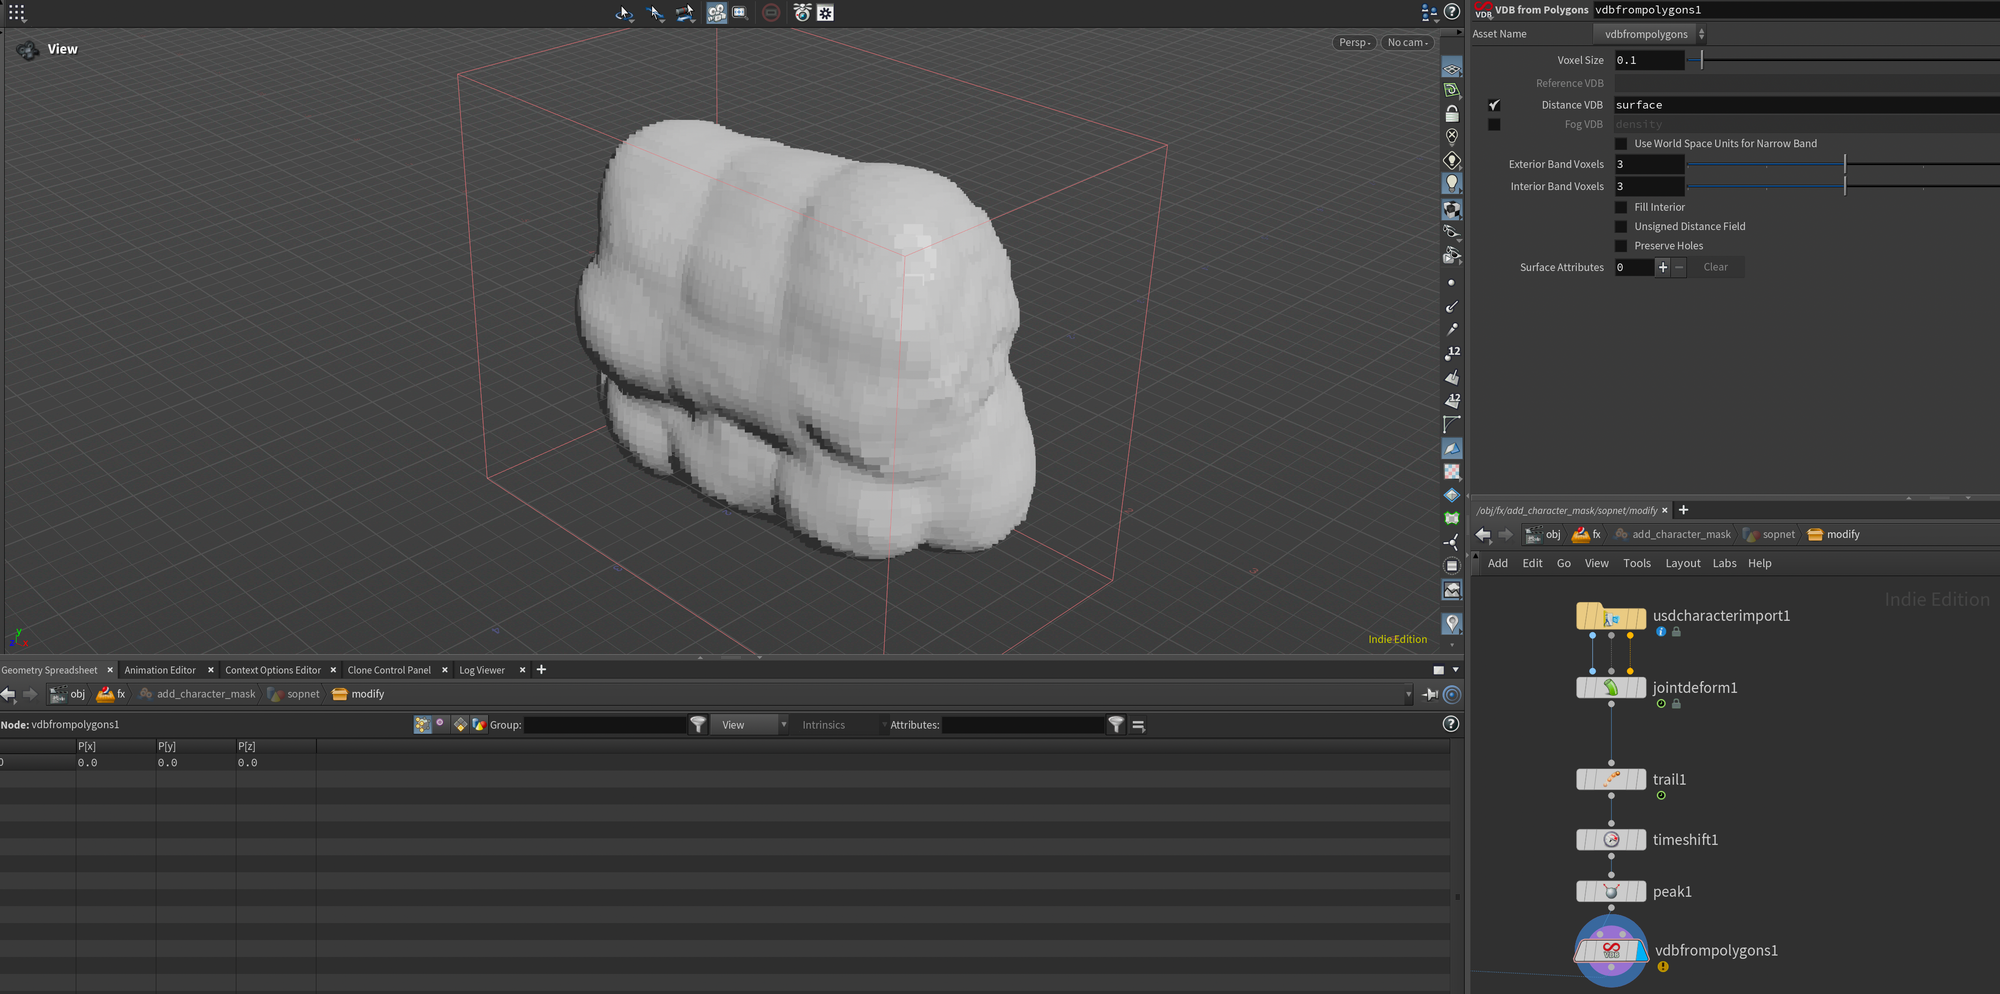
I plug this result into the second input of a Group Create node, set to Keep In Bounding Regions - Bounding Volume . This gives us a point group consisting of the vegetation that our character moves through in the shot.
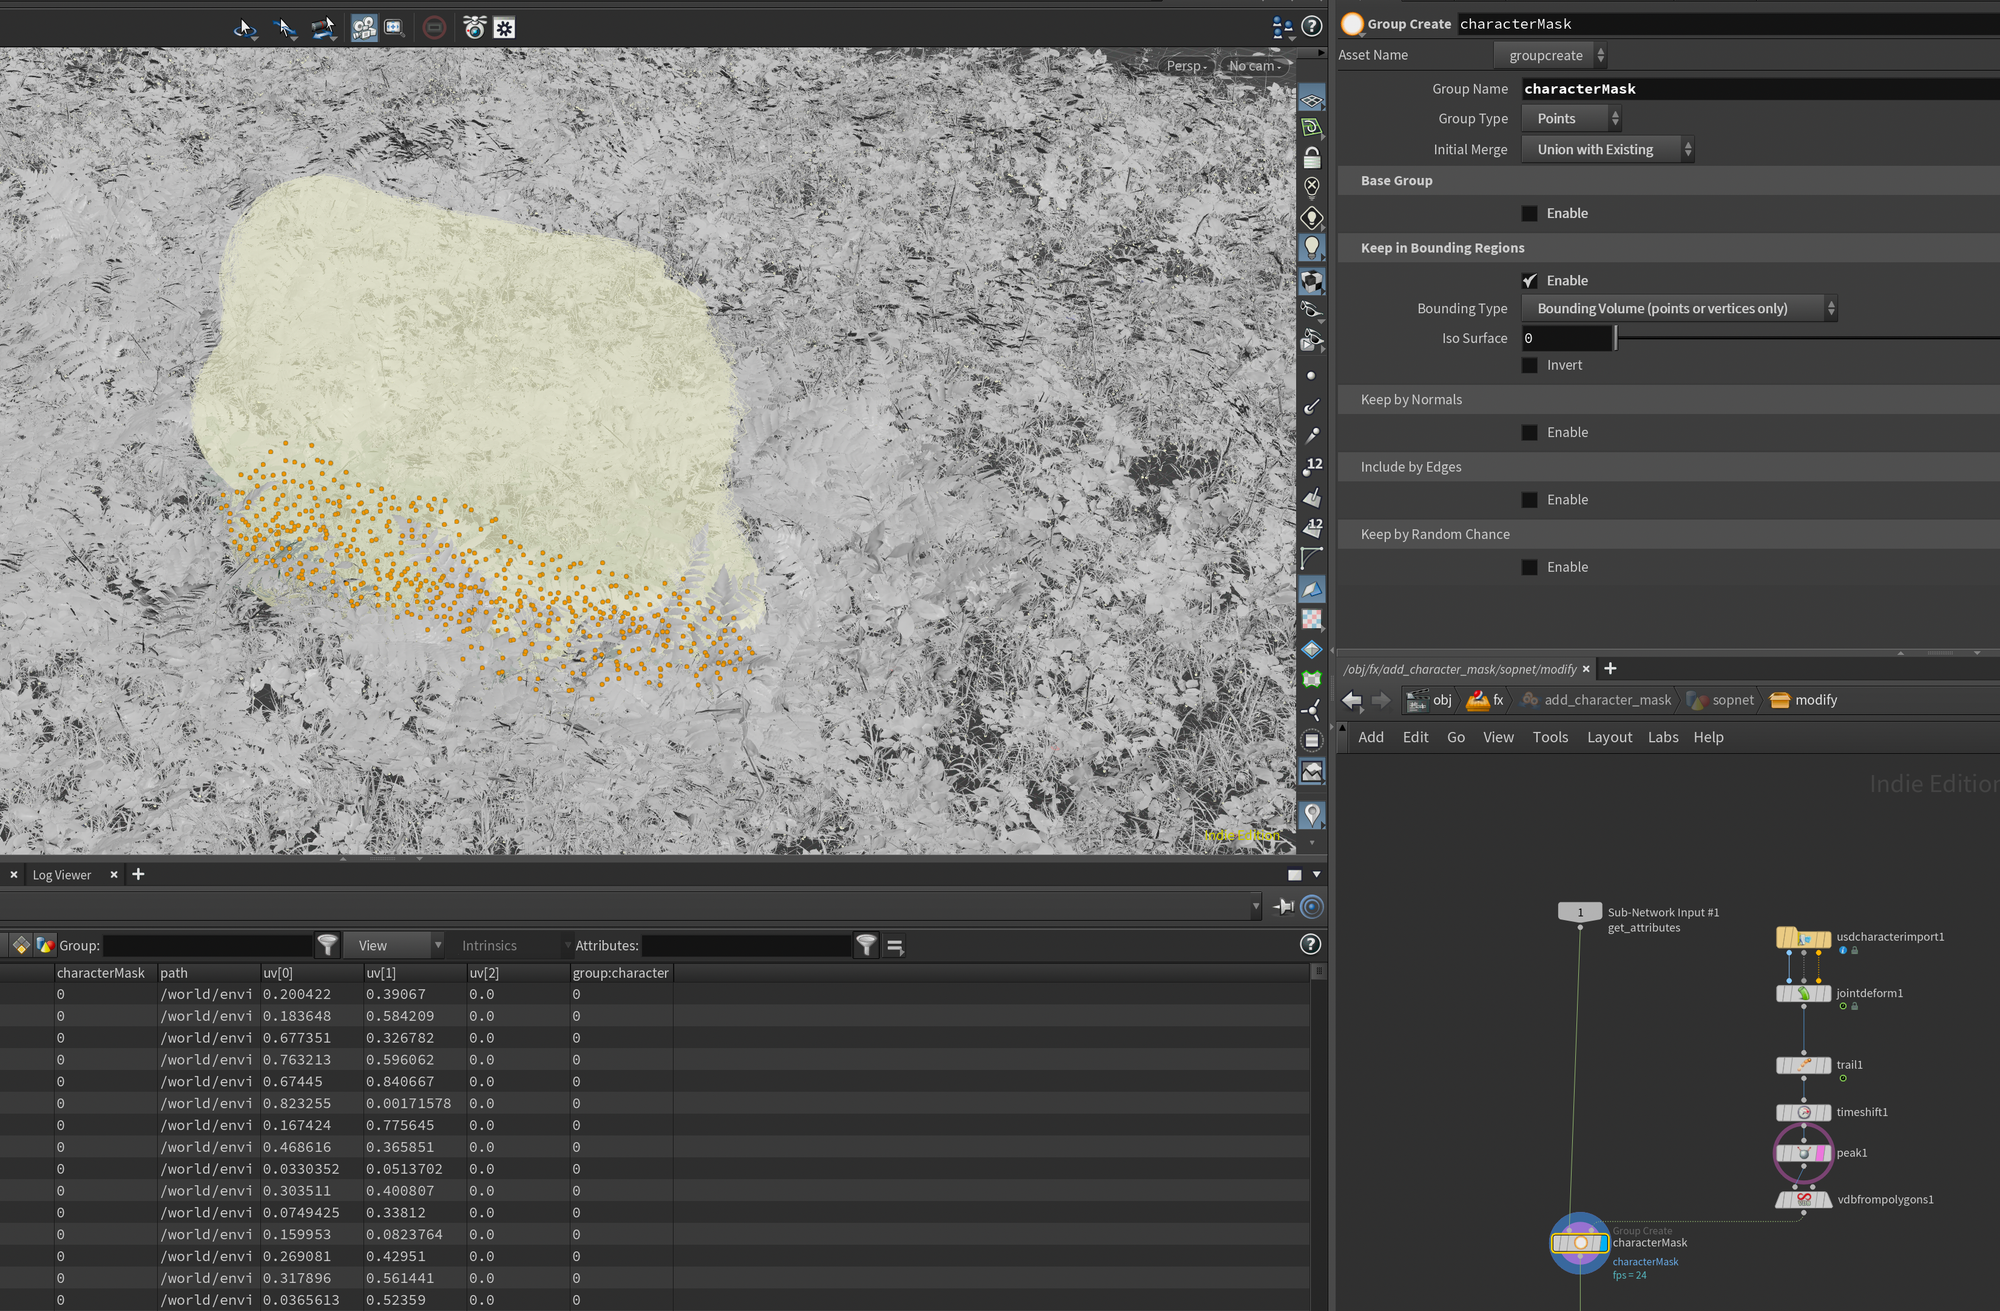
characterMaskFinally, I added a Group Promote to promote this from a group to a point attribute that we can access more easily in LOPs. Remember to check Output as Integer Attribute.

Group Promote.If you check in LOPs, you should now have access to a characterMask attribute.

characterMask attribute in LOPs.Extracting vegetation for simulation
Now we need to jump in and extract our vegetation for simulation. Essentially, we need to extract the individual pieces of vegetation from our Point Instances, simulate them using their skeleton, and layer that animation on top.
The easiest way to achieve that is to use an Extract Instances node in LOPs. Within this we can use an expression to extract only the pieces of vegetation we marked with the attribute characterMask in the previous section. We do that using the following expression:
/world/environment/instancers/fern_instancer[{i@characterMask==1}]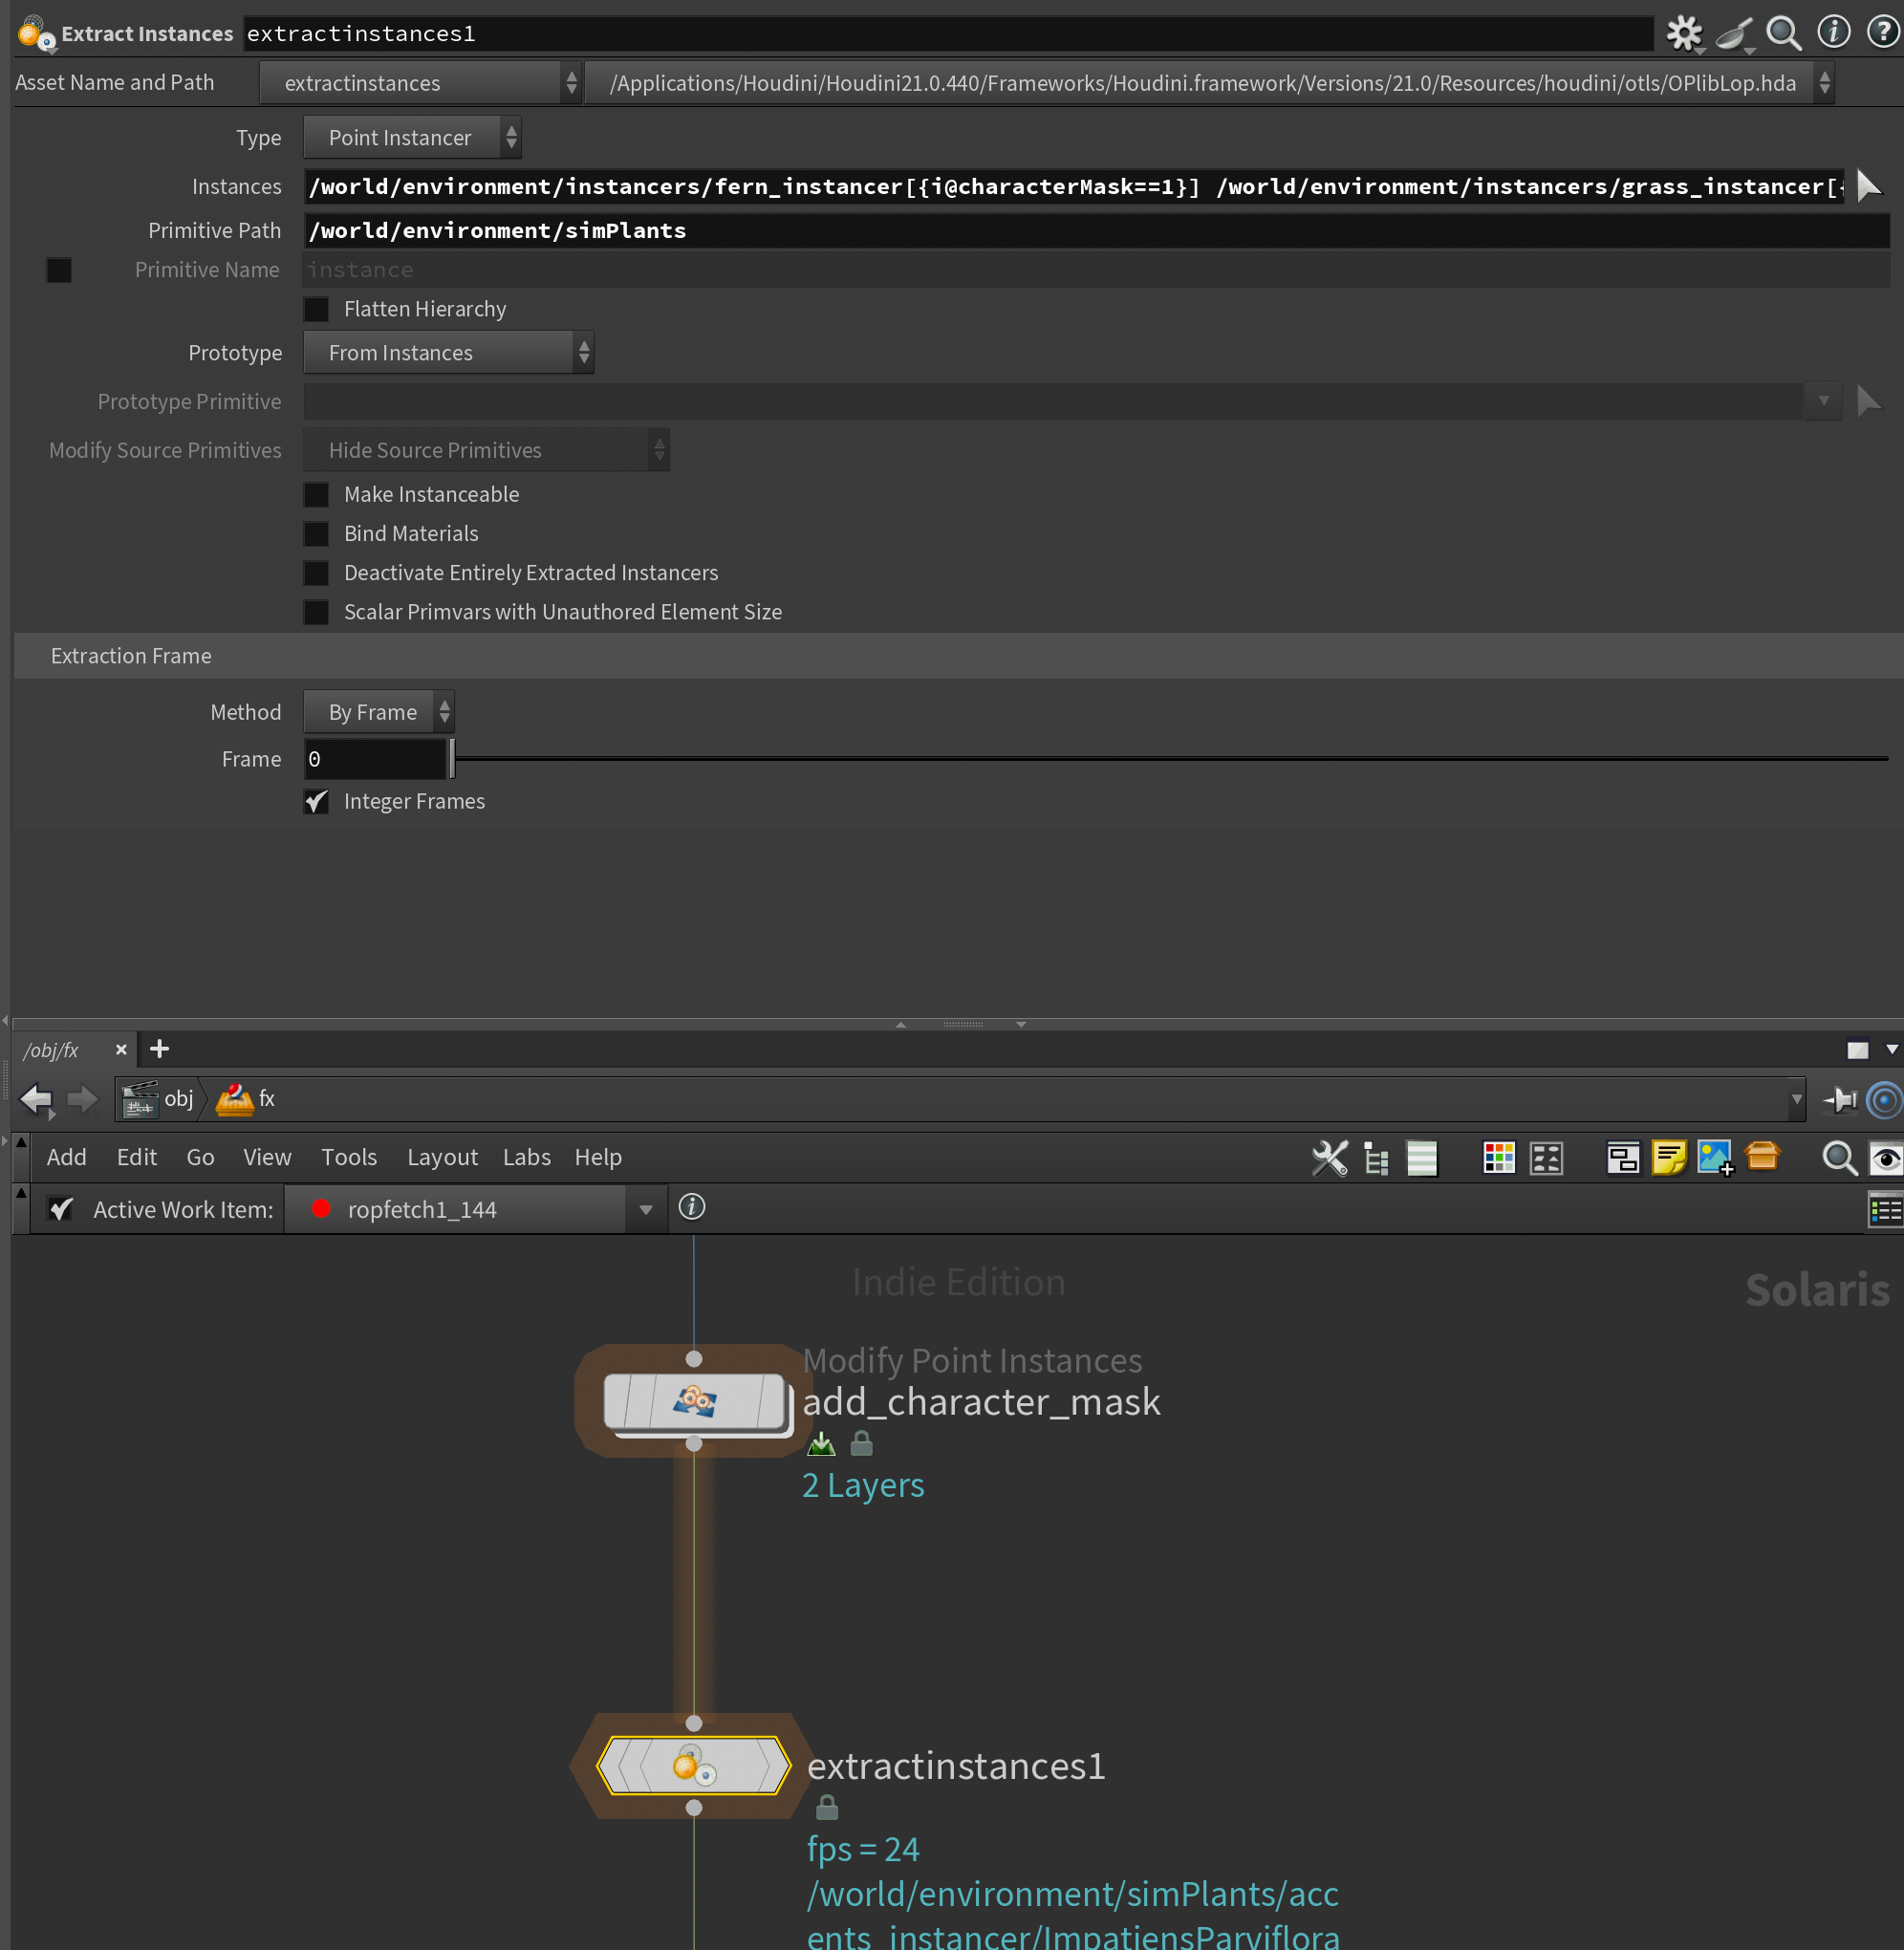
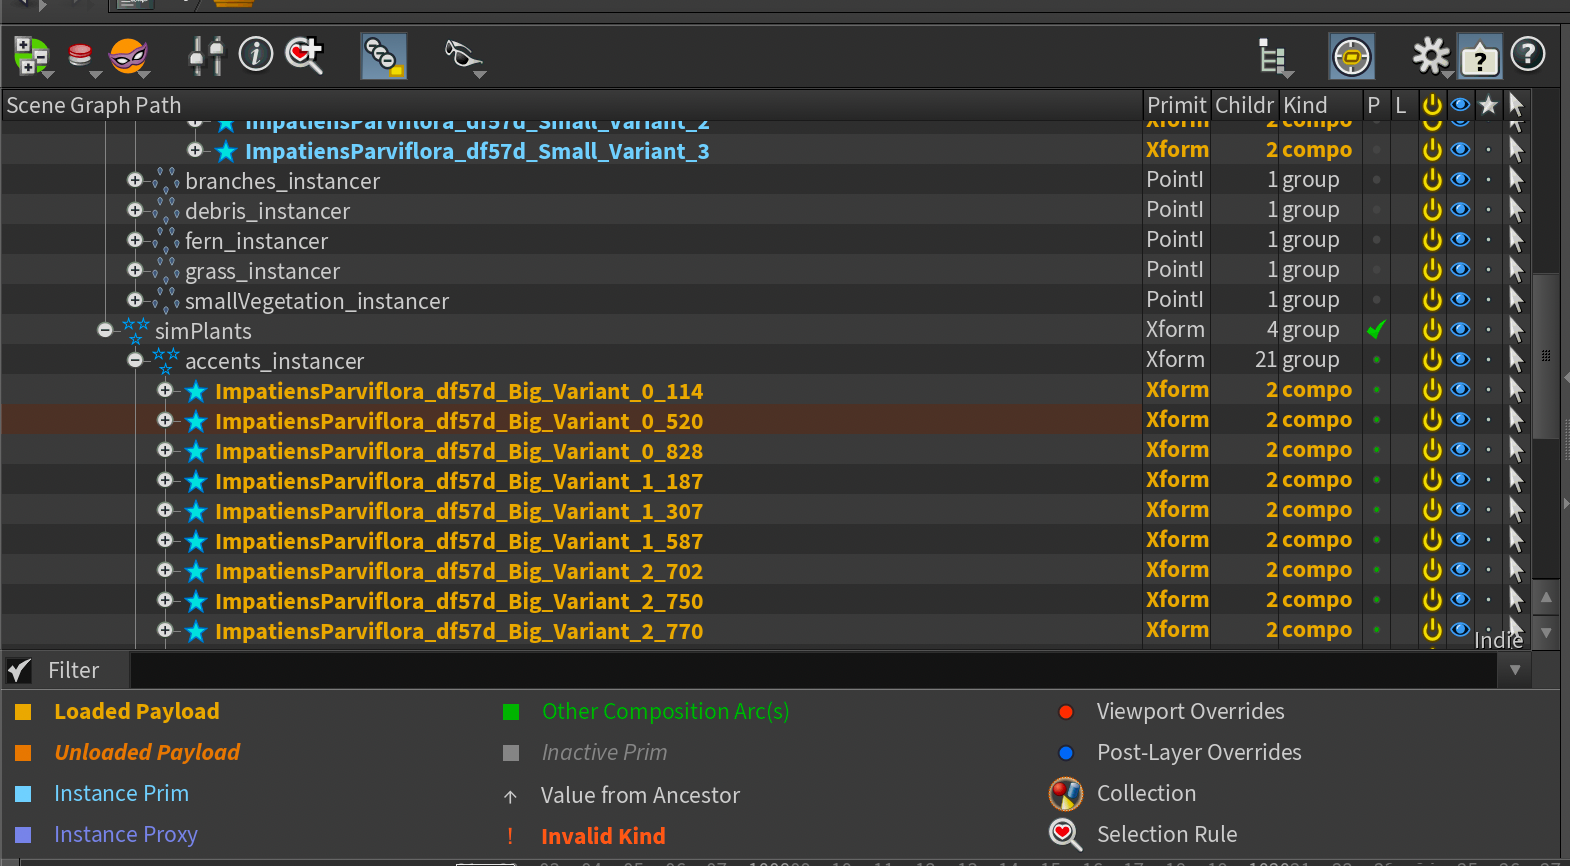
We also need to provide an output primitive path for the extracted instances. In my case I put them all in /world/environment/simPlants
After this we need to remove the extracted instances from the original Point Instances so we don't get double geometry. We can do this using a Modify Point Instances using the same prim pattern expression we used in Extract Instances in the Point Instances parameter.
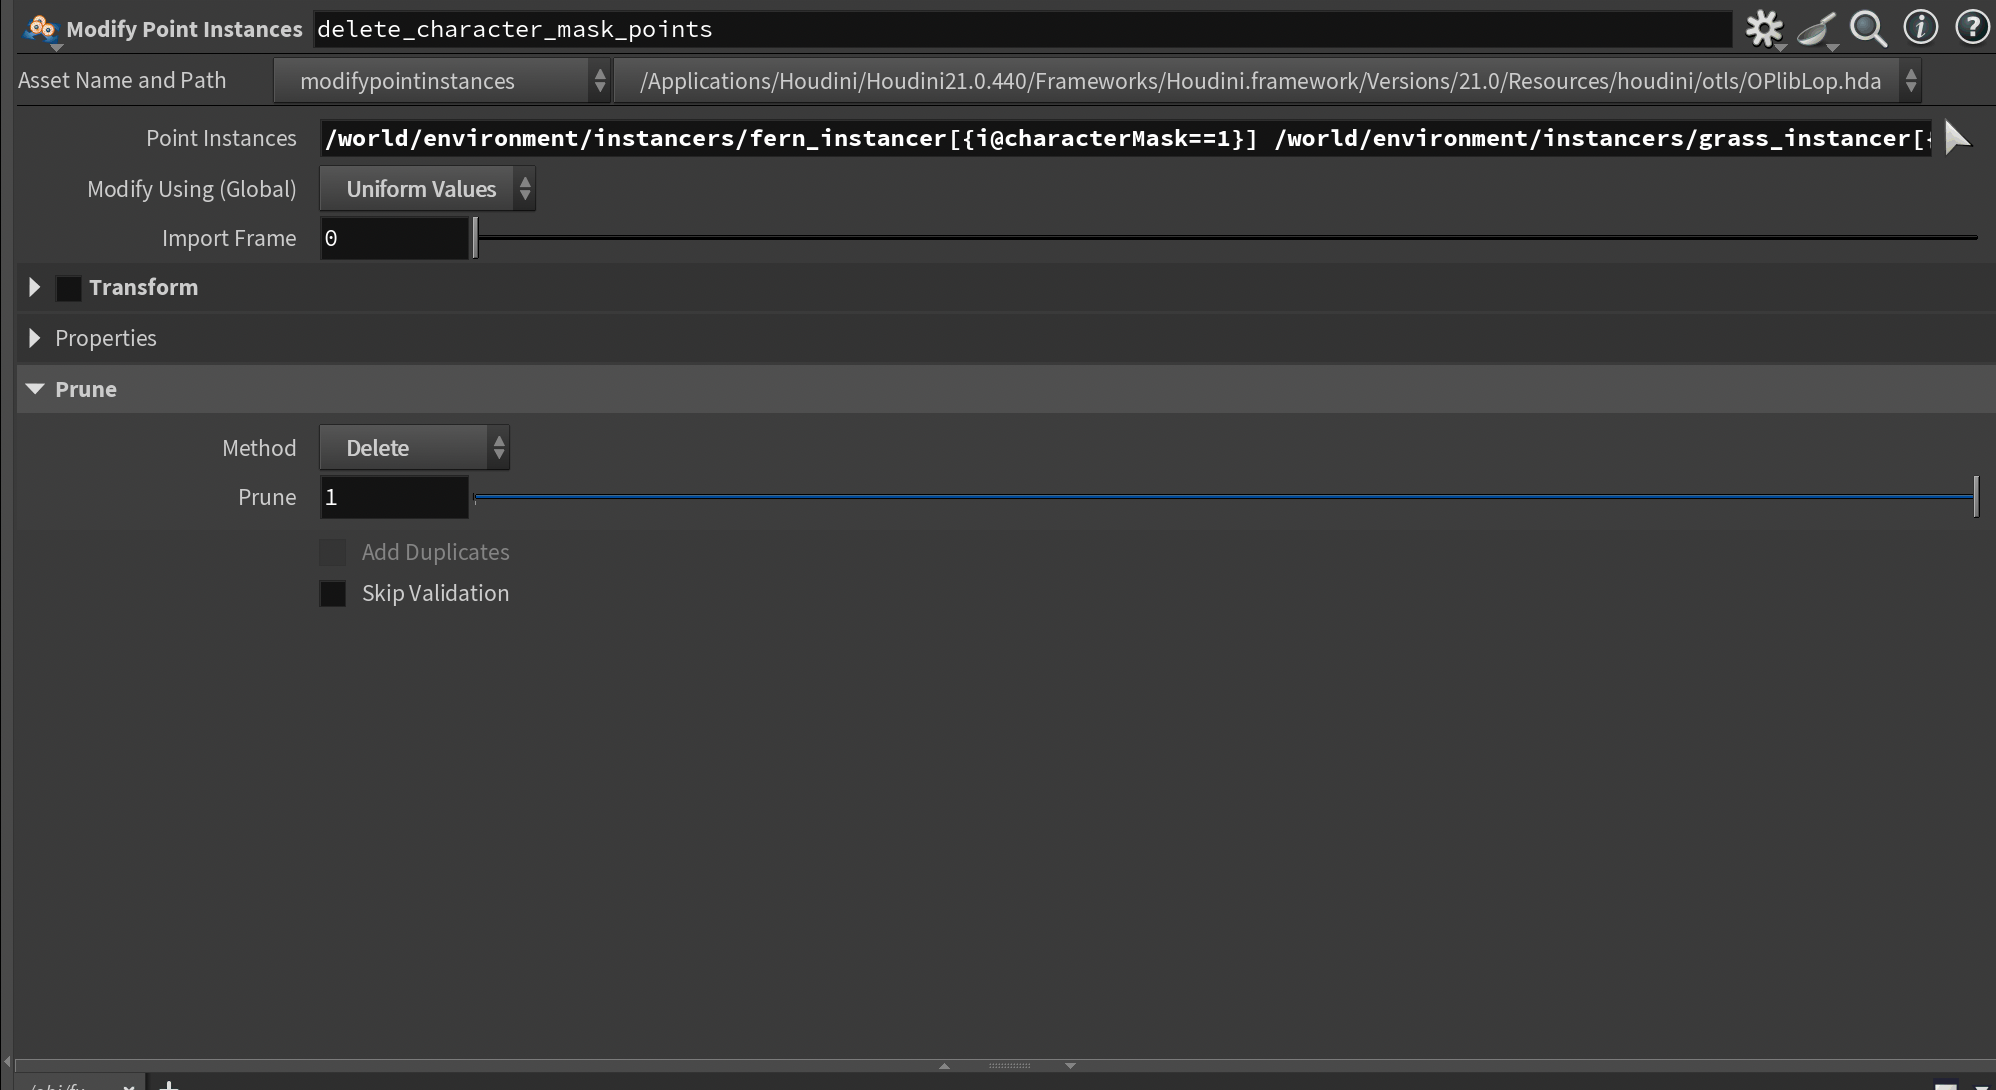
You need to set the Modify Using (Global) to Uniform Values , disable Transform, and set Prune -> Method to Delete. This will delete all of the selected instances from the Point Instances.
Finally, since we need to modify the SkelAnimation primitive for each agent (this is the node that contains the animation), we need to un-instance the extracted primitives.
To do this you can drop down a Configure Primitive node, target our extracted primitives, and set Instanceable to Not Instanceable . You should notice the color of the primitives change to yellow/orange in the viewport.
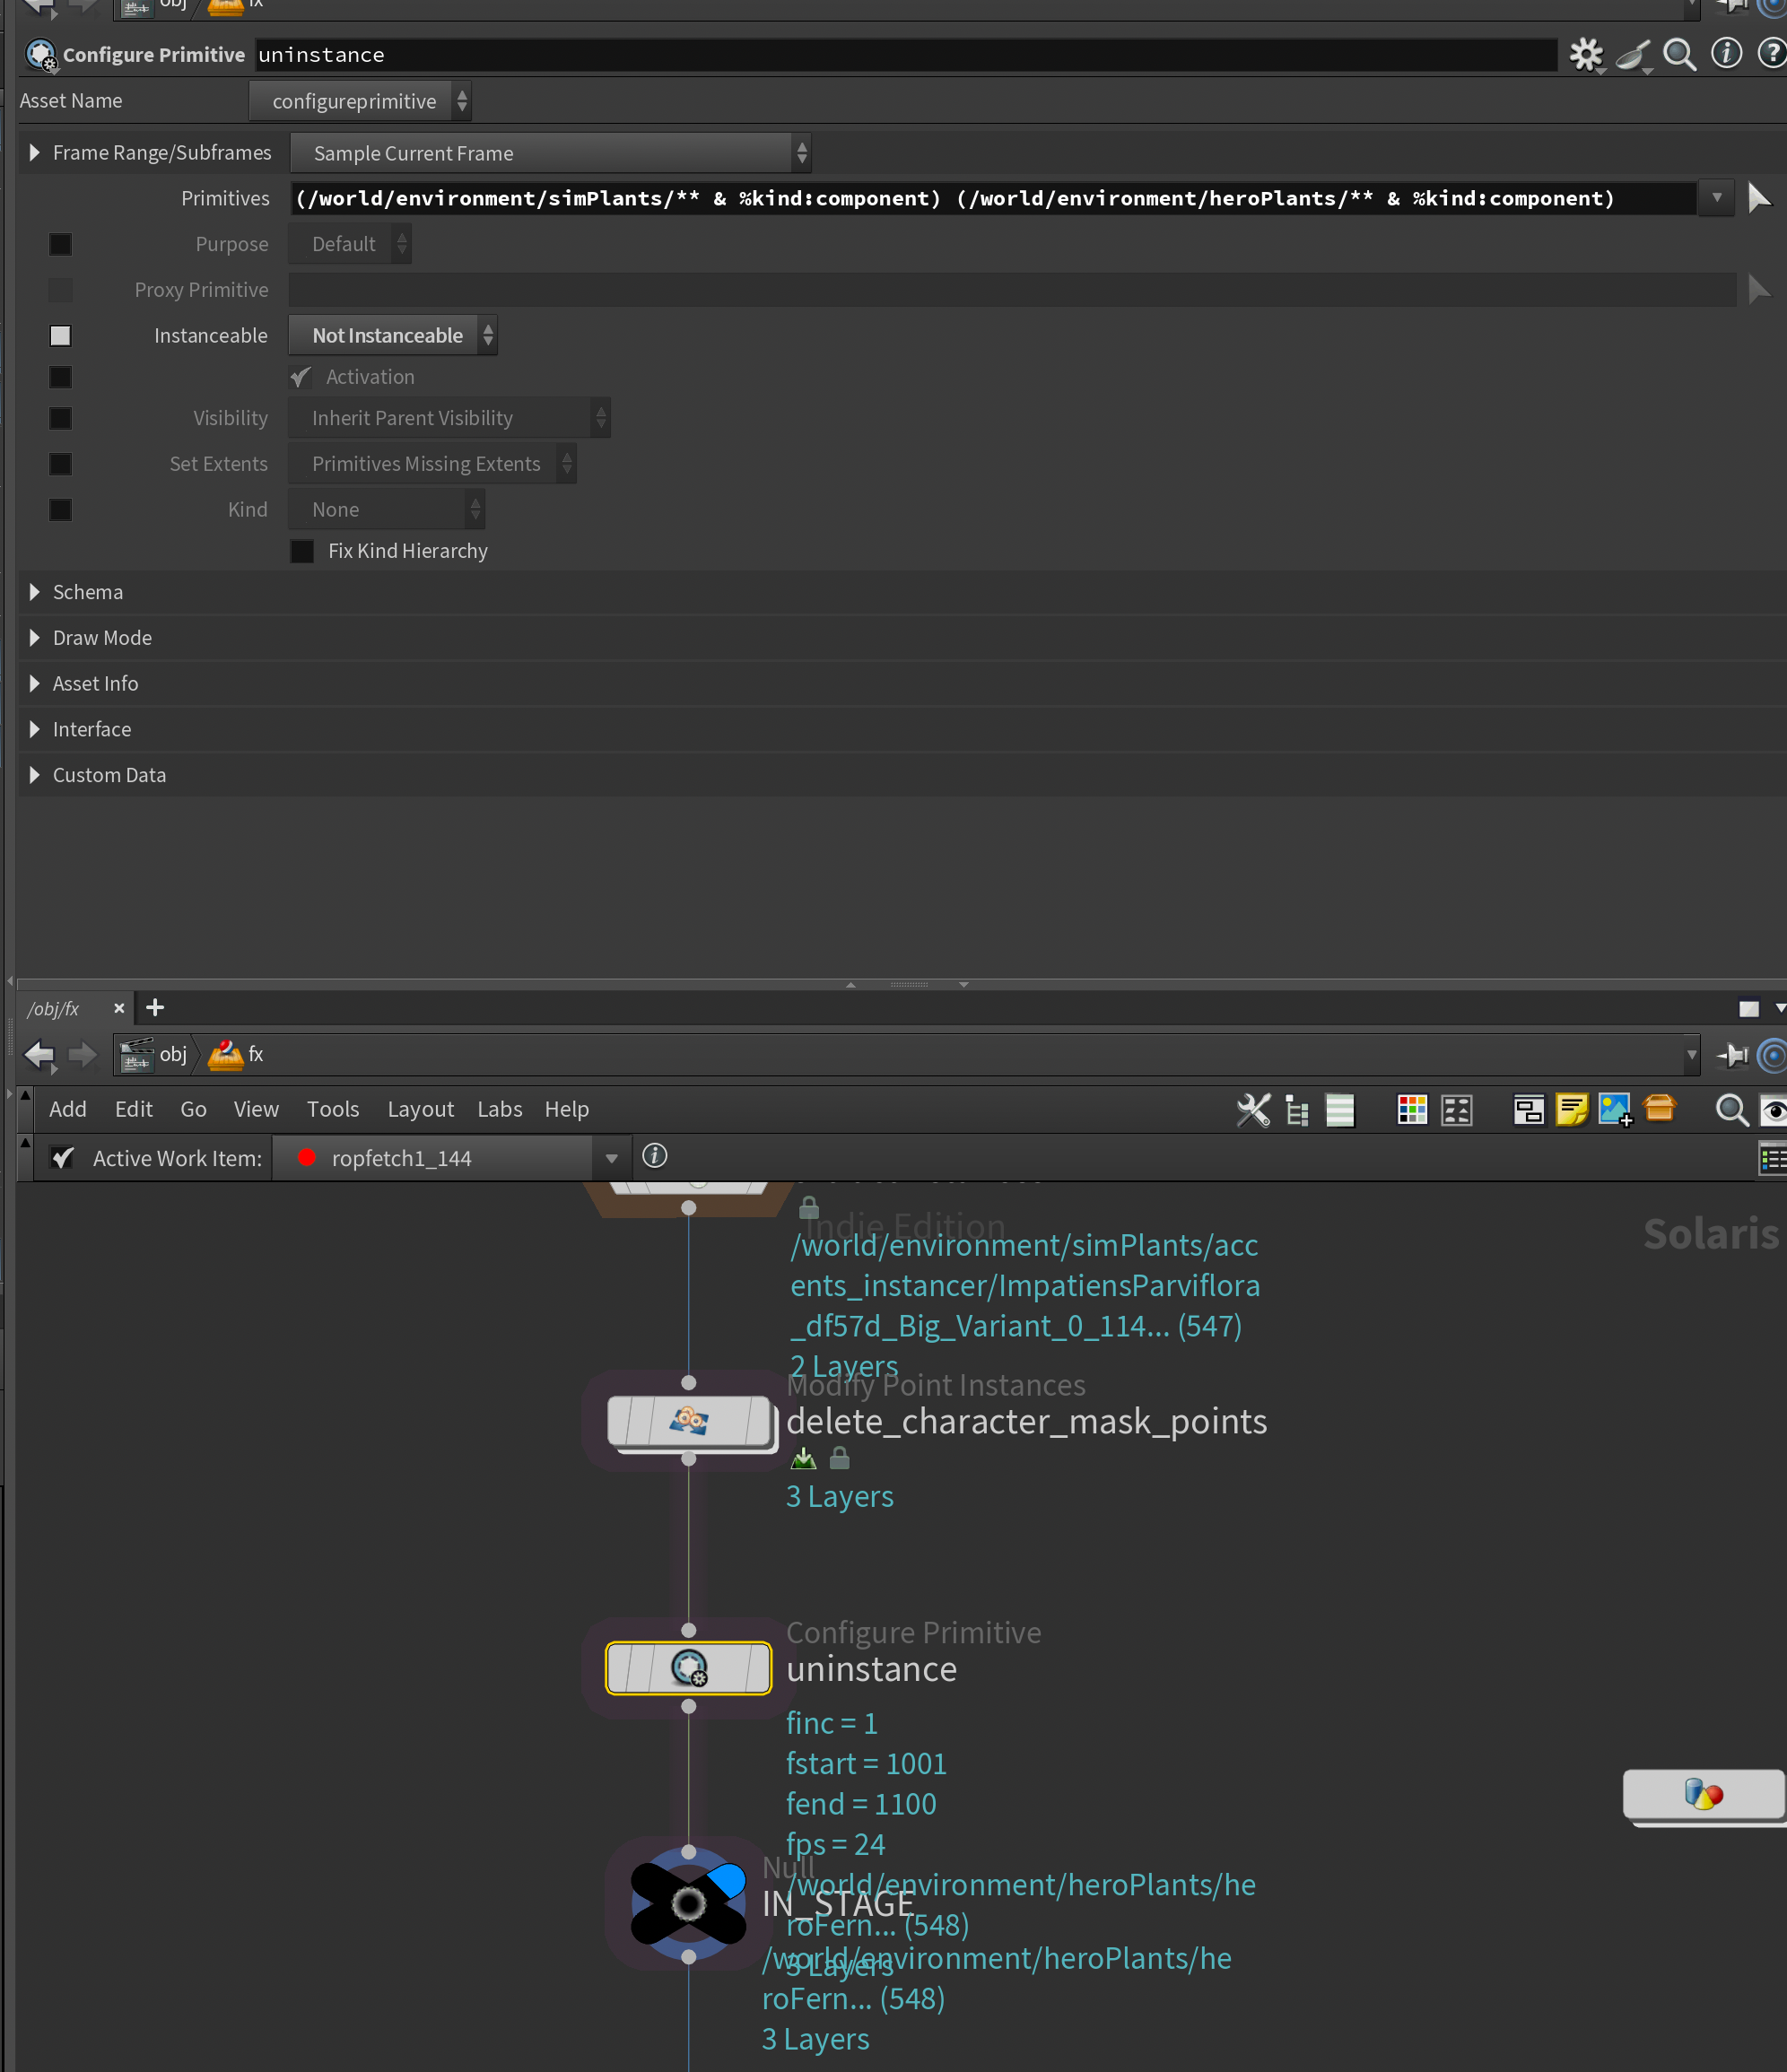
At the very end I added a null called IN_STAGE to make it a bit easier to grab in SOPs later. You can see this in the screenshots above.
Importing Vegetation Agents into SOPs
Now we need to get our Vegetation Agents into SOPs so we can simulate their skeletons with Vellum.
Start by creating an empty SOP Network in your LOP network.
Then we need to extract our agents from LOPs into SOPs. This is unfortunately not super elegant, as I need to rely on a For-Each loop because the USD Character Import node can only import one character at a time.
To do this you start with a LOP Import, plug in the IN_STAGE path to the LOP Path, add the paths to the extracted vegetation in the Primitives parameter (you can use patterns here - notice I use * as a wildcard). I also set the Purpose to render, the Time Sample to Static and finally set the Display As to Point Cloud to keep things light.
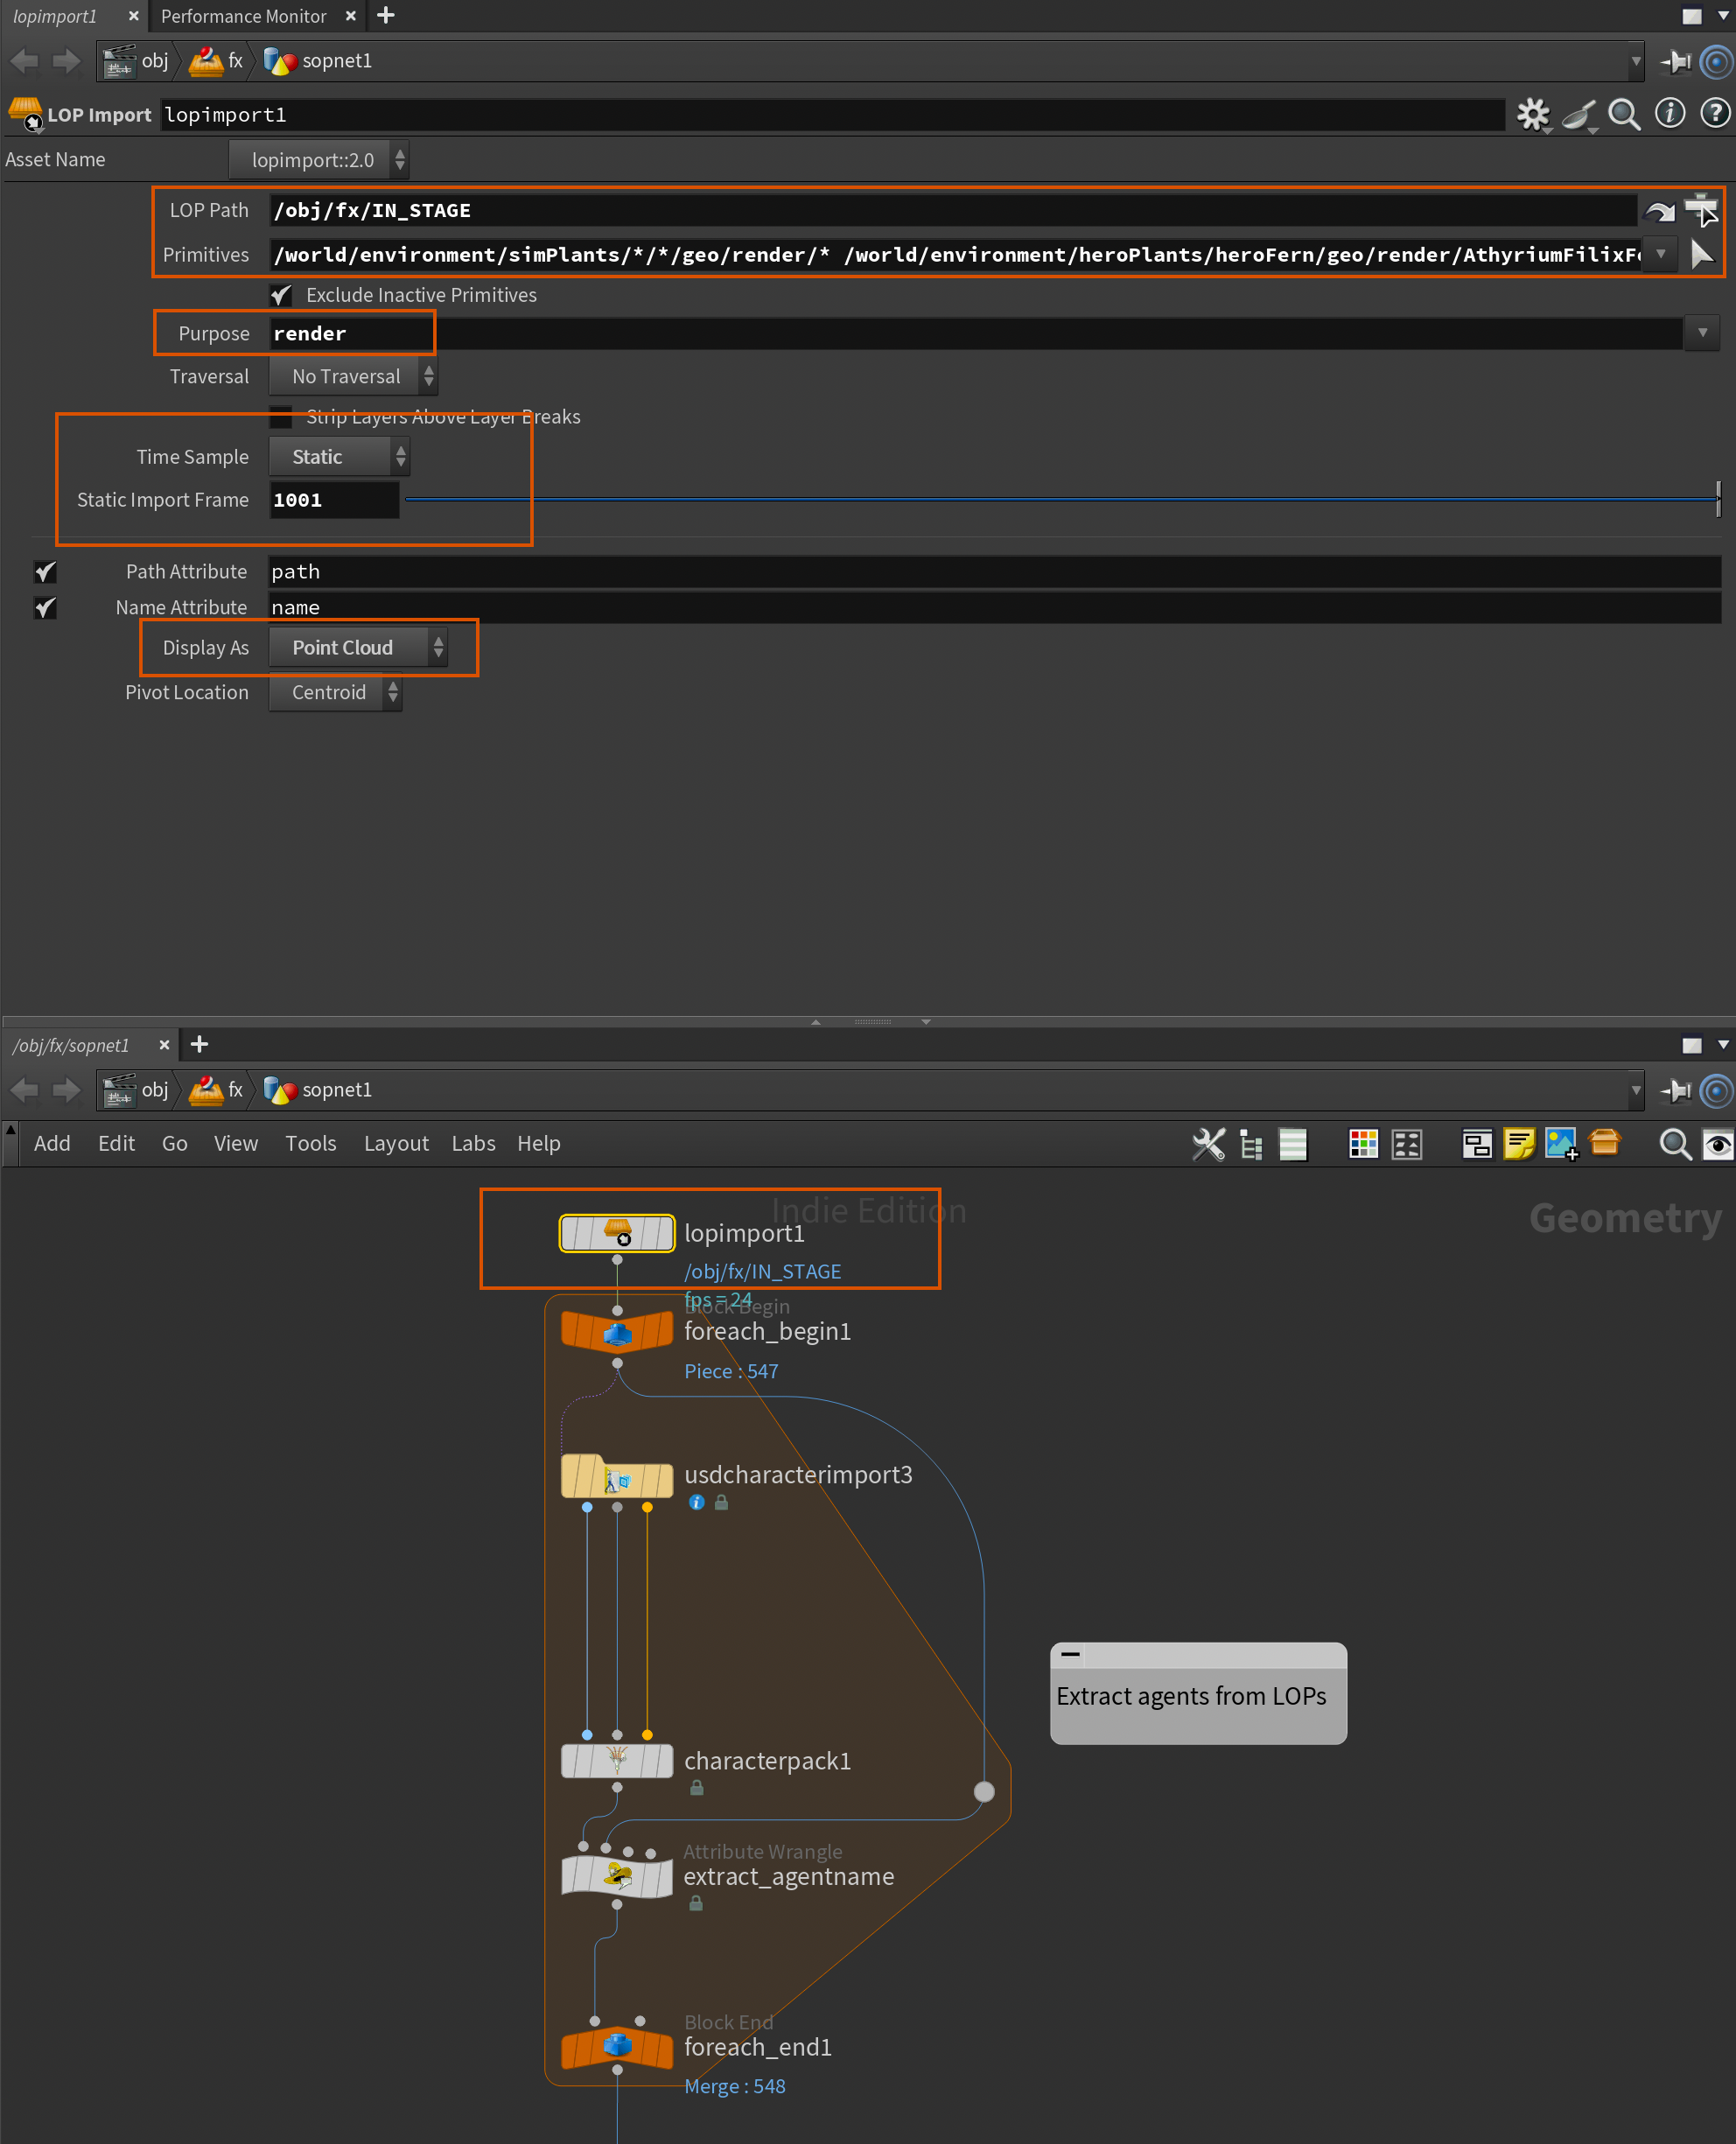
After this we need to setup a For-Each block ( For Each Primitive ) and plug our LOP Import into it.
Inside, we add a USD Character Import node. This node extracts UsdSkel data from LOPs into data that can be used in SOPs. This allows us to extract skeletons, skin, and even animation from USD characters.
In this node I set the LOP Path to the same as in the LOP Import, Purpose to render and finally specify the SkelRoot Primitive Path to:
`prims("../foreach_begin1", 0, "path")`This grabs the path attribute of the current primitive in the For Each loop and allows us to import the "character" (vegetation in our case).
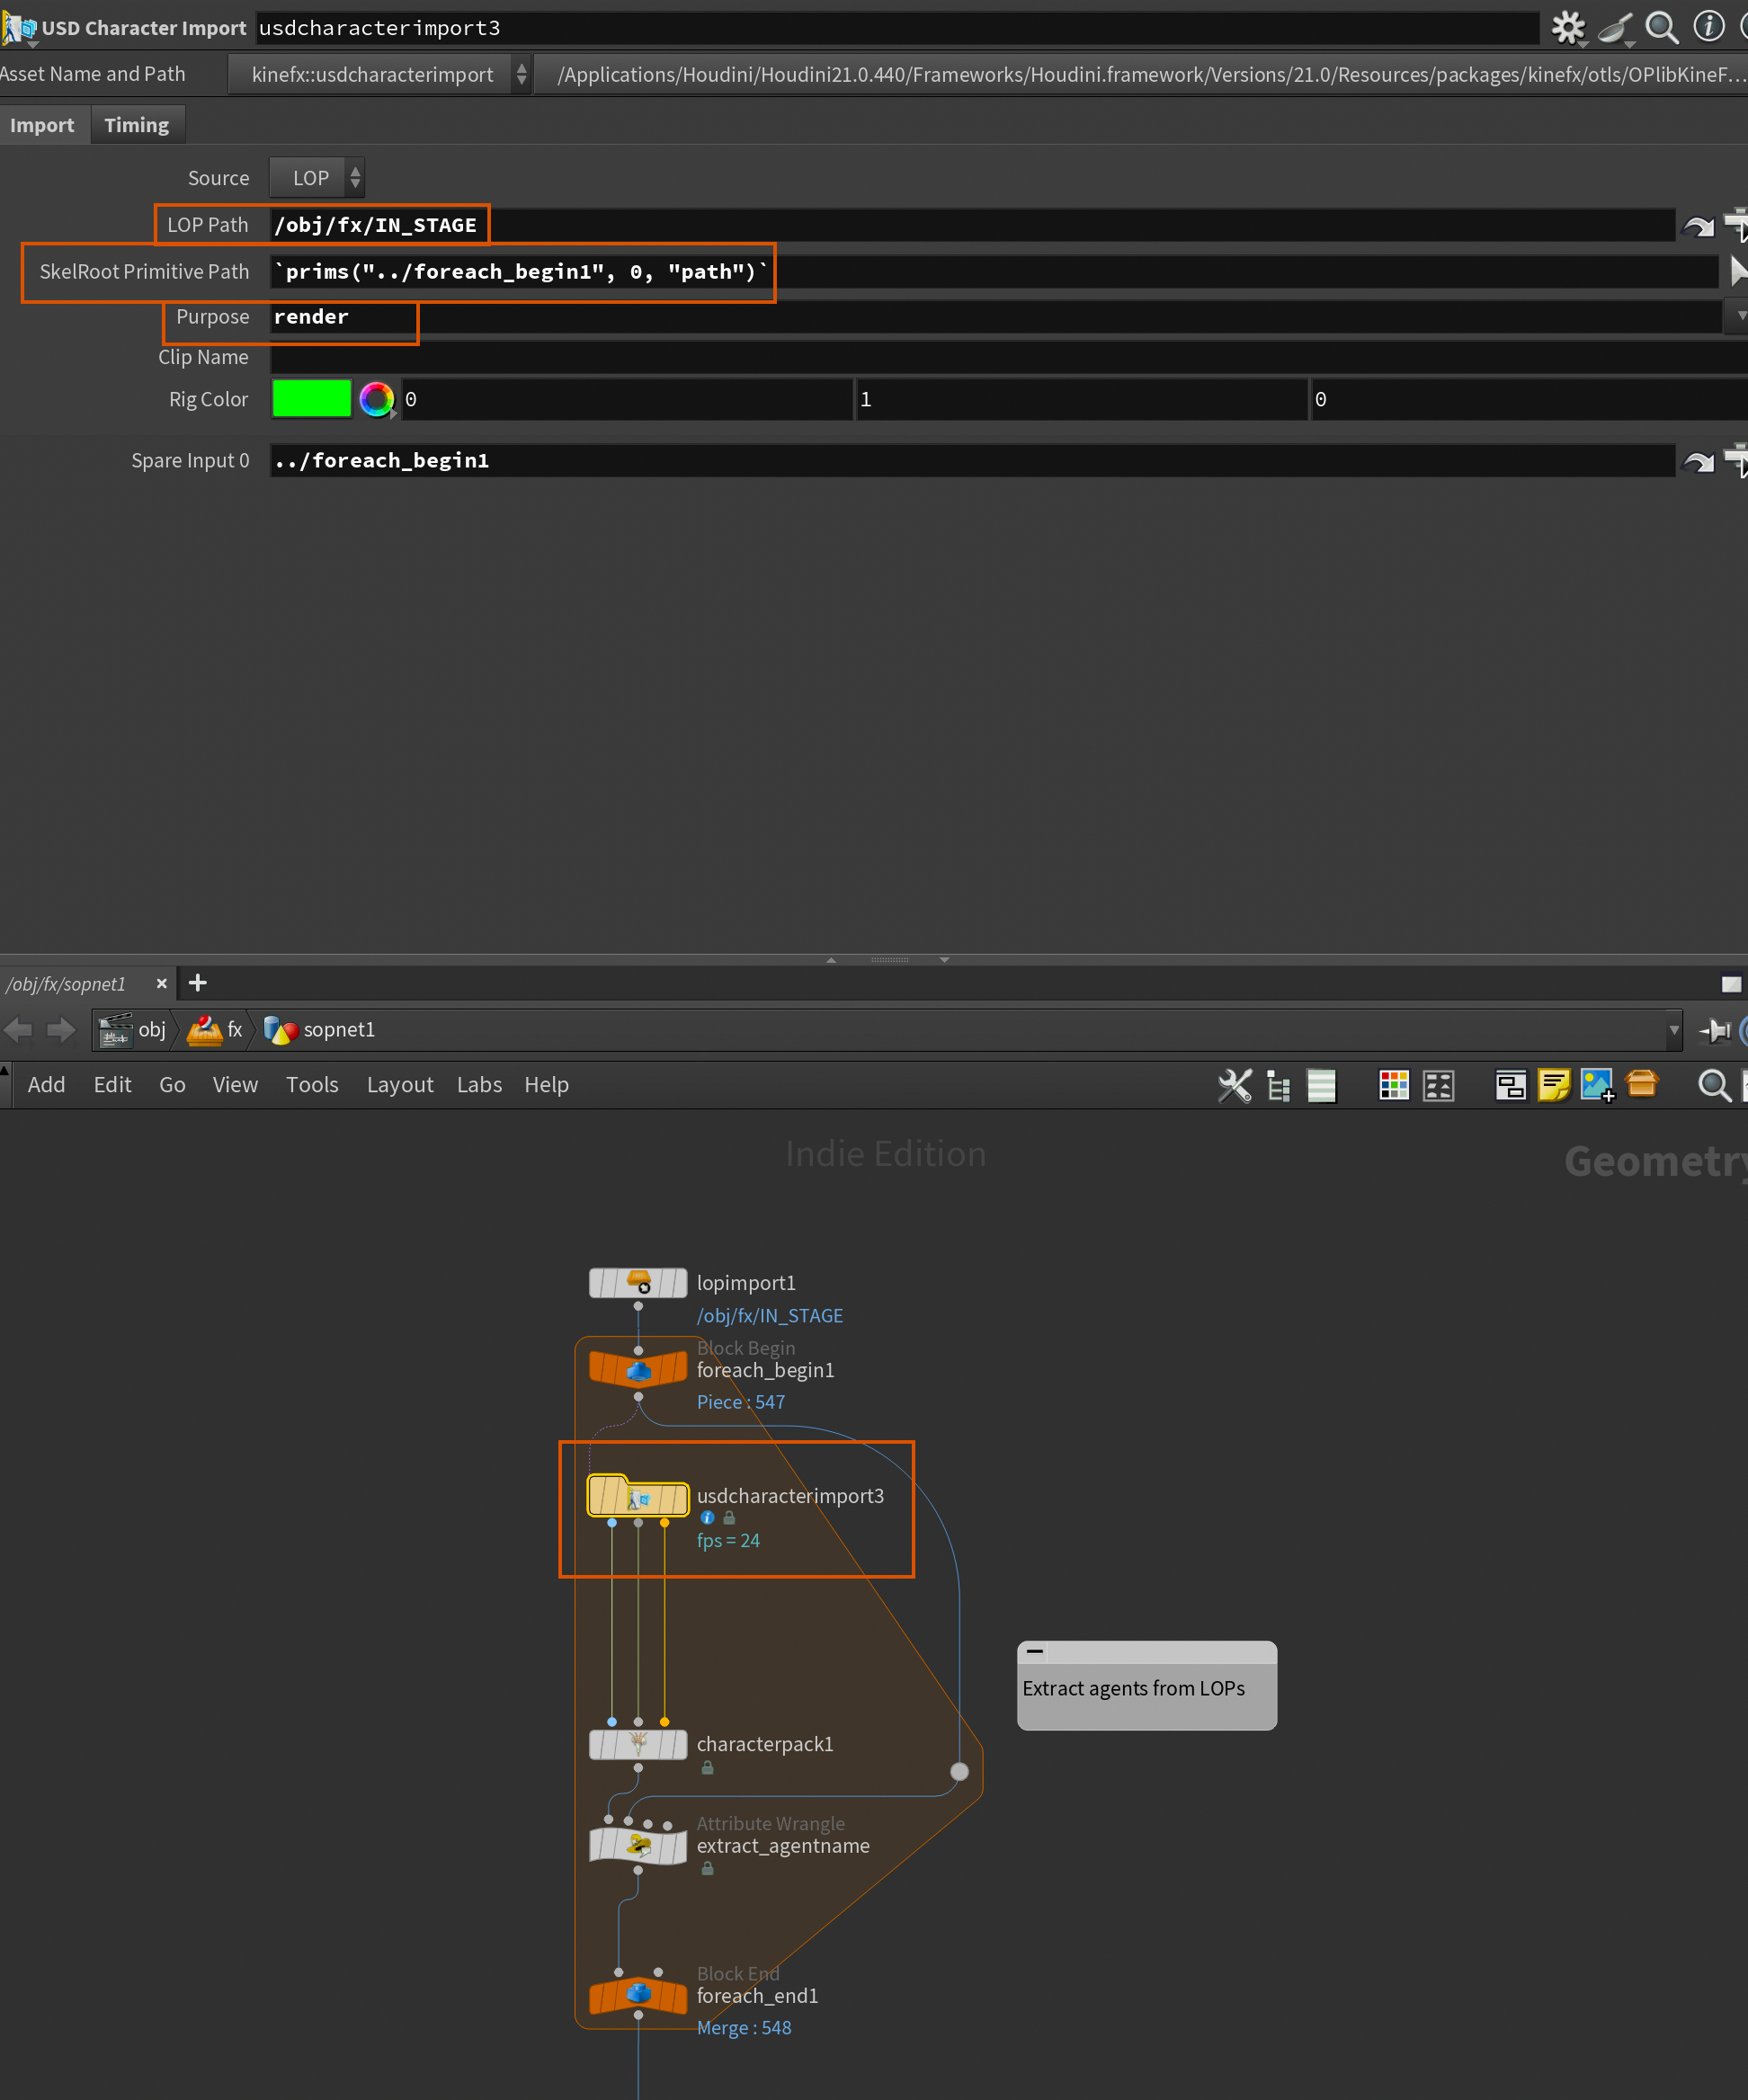
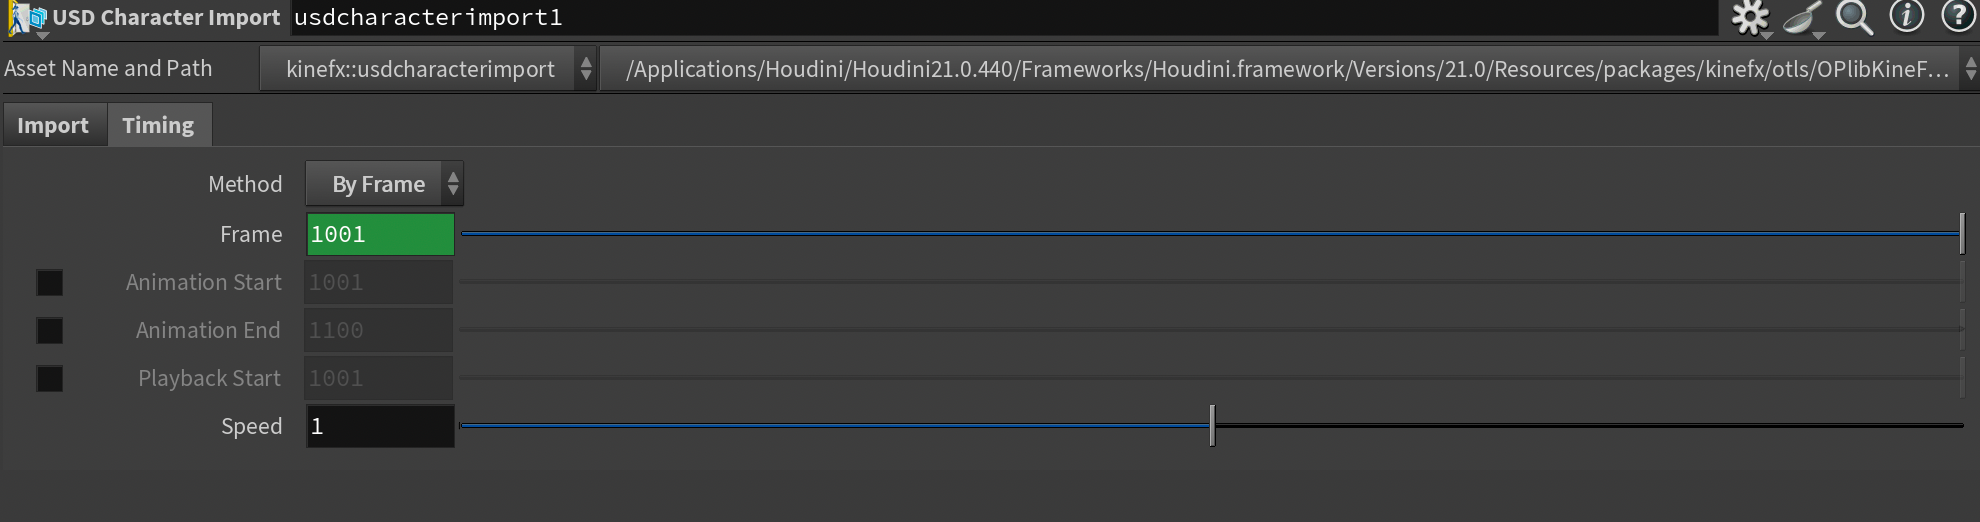
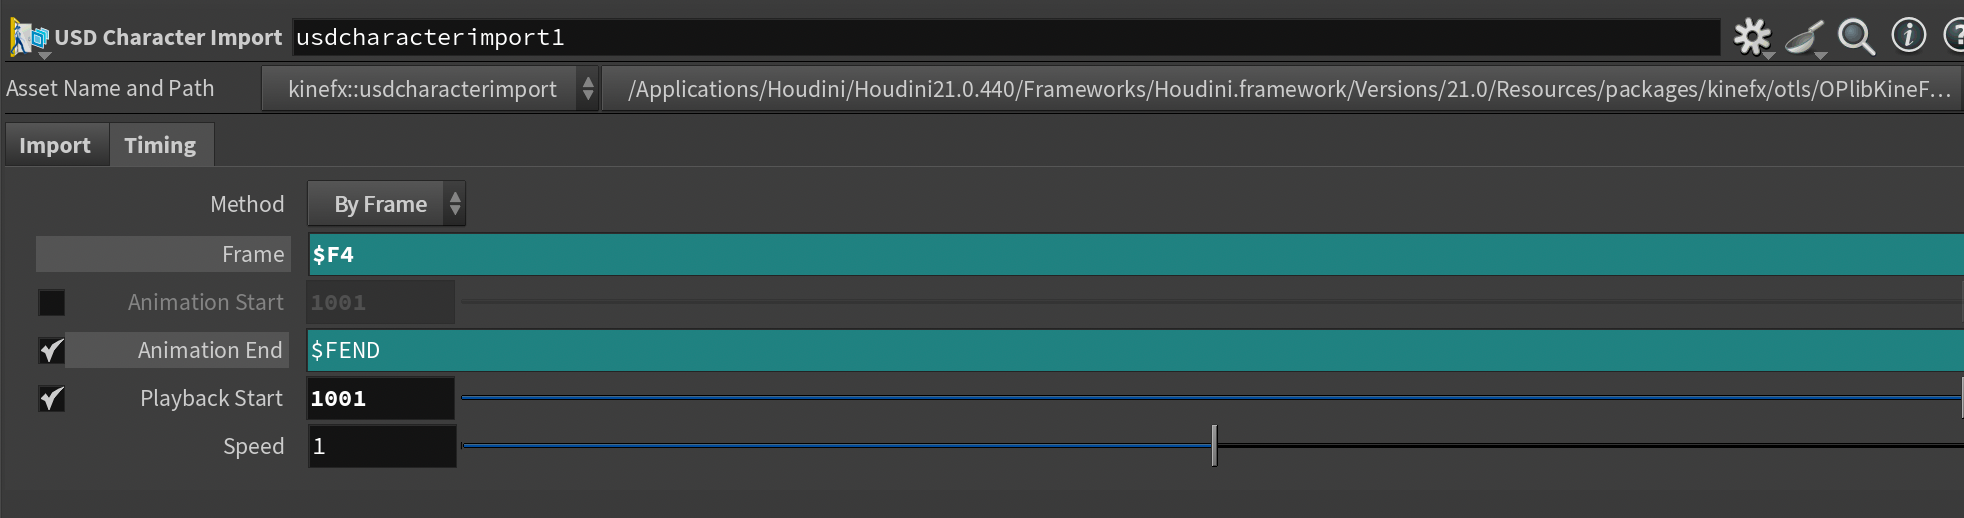
Timing tab of the USD Character Import to be By Frame and then locked the Frame to 1001 as we don't have any animation we need to read from LOPs.In order to make things easier to work with I also packed our vegetation "character" using a Character Pack connected directly after the USD Character Import. This will give us 3 packed primitives per character - the skin, the deformed pose, and the rest pose (just like the 3 inputs).
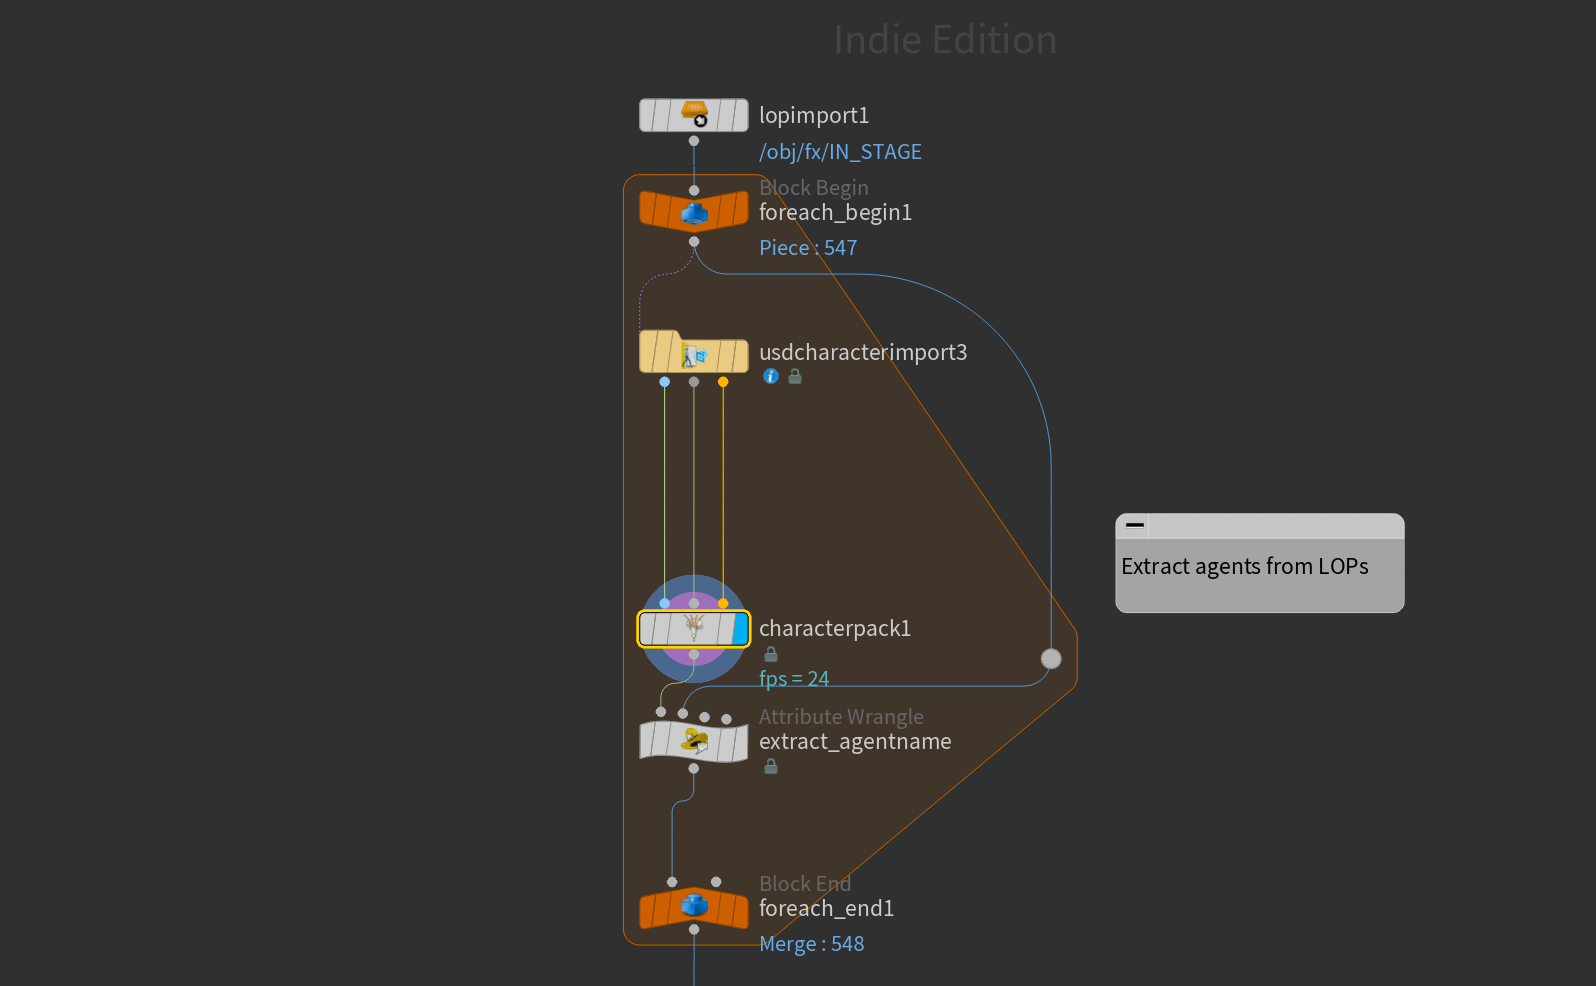
Character Pack and Wrangle.Finally, before plugging the result into the For Each End, I added a Wrangle. I'm doing this to extract some additional information from the LOPs. In particular, I'm looking for an agentname (a unique name we'll use to identify each piece of vegetation).
This is extracted from the path attribute. Notice the For Each Begin is plugged into the second input of the Wrangle. This is because I need to extract it from the primitives generated by the LOP Import.
Here is the code:
string path[] = re_split("/", prim(1, "path", 0));

s@agentname = path[-4];
Here I turn the path attribute into a list using re_split and then extract the agentname and name from the path.
Vellum Simulation
Finally, it's time to simulate our vegetation with Vellum using our skeletons. I want to preface this by saying that I'm by no means a Vellum expert, and there's a lot to improve in the simulation itself. That being said, I hope this can provide an overview of the general workflow.
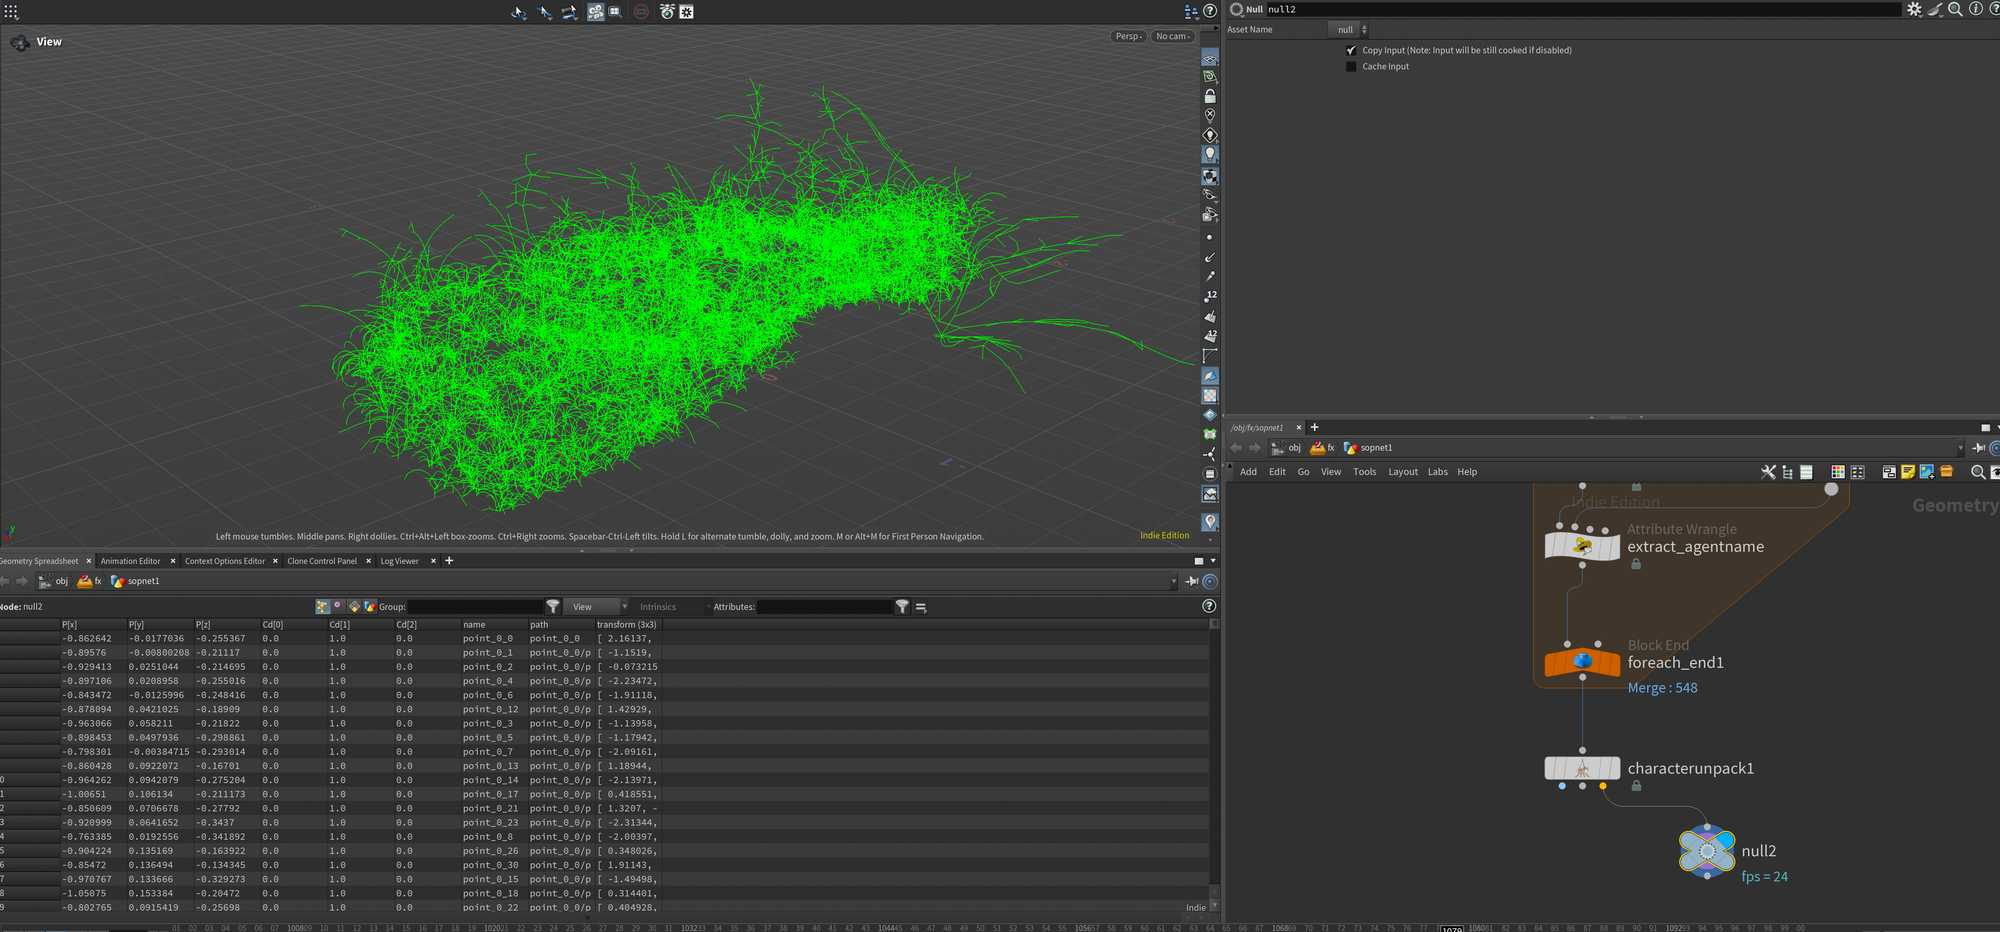
First, we need to unpack our vegetation "characters" using a Character Unpack after the For Each loop. This will allow us to grab just the "animated pose" (i.e. the different vegetation agents’ skeleton position in our layout) and perform our simulation on that. It should look something like the screenshot below.
Before we get ahead of ourselves I'm also quickly going to set up our collision objects which in our case will be the ground geometry and the mocap character from earlier.
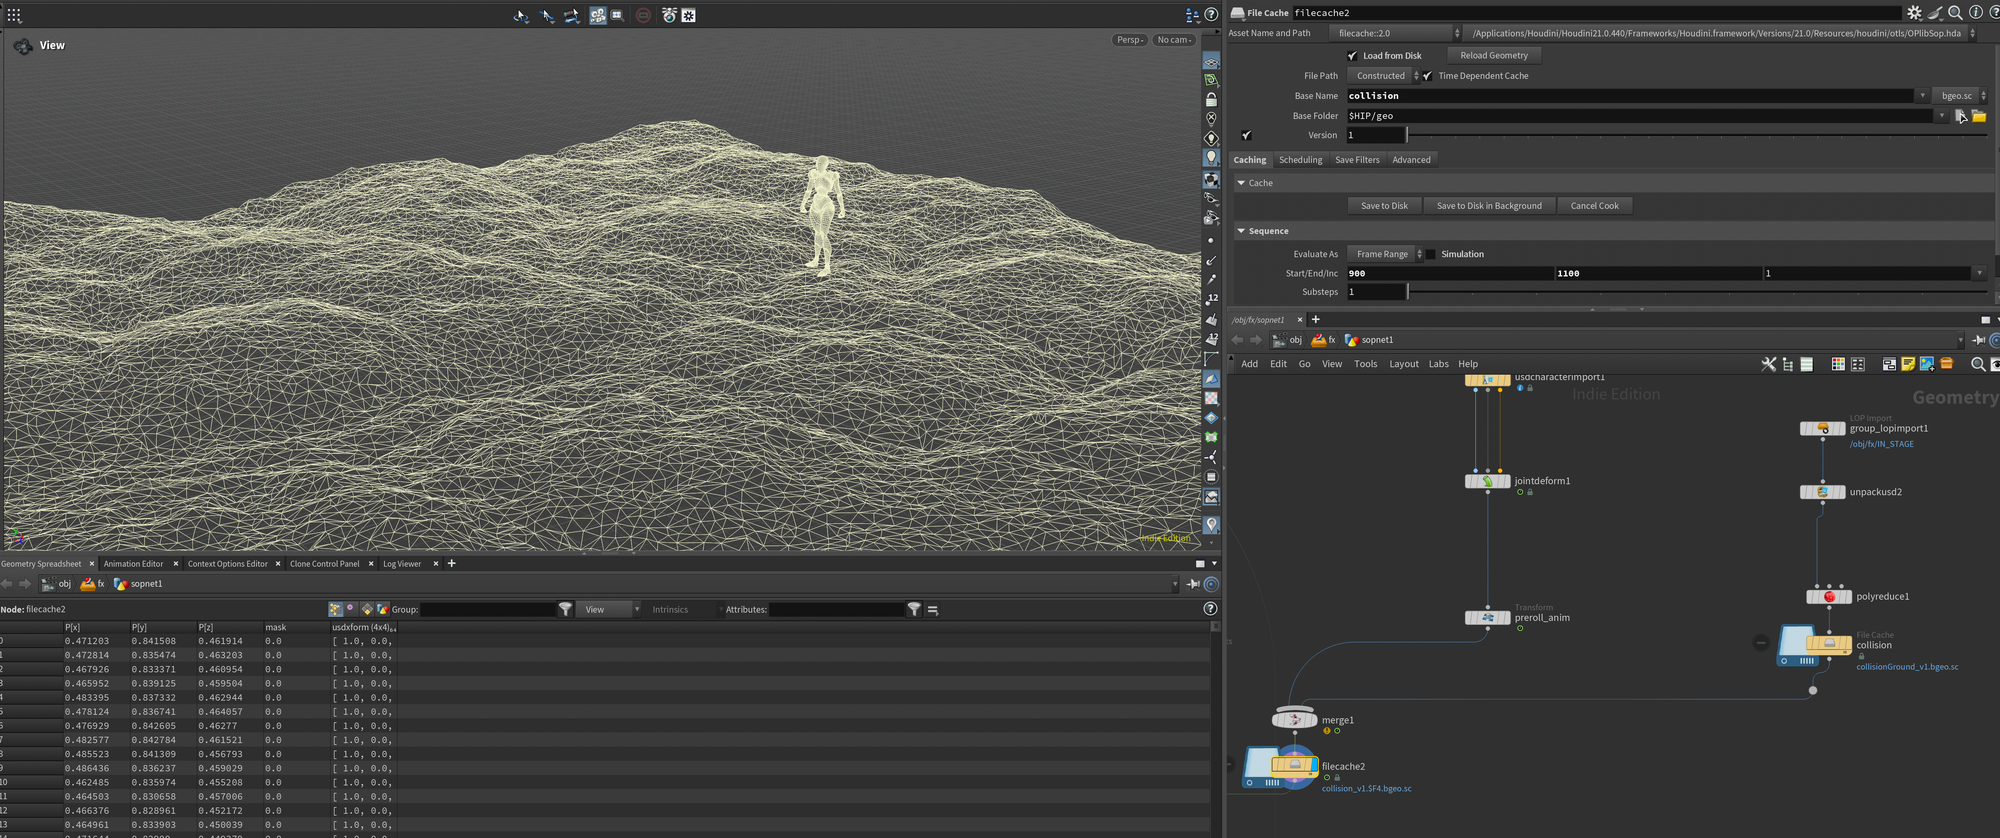
To load the character I add another USD Character Import with the settings below to load in our character.
USD Character Import for mocap character.I also adjust the Timing tab slightly to make sure we get the correct frame range.
USD Character ImportI then plug in the results of the USD Character Import into a Joint Deform node to get our animation applied to our skinned geometry.
Joint DeformFinally, I decided to add a bit of preroll animation to our character - basically just animating her falling into the vegetation before frame 1001. This was to avoid intersections with her if she started inside a piece of vegetation.
Next up I want to load in the ground geometry. This is a little simpler, I added a LOP Import targeting the ground primitive, used a Unpack USD To Polygons node to unpack it, and finally added a Poly Reduce to lower to poly count significantly as the mesh was pretty heavy.
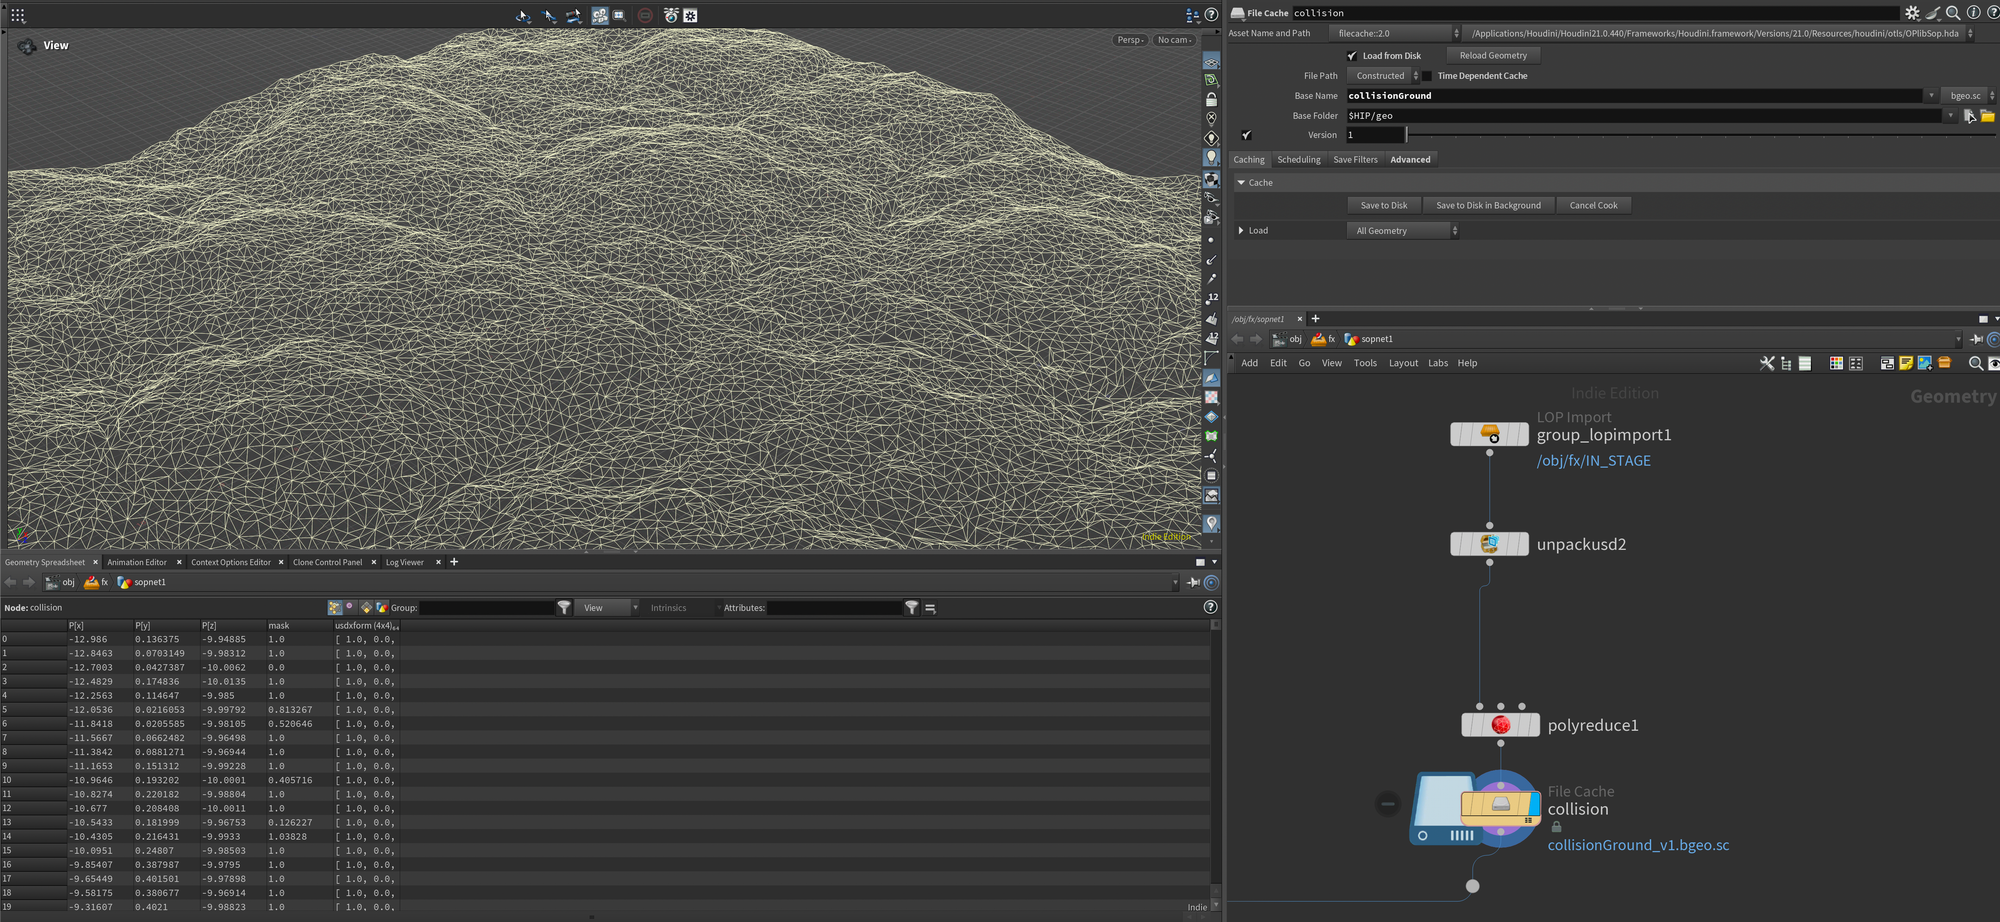
To finish off I merged the two collision elements (ground and character) and cached them to disk using a File Cache node.
Now, moving back to our skeletons, we need to first set up a pin group for the skeleton. The pin group will be used in our vellum simulation to "stick" the roots of the vegetation to the ground so they don't fly everywhere when the character runs into them.
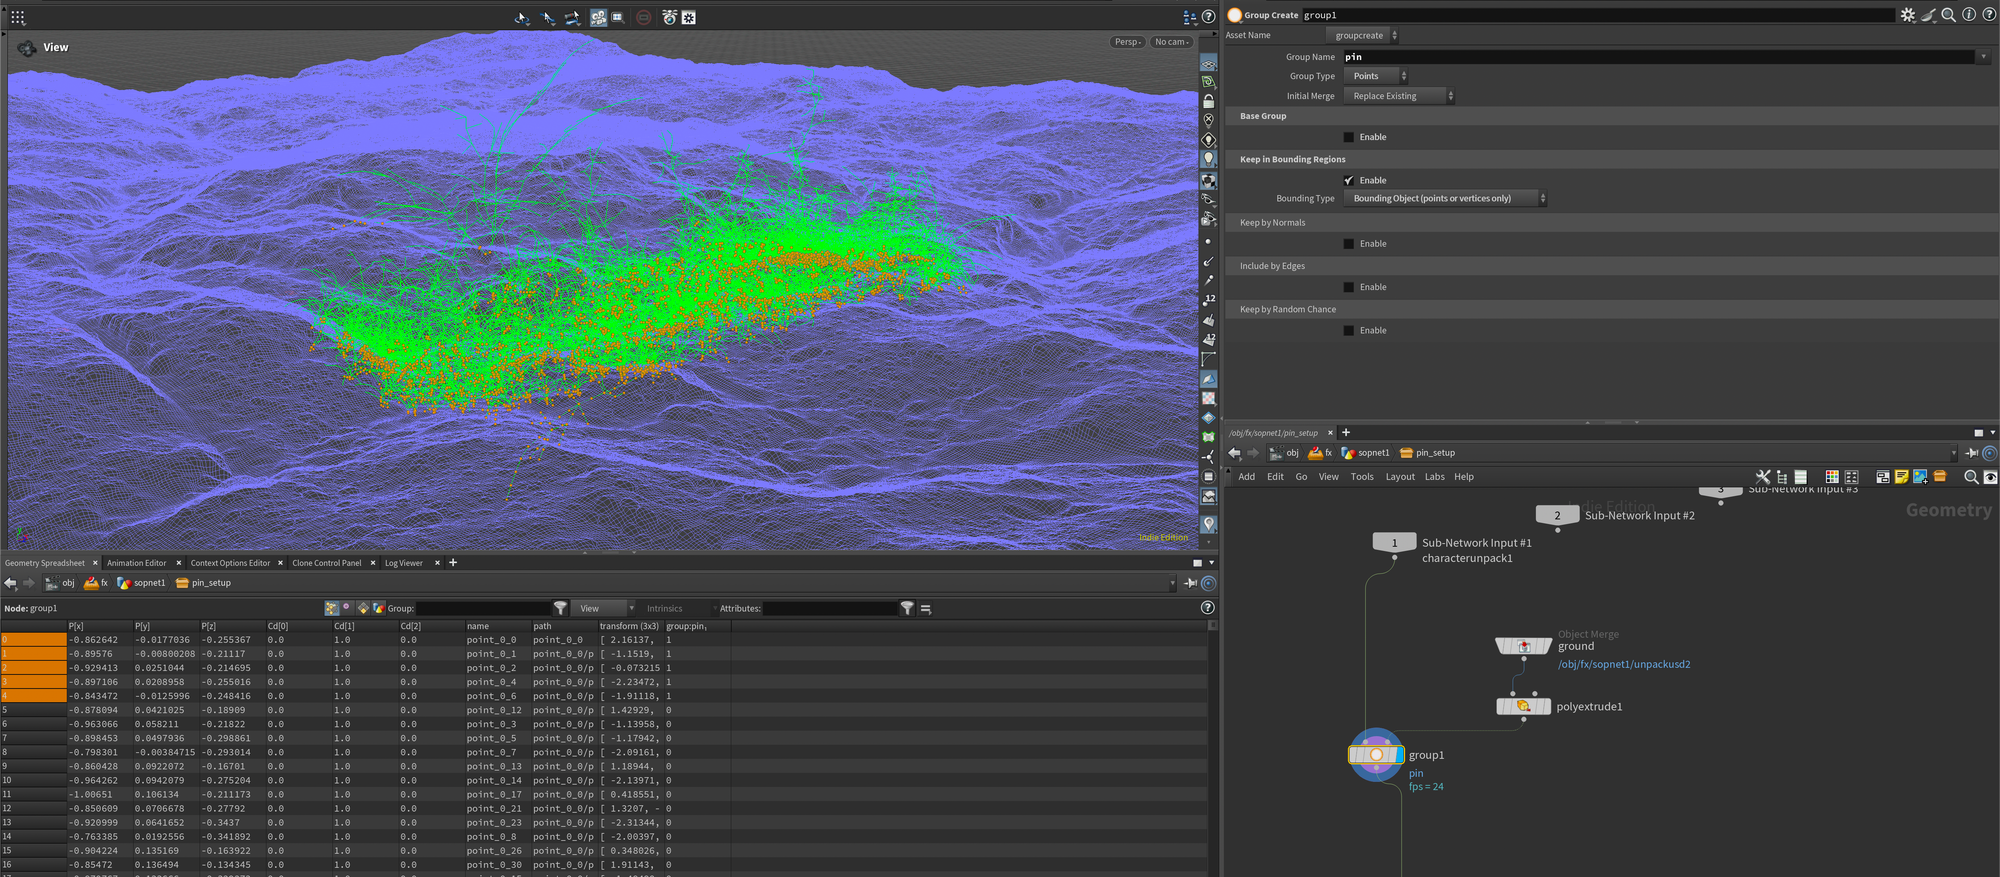
This is a fairly small setup. I first loaded in the ground geometry (from our collision - the full res one grabbed directly from the Unpack USD to Polygons ) and extruded it by 0.02. I used this as a second input for a Group Create node set to name pin, type points, and Bounding Type Bounding Object. This creates a simple pin group of all the points "inside" the ground. I extruded it a bit simply to contain some extra points as not all vegetation was deep inside the ground with the original height.
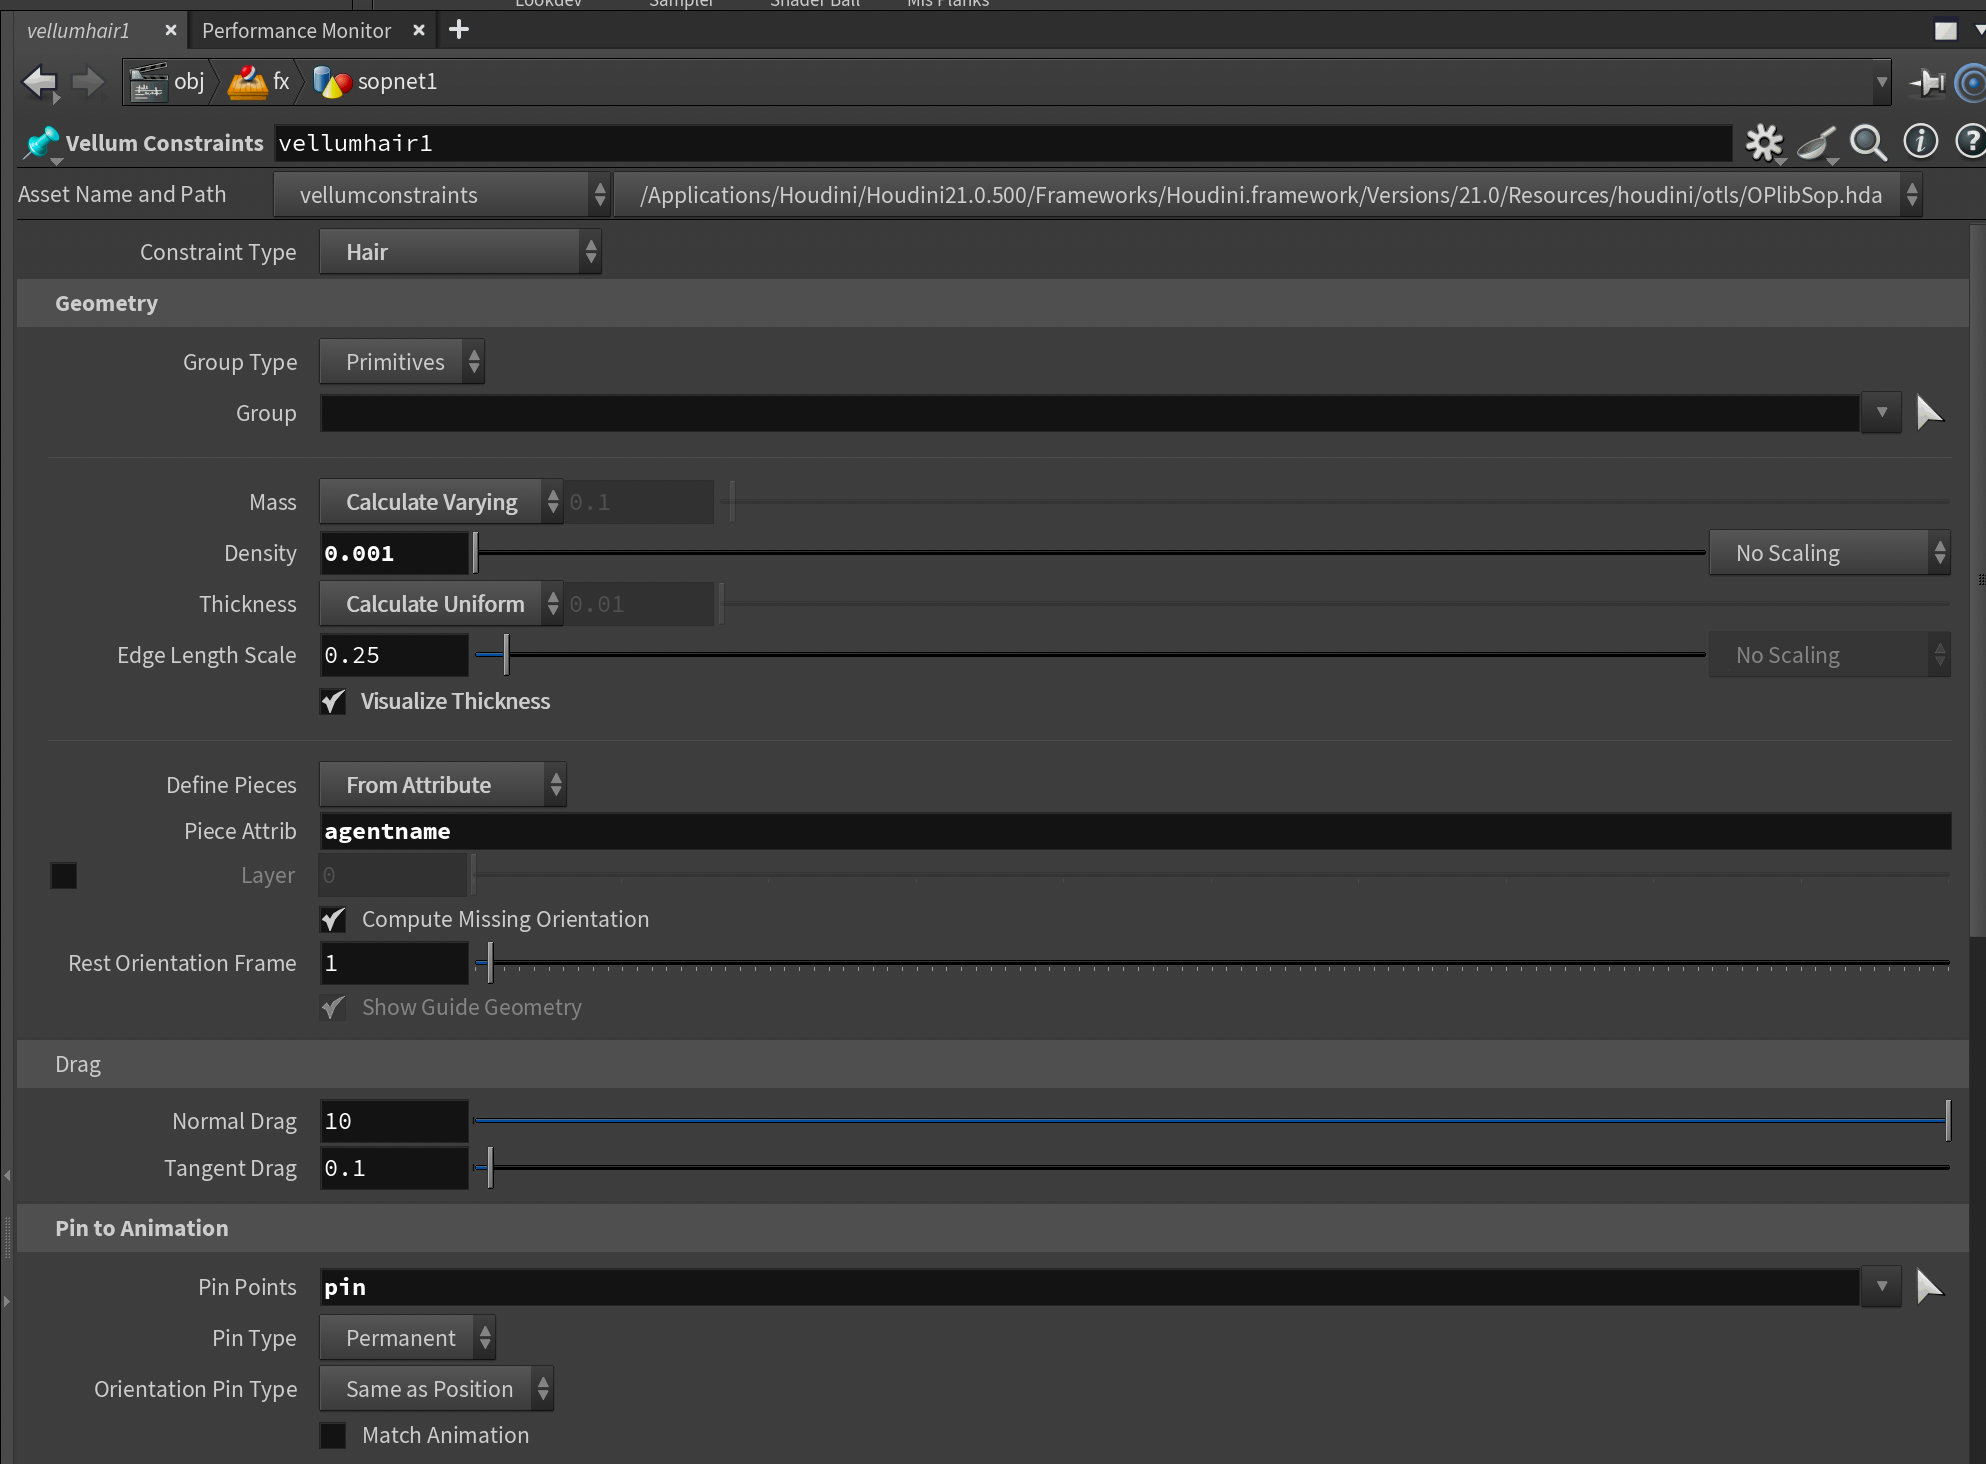
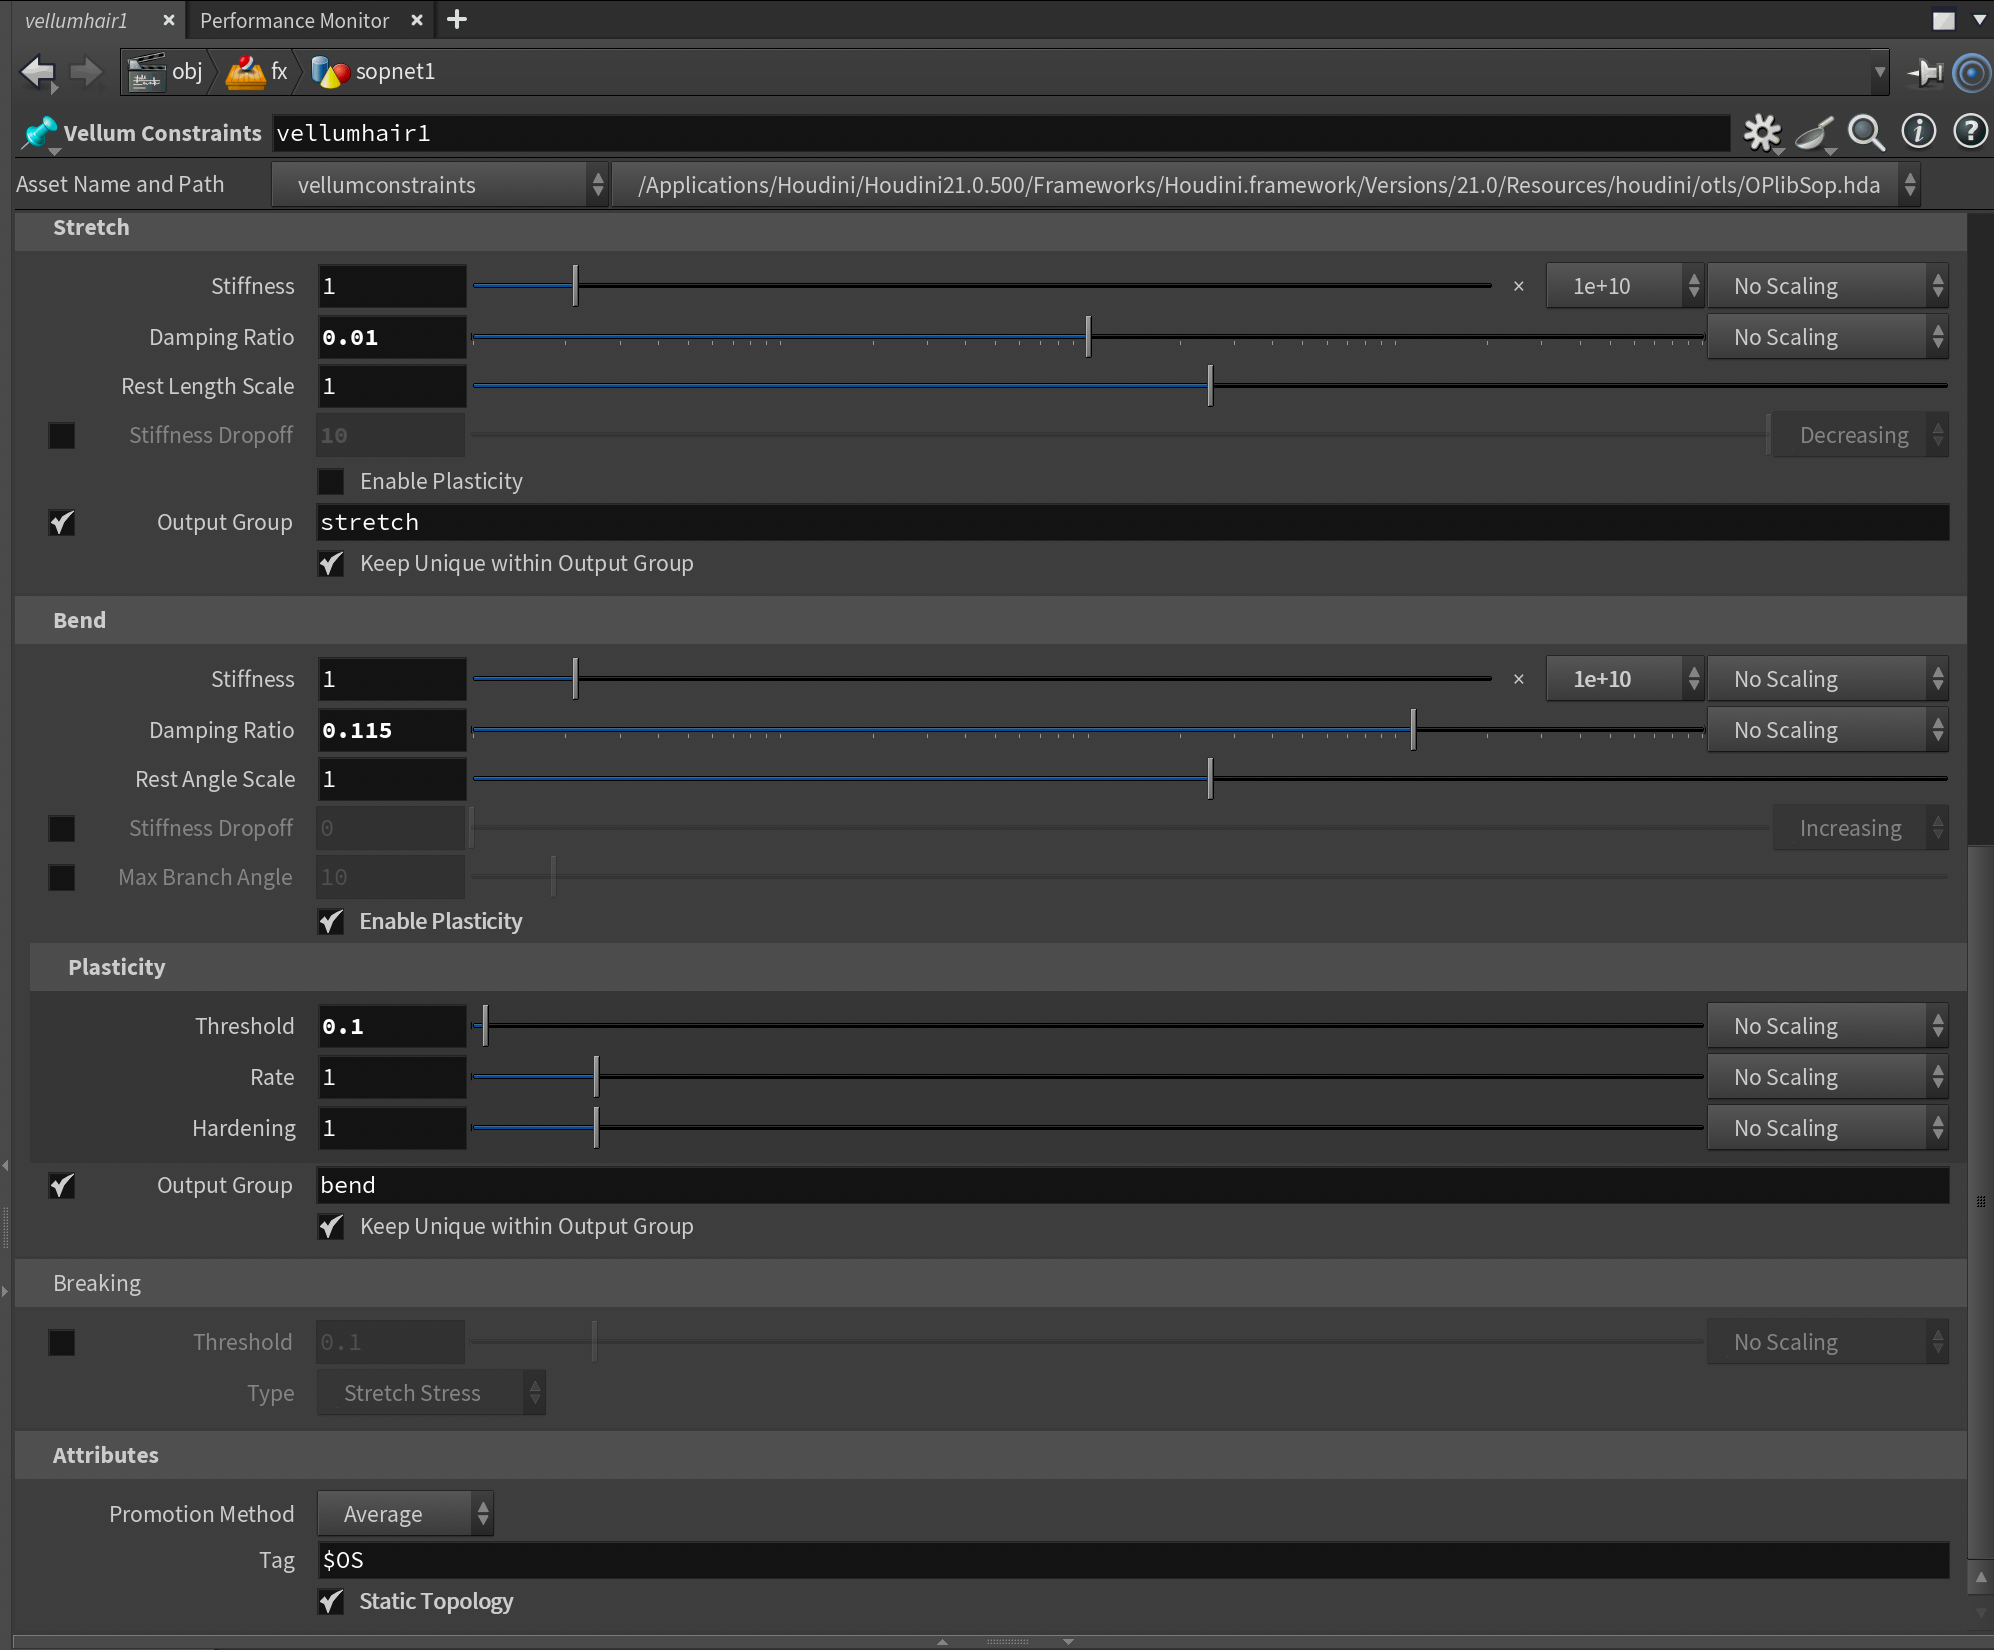
Next we need to setup our Vellum constraints. For this we want to start off using the Vellum Configure Hair preset since this Vellum constraint type updates the joint orientations, which we'll need to get proper rig deformation.
Now, finding the right settings for this takes some trial and error (at least it did for me), as it depends a lot on geometry resolution and scene scale. I'll share the settings I used in the Vellum Constraint node below, but keep in mind your milage may wary.
The only really important parameters is setting the Define Pieces to From Attribute and the Pin Points parameter to pin (our pin group).
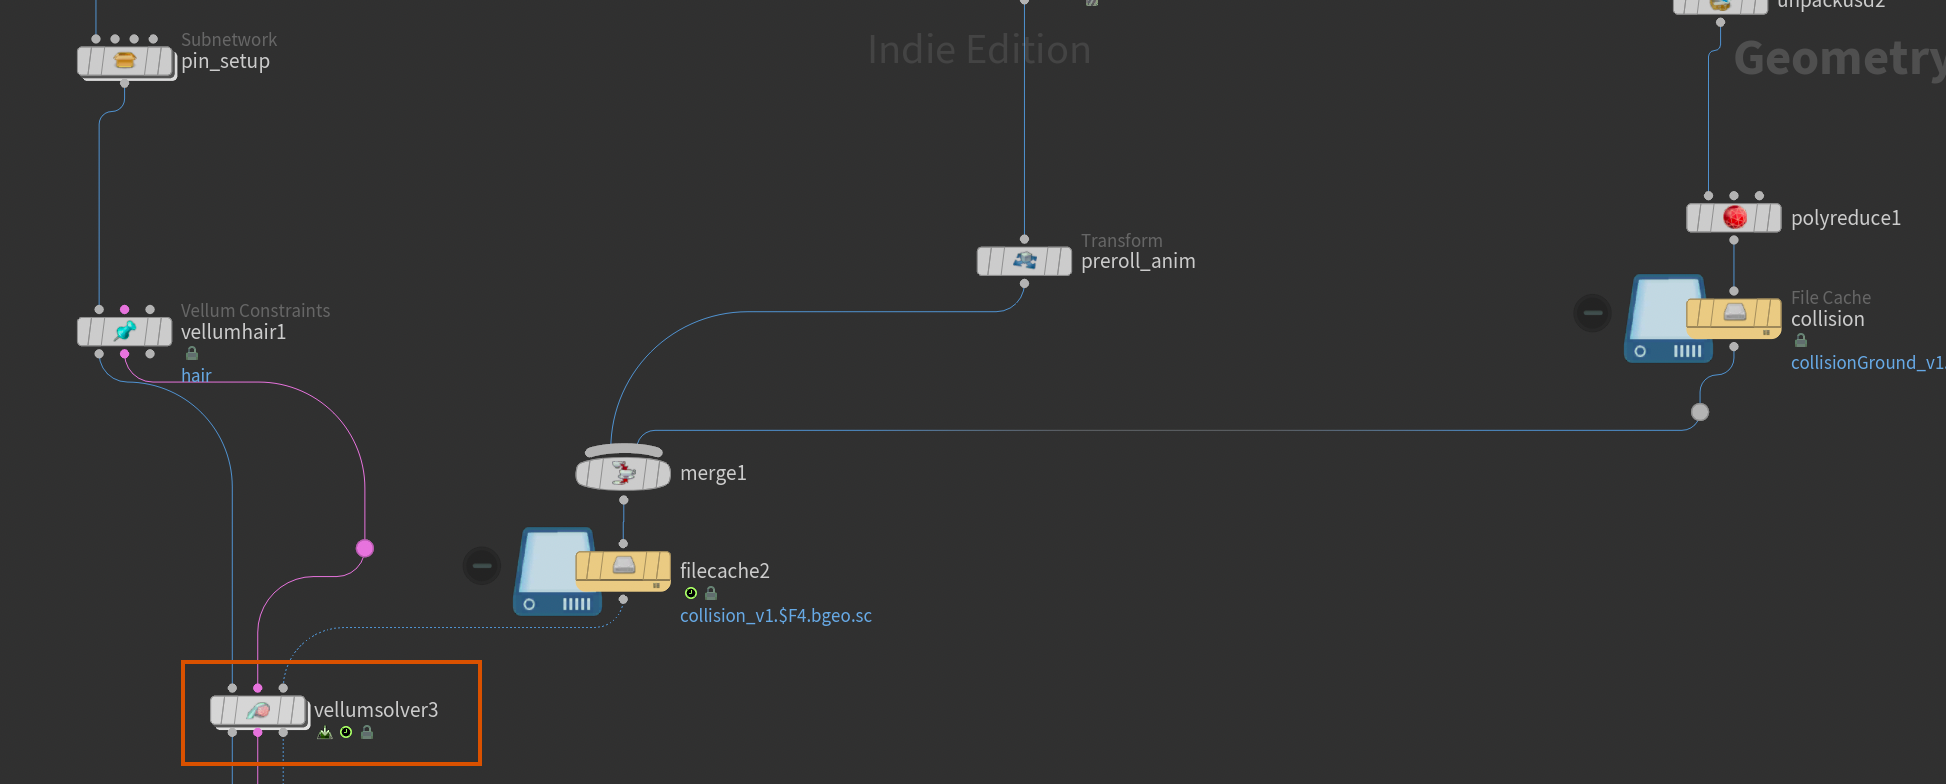
After this we need to plug the result of the Vellum Constraint into a Vellum Solver node. We need to wire both the first and second output into the first and second input of the Vellum Solver. I also plugged in the collisions we generated earlier into the third input.
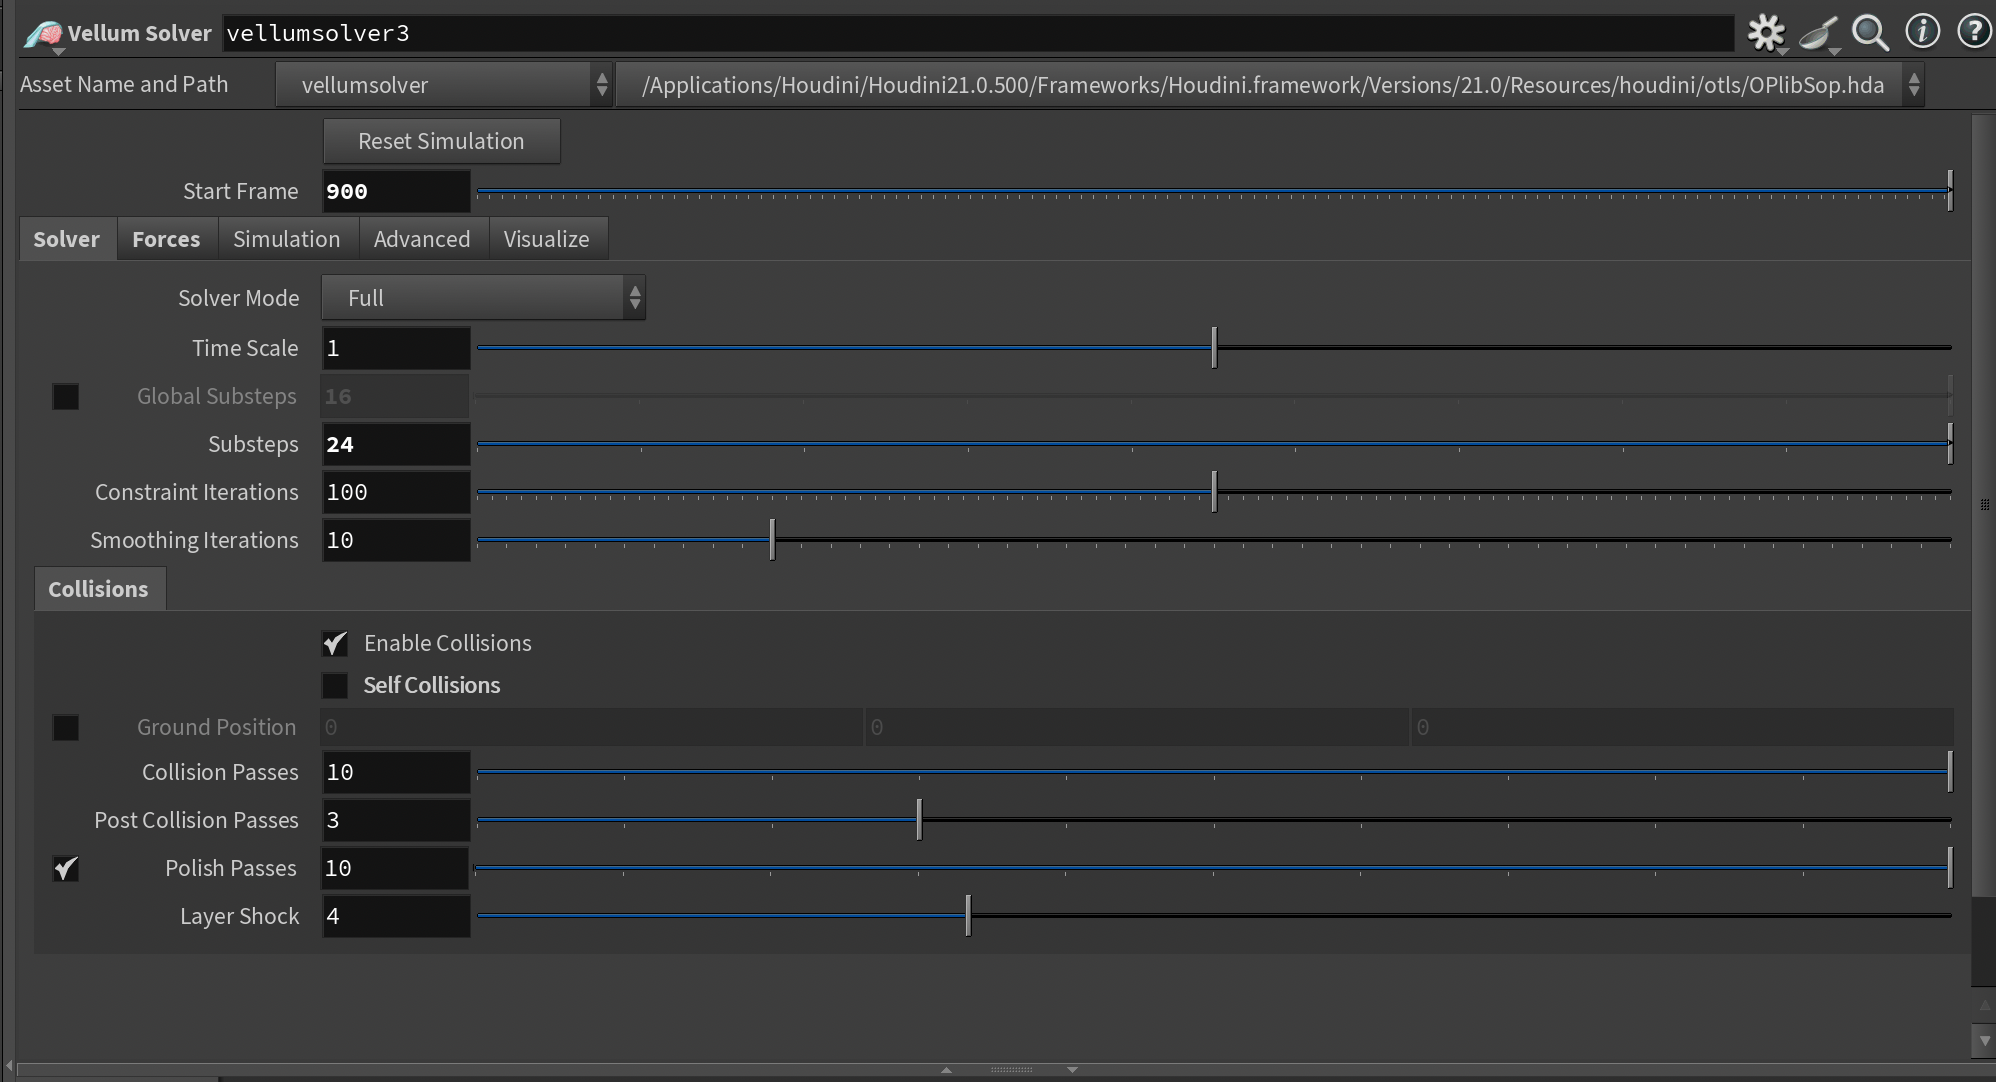
Now, regarding solver parameters I didn't actually modify much. Under the Solver tab I changed Substeps to 24 (you may need more depending on your input skeletons), and disabled Self Collisions. Depending on how close you get, you may benefit from self-collisions, but in my scene, I found it unnecessary.
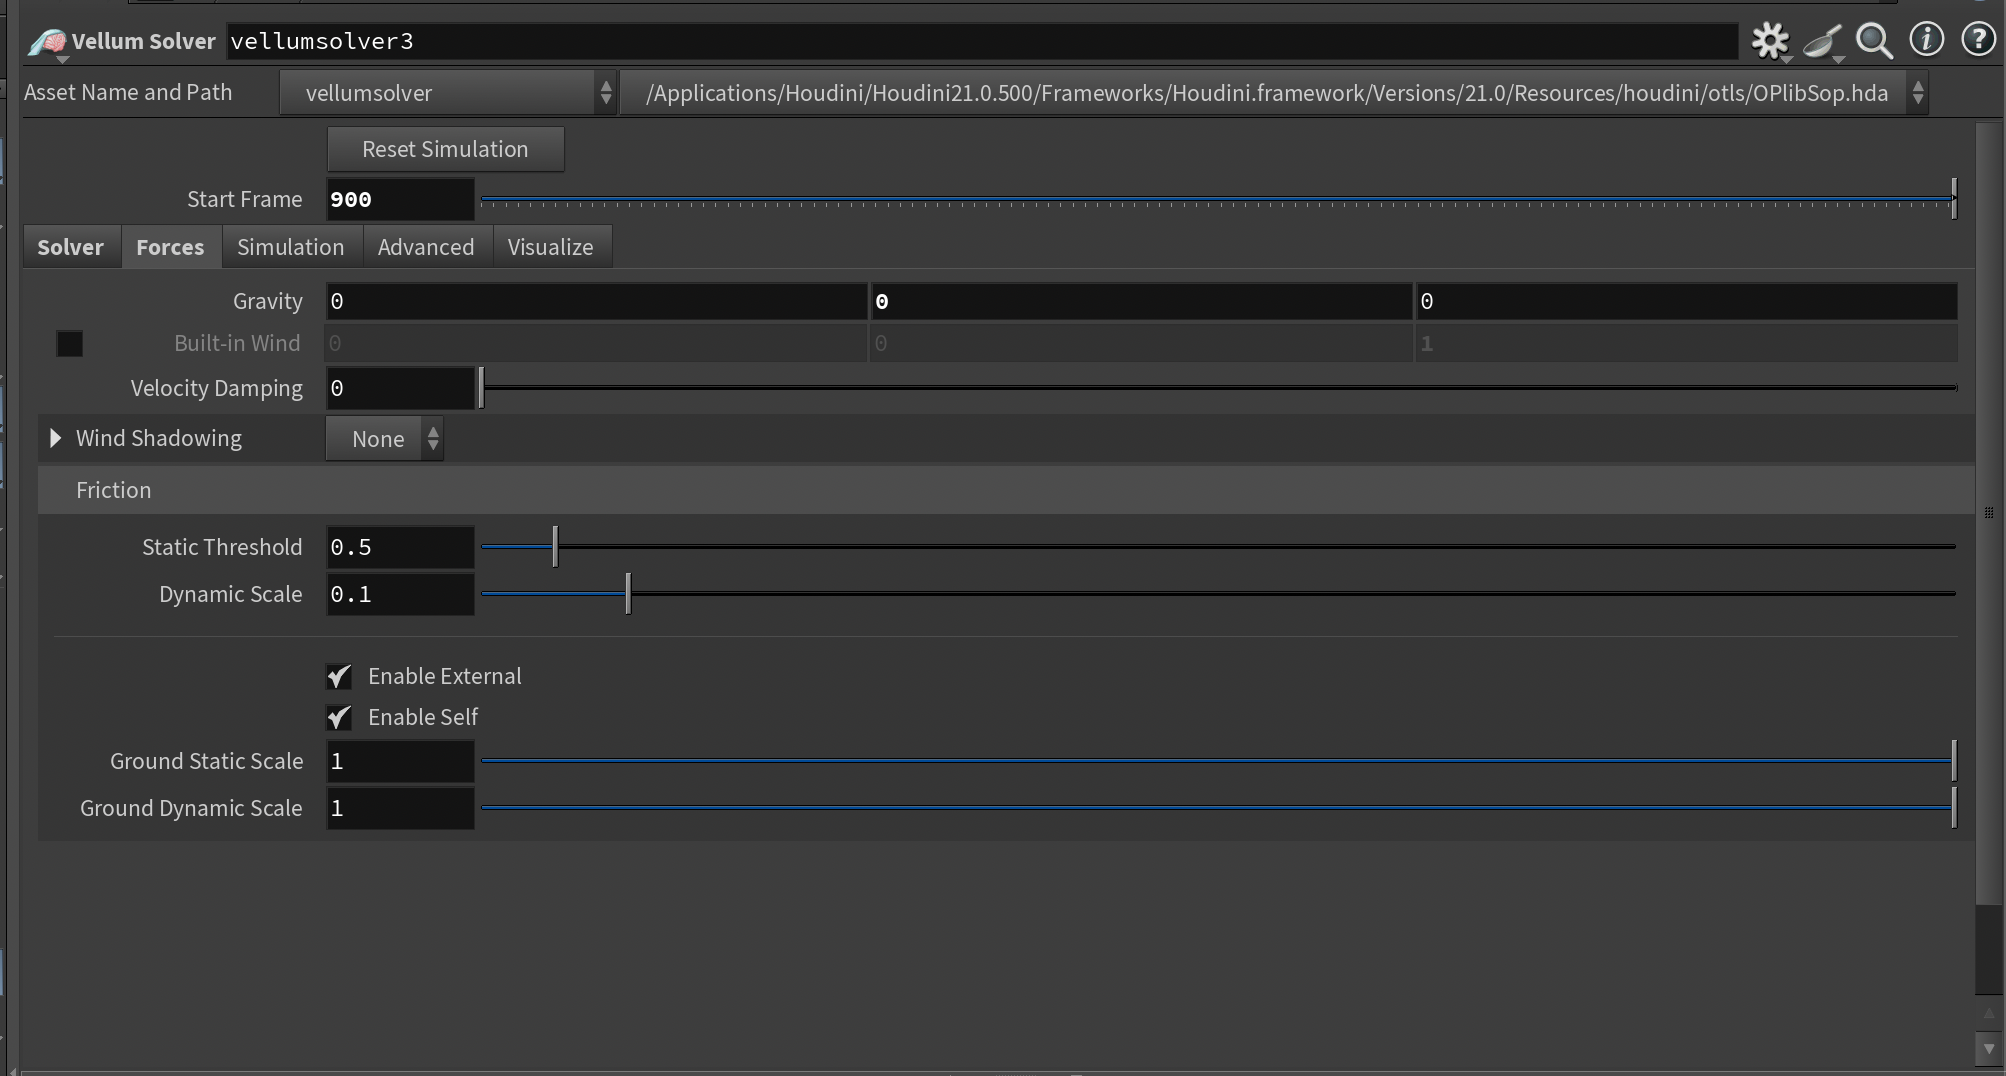
Under Forces, I also set the Gravity to 0 so none of the vegetation would start drooping. You could also adjust the vellum constraints further to avoid this, I'm sure, but I found this setup to be the easiest in my case.
Finally, I set the Start Frame to 900, just to give the vegetation some time to settle before our start frame 1001. In the end, I could probably go with less preroll - but 100 frames worked very well in my case.
Now, right out of the box we'll run into some issues with the output from our Vellum Solver - you'll notice that the point count changes as we apply a vellum constraint to our geometry. This is because Vellum will split the skeleton connections - something it needs to do to perform the Vellum simulations. Luckily it will store which points need to be welded back together using the weld and branchweld attributes.
We can then easily weld the points back together using a Vellum Post-Process node after our Vellum Solver by checking the Apply Welds toggle. By doing this, we have restored the Geometry of our original skeleton, while maintaining any motion simulated by Vellum.
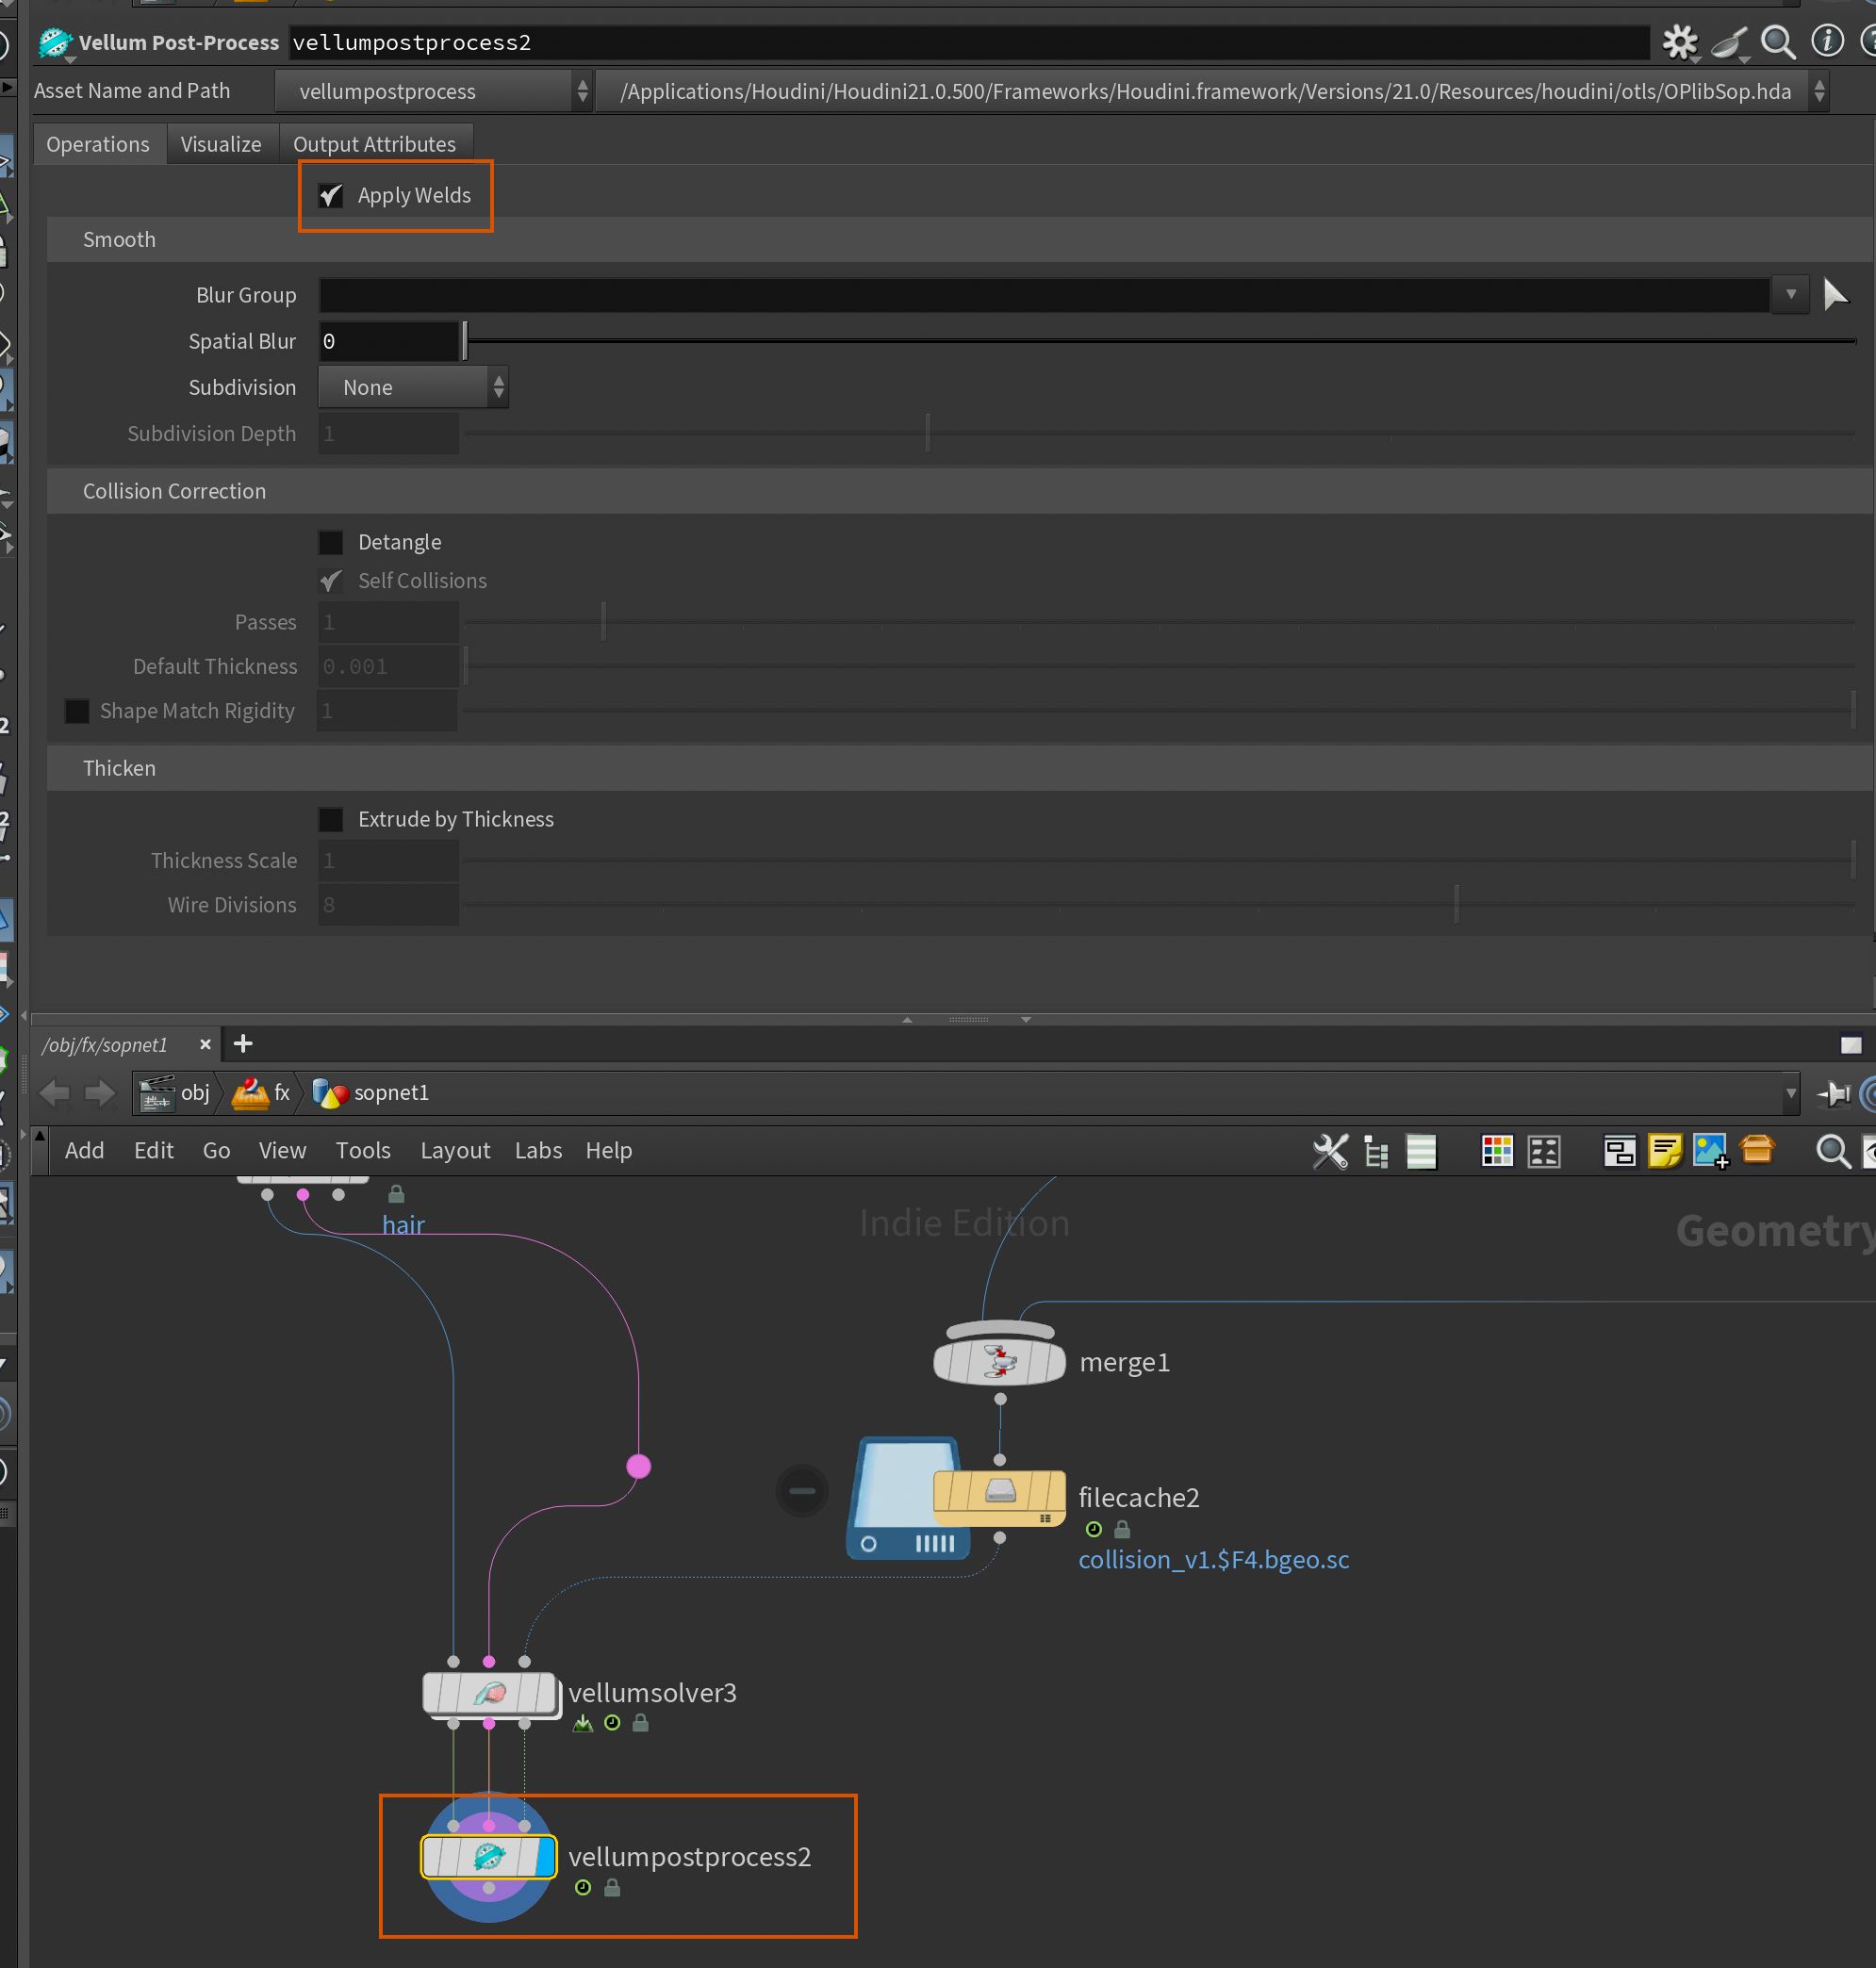
You can also do other fancy operations in the Vellum Post-Process, but in our case we'll stick to just doing the welding.
After the Vellum Post-Process I added a File Cache node and proceeded to cache the simulation.
Attaching Vellum Simulation to Agents
Attaching our simulation to Agents in SOPs and importing them in LOPs.
With our simulation cached we are ready to start attaching the animated skeleton to our vegetation Agents and transfer that animation back into LOPs.
In order to do this we need to generate an Agent based on our input geometry and skeleton, then apply the animated skeleton to that agent, and finally add the appropriate usdpathattribute so Solaris knows where to put our agents in the hierarchy (and making sure they only override the SkelAnimation primitive.
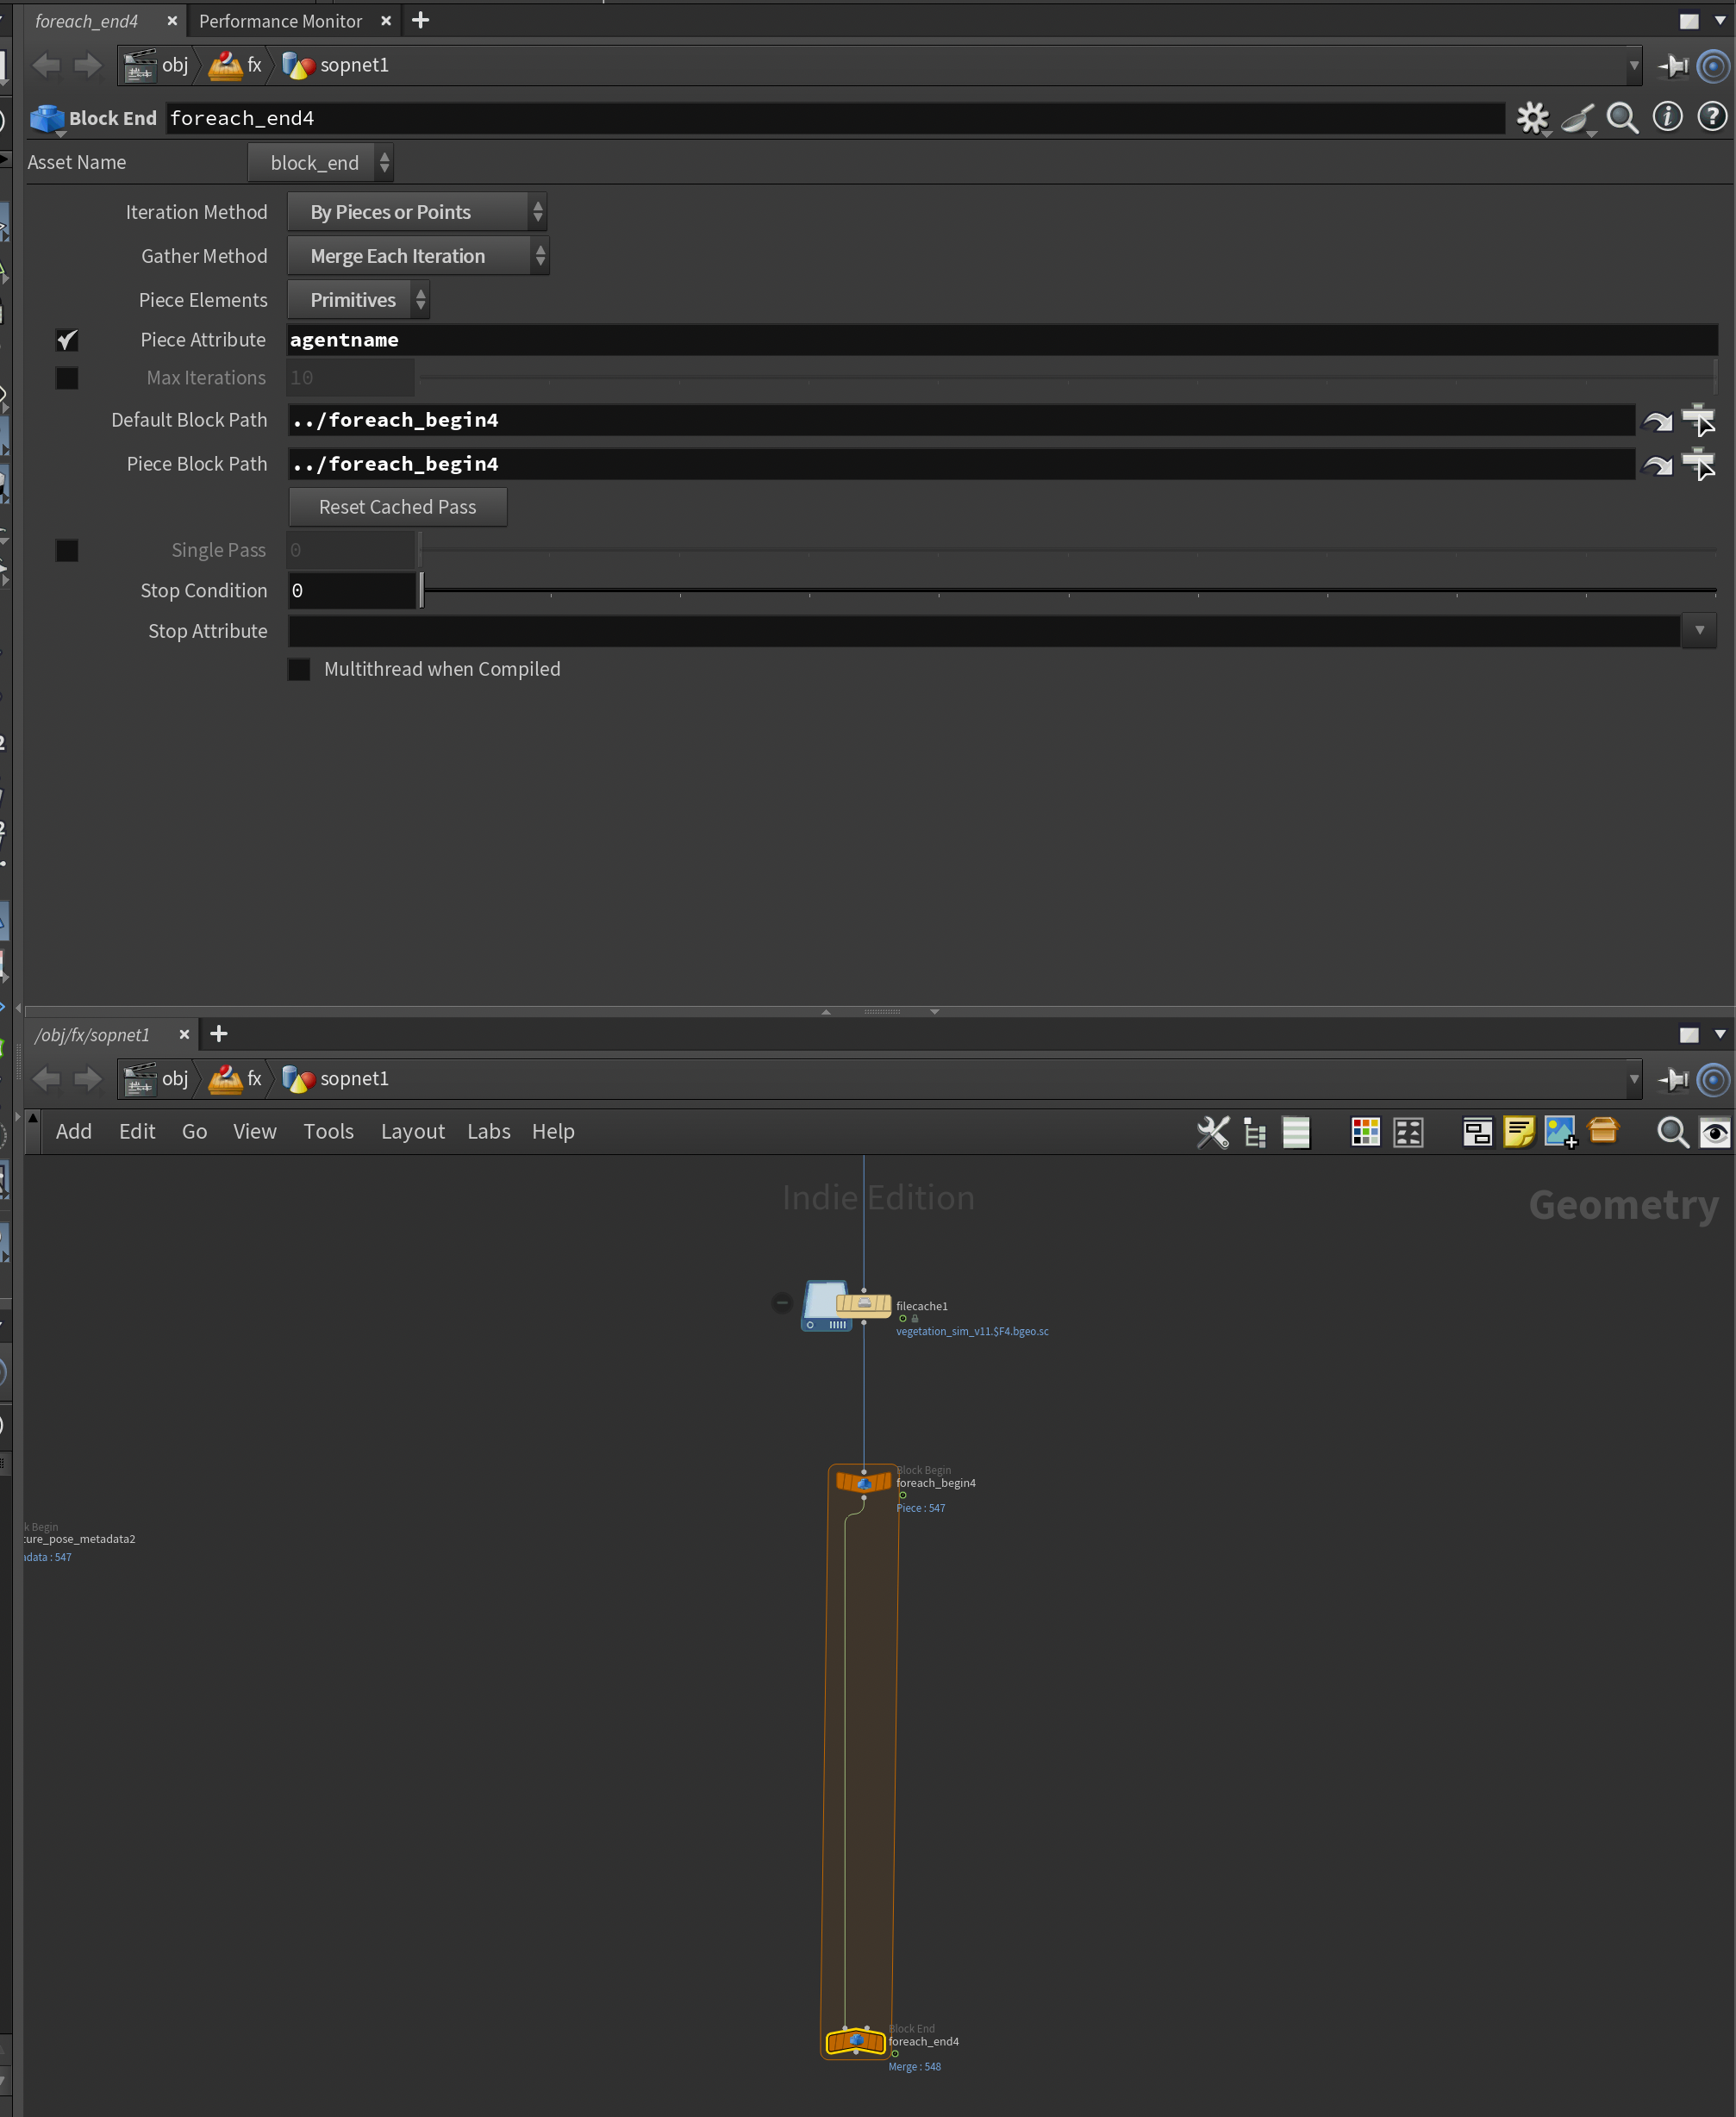
Let's start with the SOP part. To start, we will need a For Each loop since we need to apply a different animation to each vegetation agent.
Create a For-Each Named Primitive connected to our cached simulation and change the Piece Attribute to agentname. This will cause the For-Each loop to run over each agent in our vegetation layout (we created a unique agentname for each vegetation element earlier in the article when we imported the vegetation from LOPs).
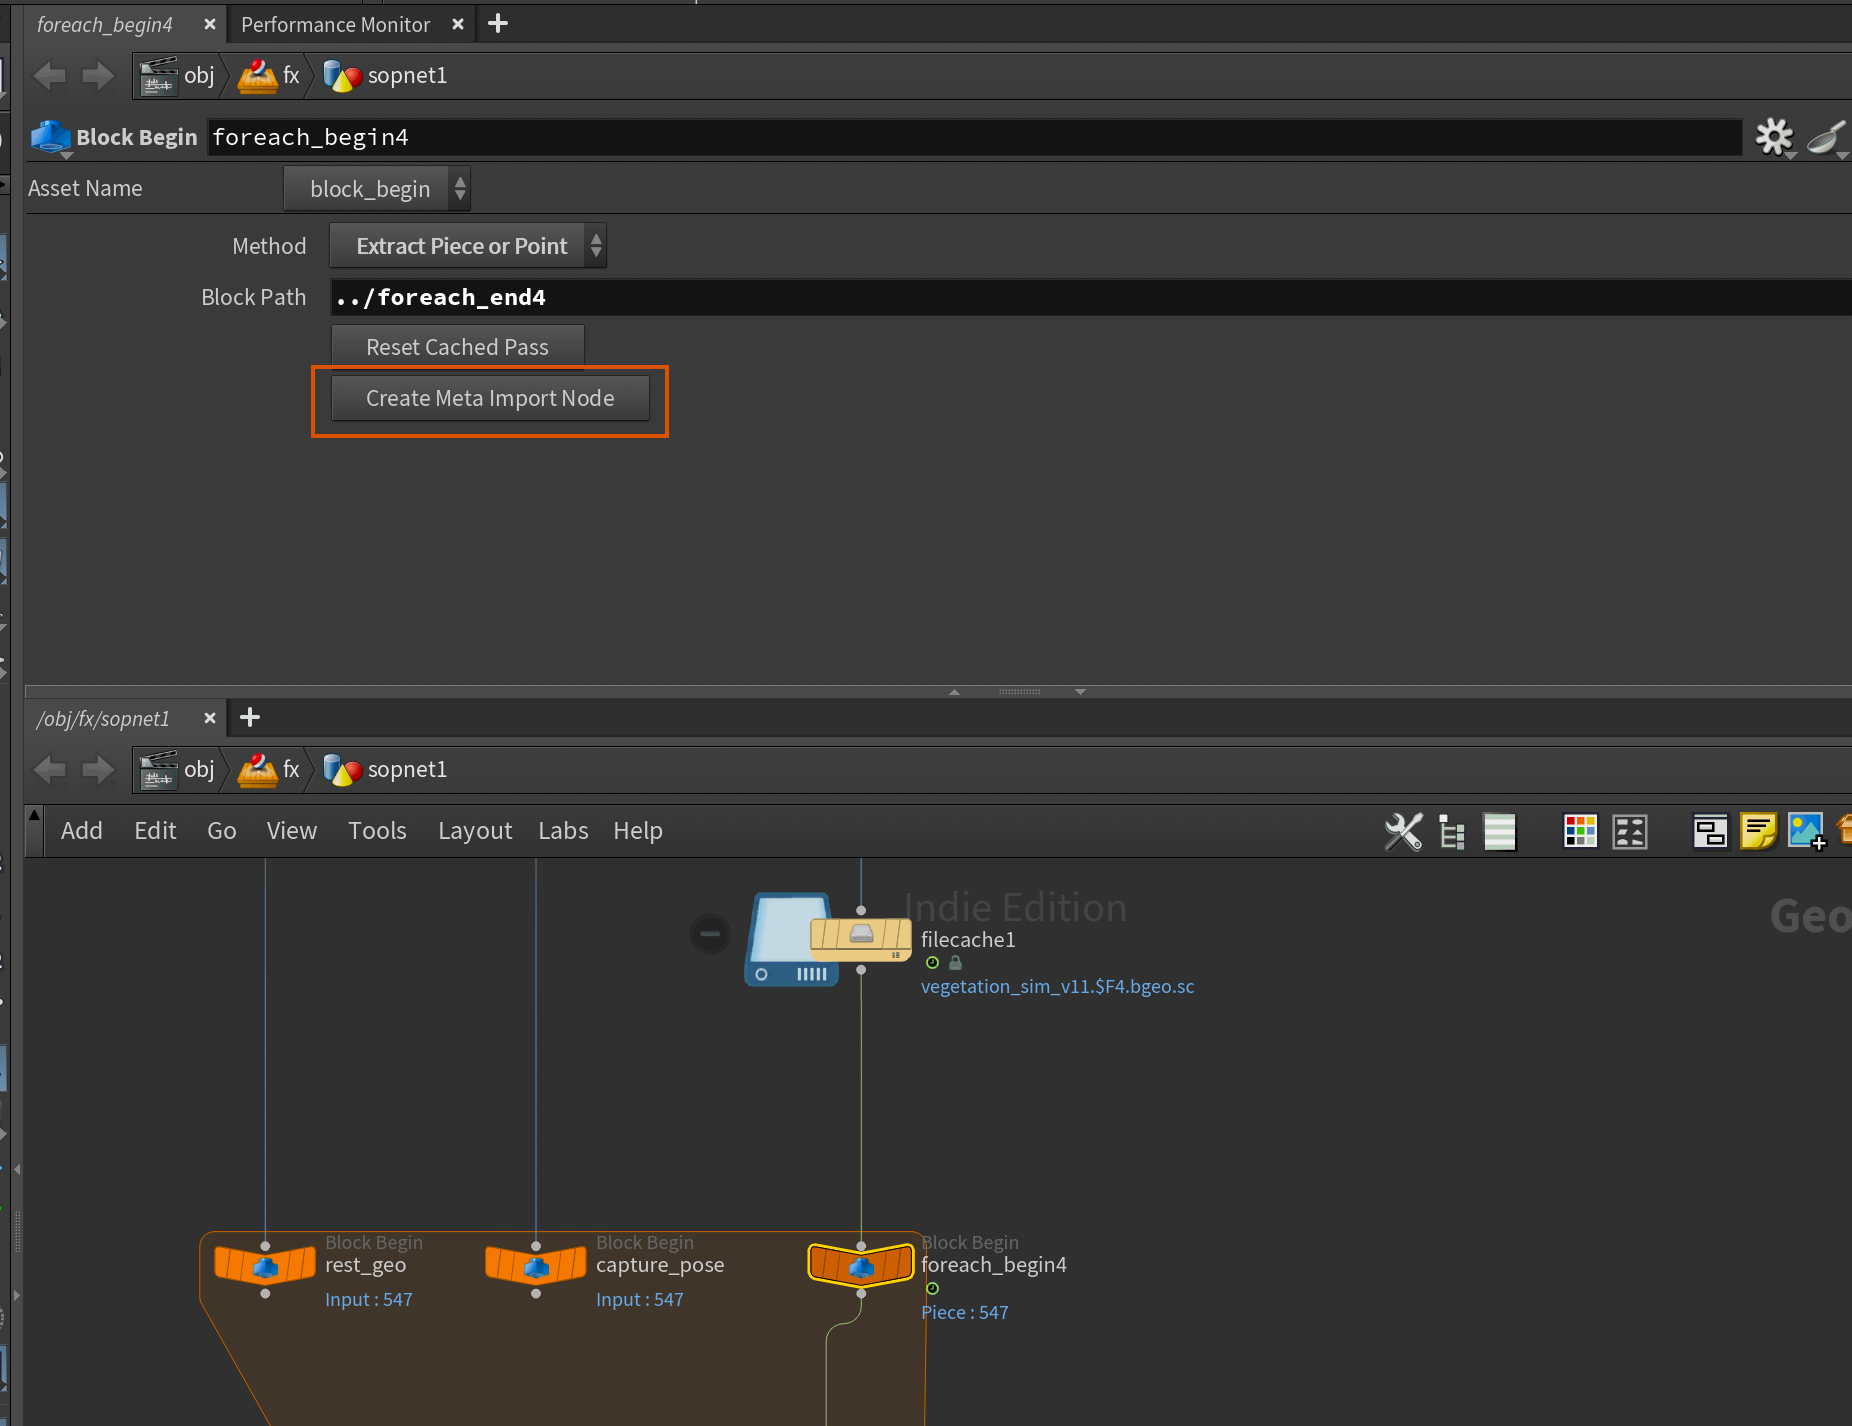
Now, we also need 2 more Block Begin nodes set to Fetch Input . We need this in order to fetch the rest geometry and pose for each vegetation agent. I've named them accordingly in my scene and connected them to the respective outputs from the Character Unpack node earlier in the graph. See screenshot below. We also need to plugin the path to the For-Each End node. In my case it's called foreach_end4. You'll know it worked if you get an orange border around your new Block Begin nodes.
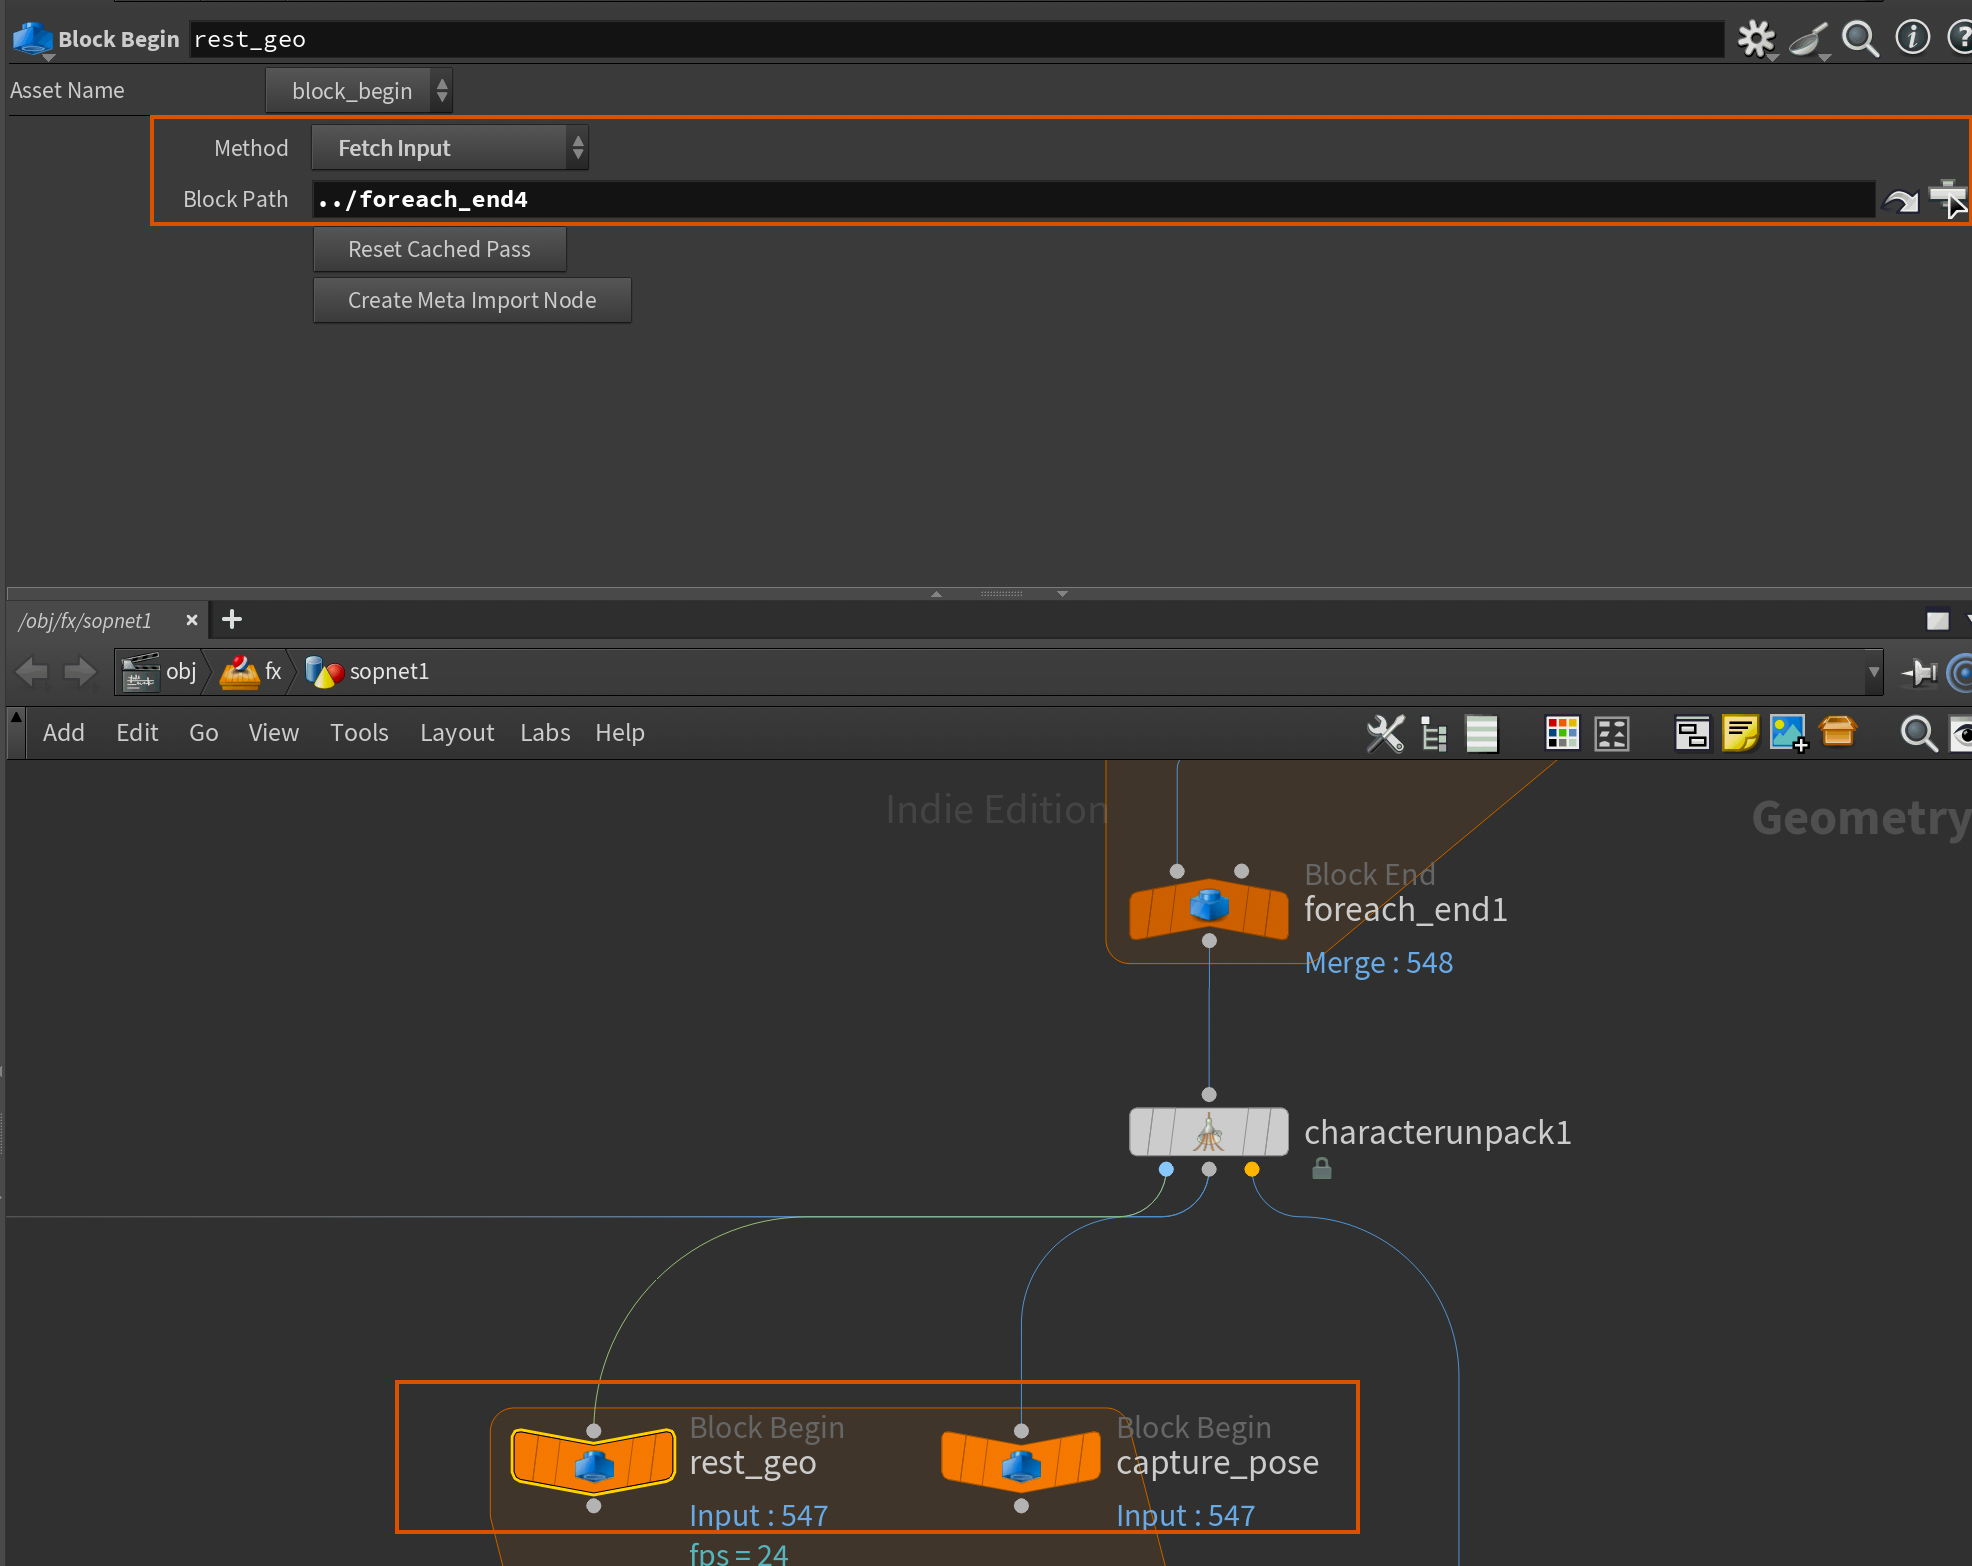
At the moment these nodes will simply grab every single capture pose and rest geo, but we need to isolate only the ones we need for each iteration. In order to do this we need to create a Meta Import Node. You can do this by selecting the original For-Each Block Begin node and clicking Create Meta Import Node .
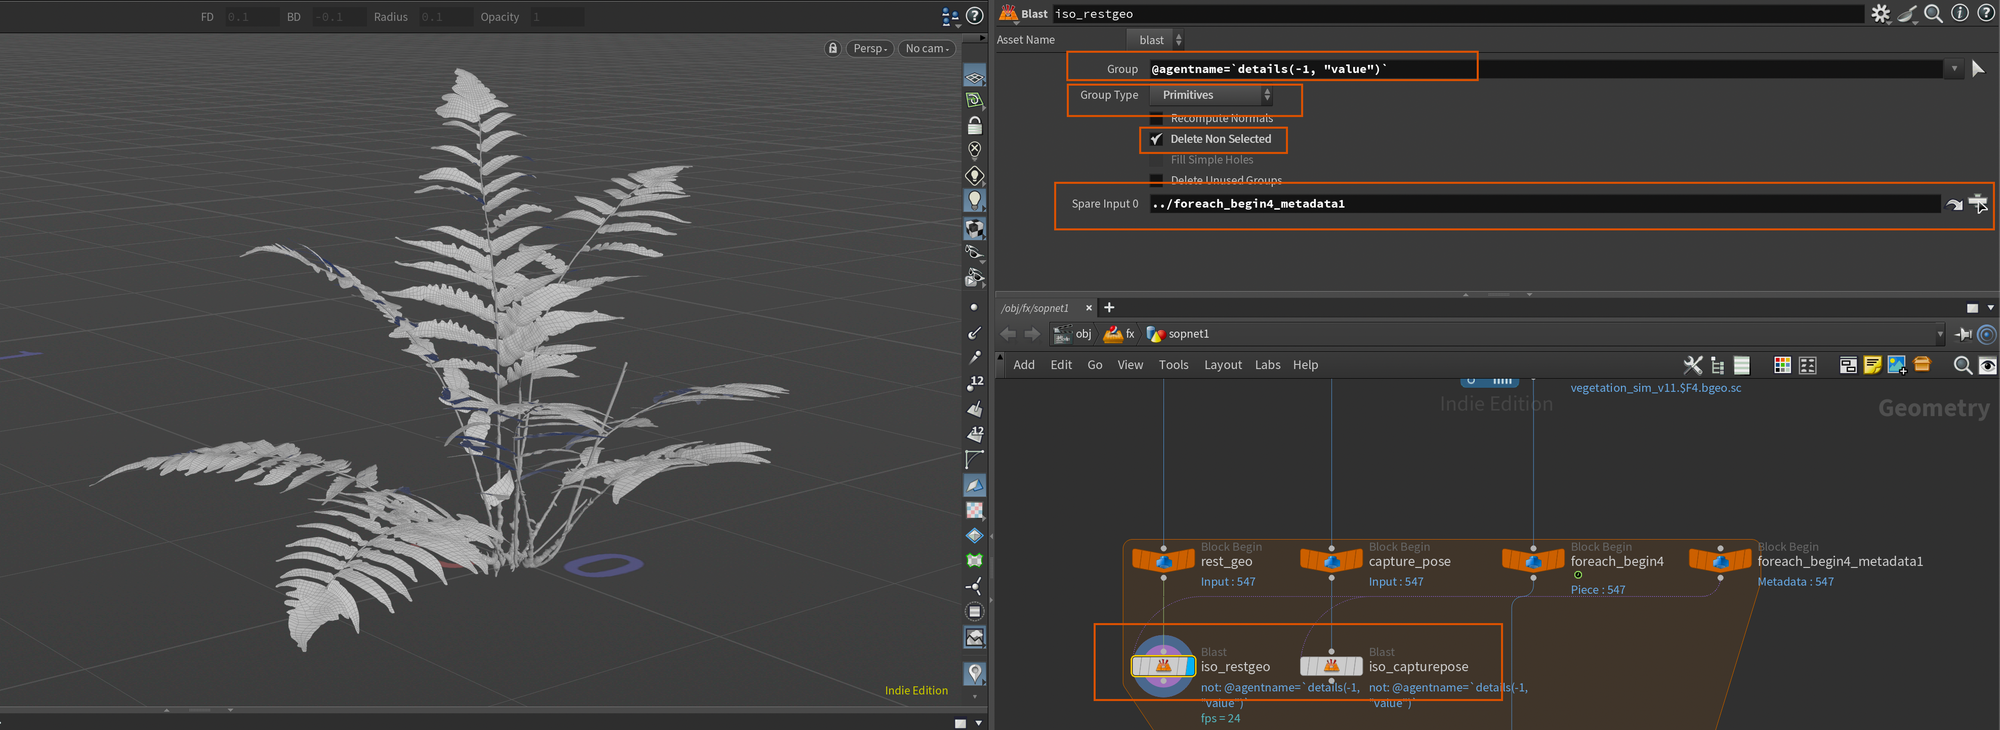
With this node we can grab the current iteration information and use it to isolate the corresponding rest geo and capture pose from our original character data. We can achieve this with 2 Blast nodes with the exact same settings.
Add a Spare Input to each one (click the wheel in the top right and press Create Spare Input) and drag the foreach_begin_metadata node into the Spare Input 0 field. Now you can just set the node to Delete Non Selected, and the group to:
@agentname=`details(-1, "value")`And you should successfully be able to isolate only the skeleton and rest geo for the current agent you're iterating on.
Now we need to turn all of this data into agents so we can successfully turn this into UsdSkel Agents in Solaris. We can do this using the Agent From Rig node which will pack all of our character data and turn it into an Agent. This setup is usually reserved for traditional crowds, but this is by far the easiest way to generate USDSkel-ready Agents in SOPs, so we'll use it here too.
I've set the Agent Name to grab the agentname attribute from our input geometry - this way they'll be named the same way as our input vegetation layout elements:
`prims(0, 0, "agentname")`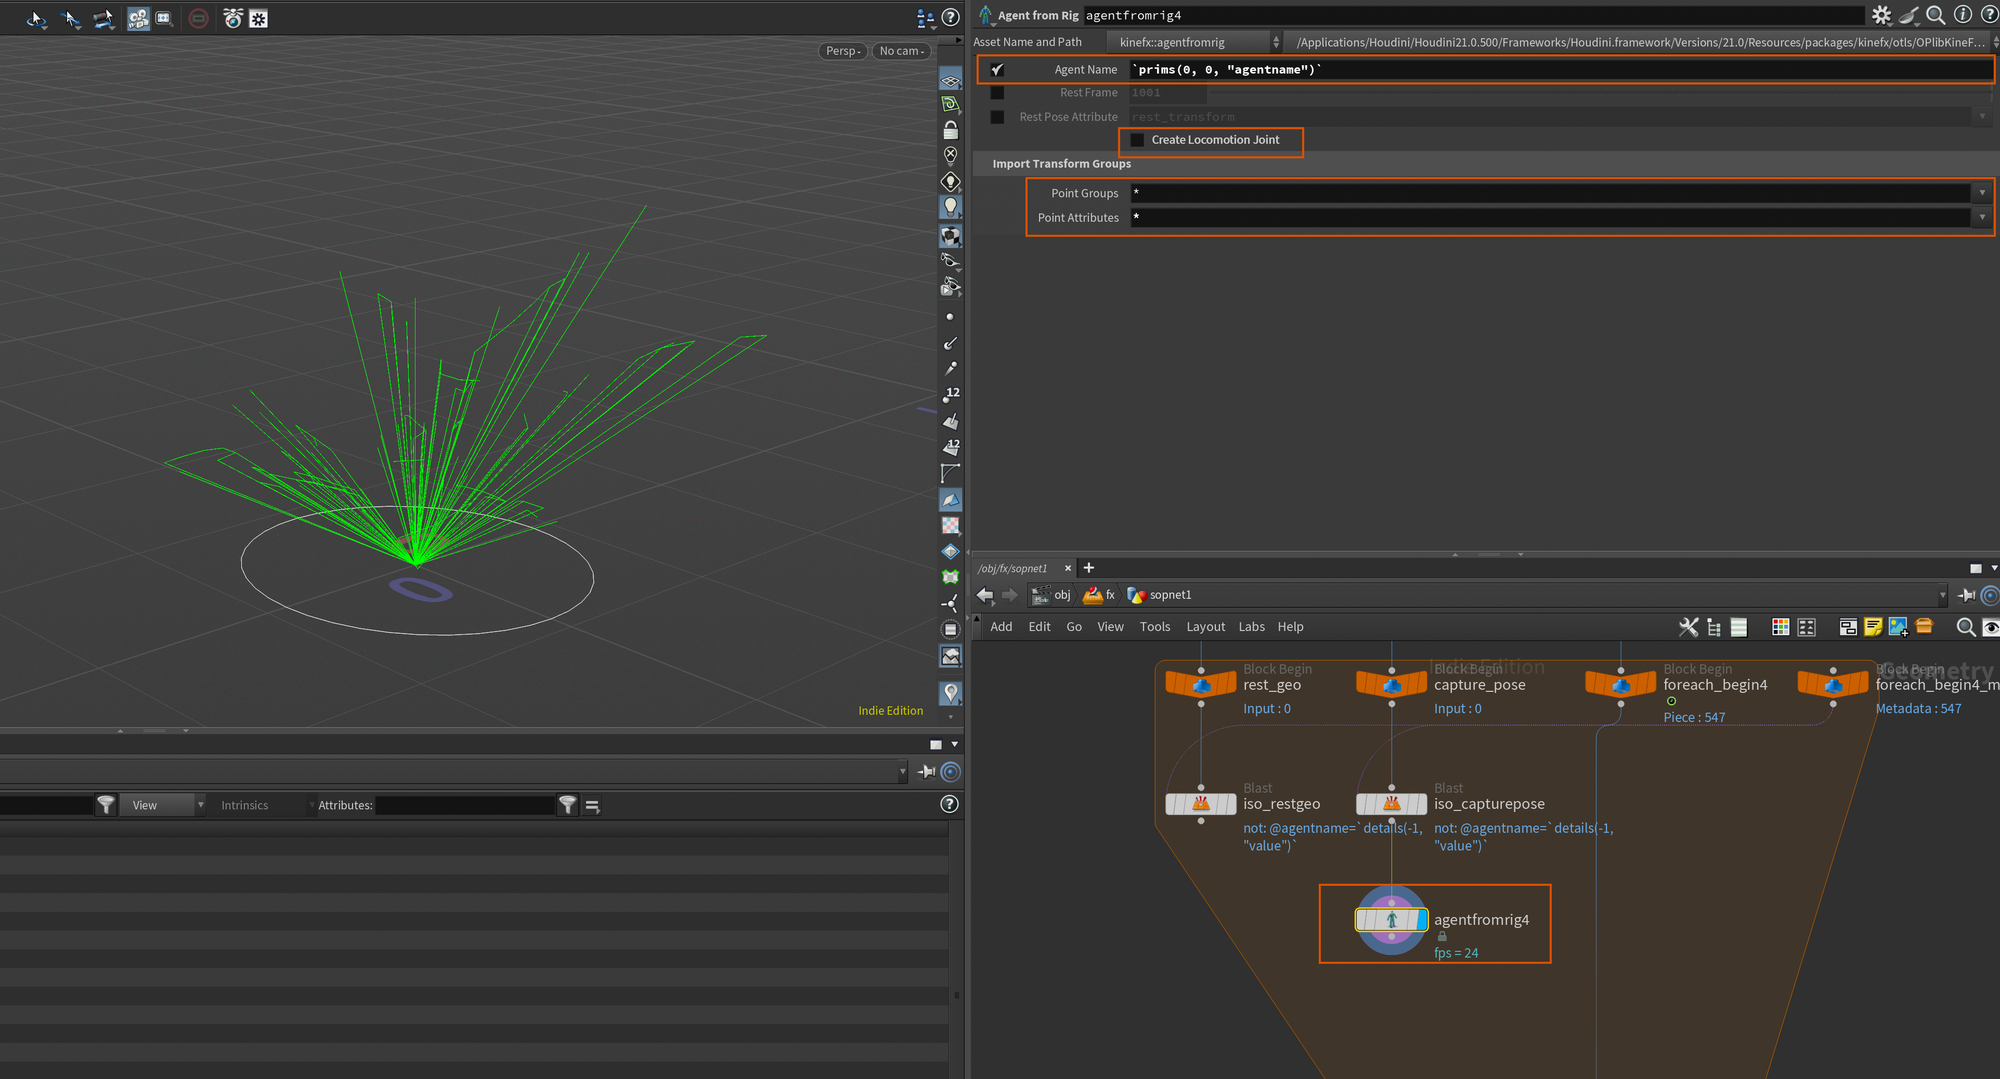
I also set Point Groups and Point Attributes to * so that all of our groups and attributes are transferred, and disabled Locomotion Joint . This is really only used in traditional crowd setups with locomotion. See my other article on crowds for more information:
As of writing it works in the latest daily build (for me that's 21.0.500), so please use that.
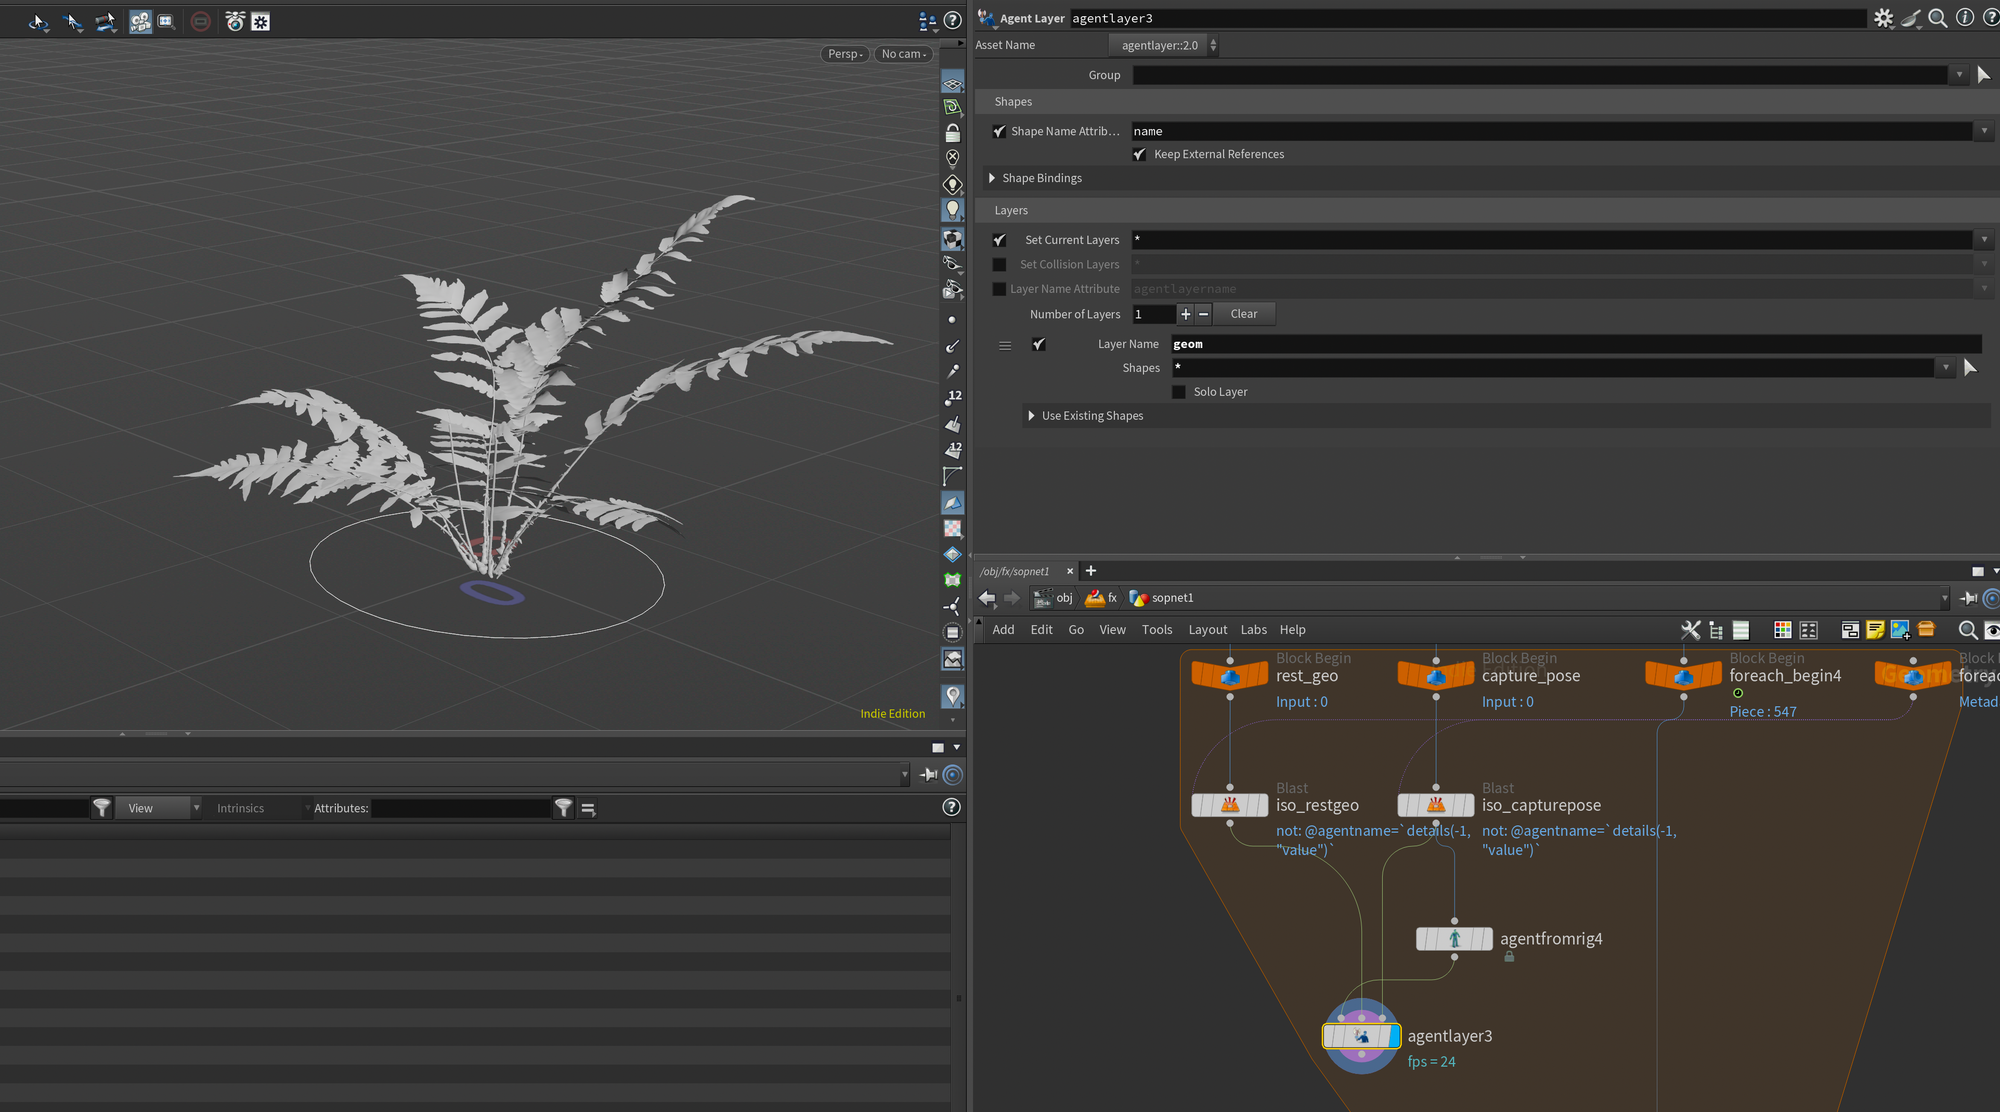
Next, we need to attach our geometry to the agent as it currently only contains our skeleton. To do this we use an Agent Layer node set up like below. I just opted for calling the layer geom but you can call it whatever you like. First input should be the agent (Agent From Rig), second the rest geo, and third the capture pose (skeleton).
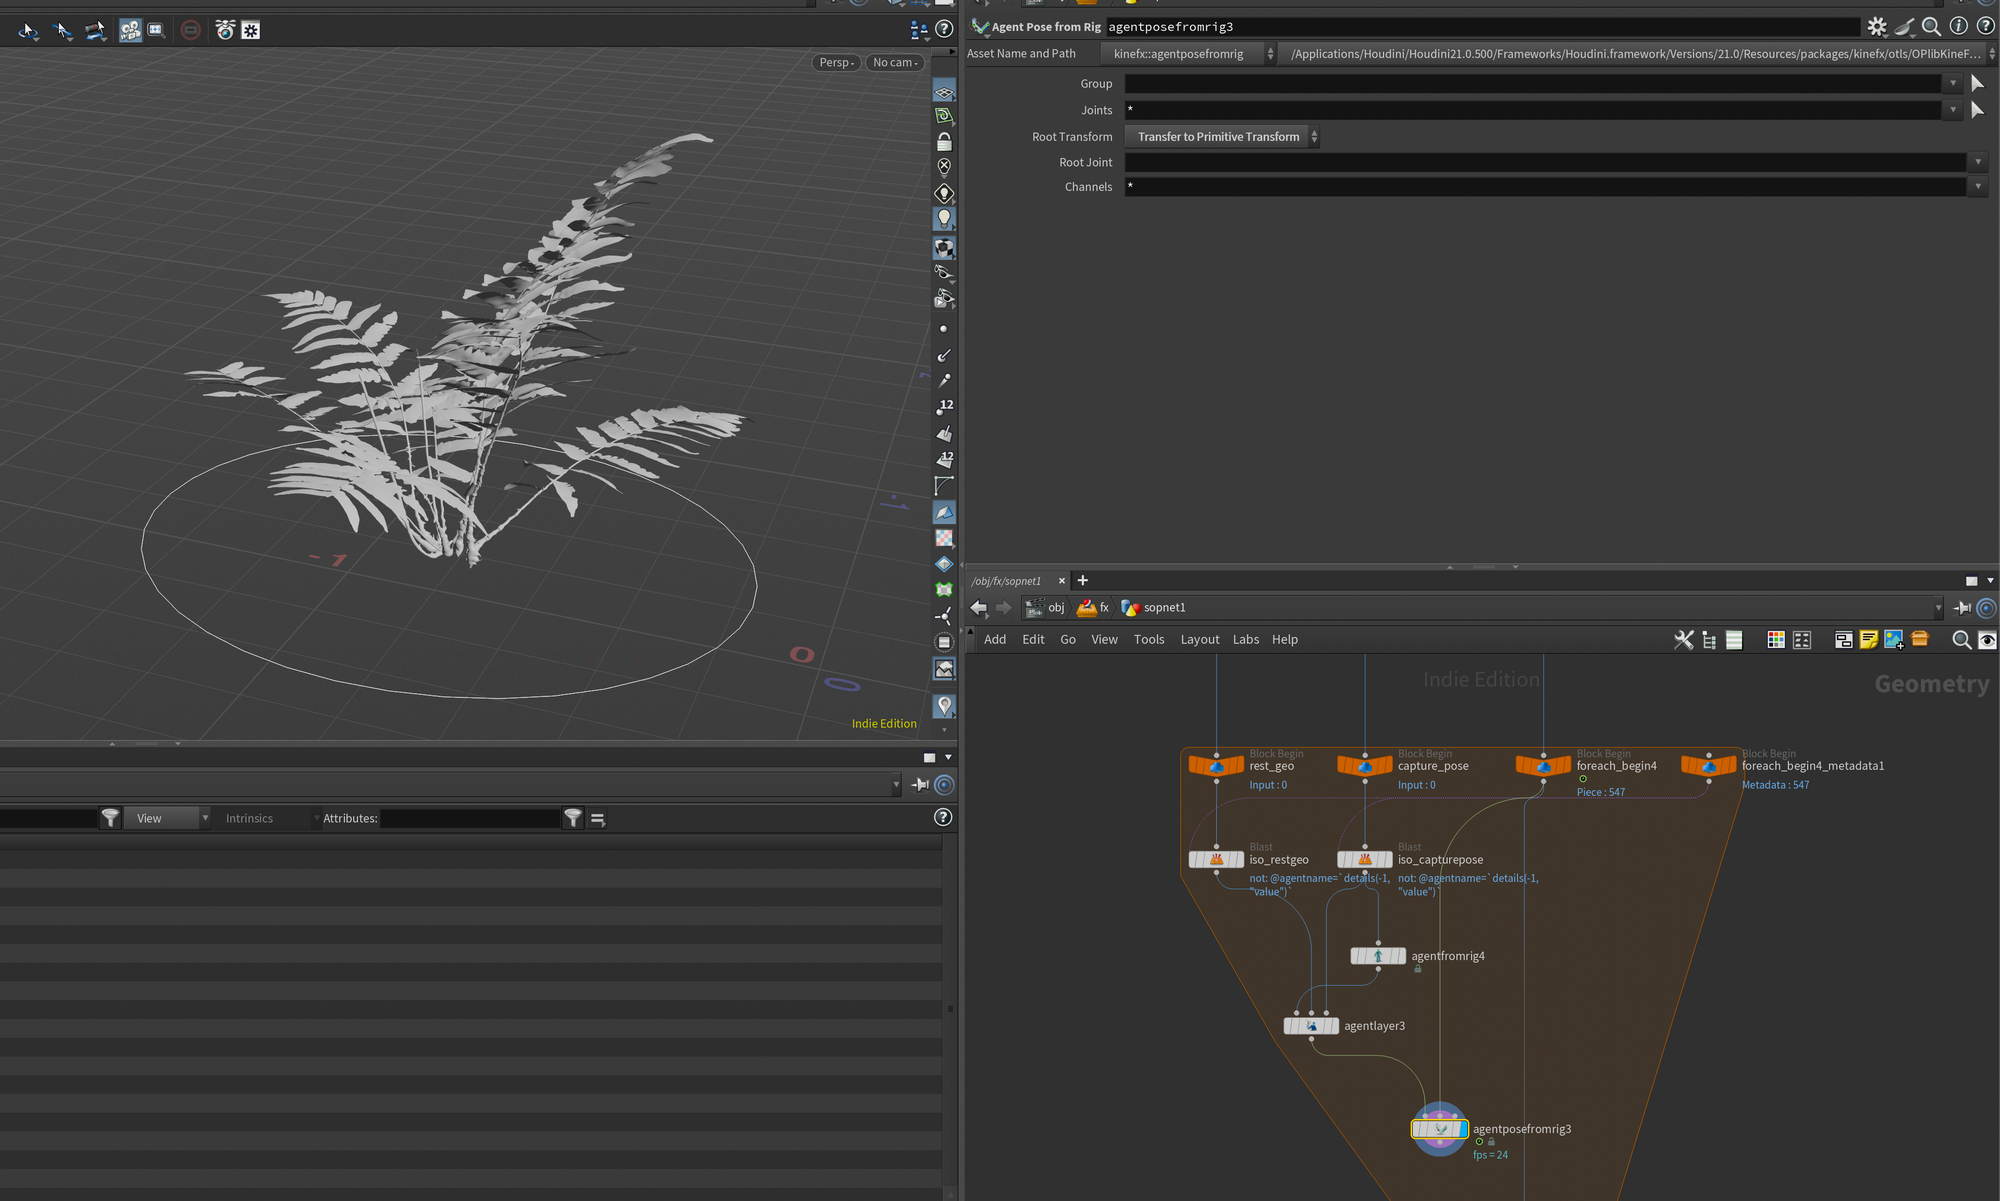
Finally we need to apply our animated skeleton to this agent. To do this we'll use the Agent Pose from Rig node. Plugin the output of the Agent Layer to the first input, and the foreach_begin containing the animated skeleton into the second like below. This will apply the animation to the agent - you should be able to see the vegetation change in the viewport.
At this point you could actually just wire this into the output foreach_end and load it in a SOP Import to have a working vegetation crowd. However, in our case, in order to maintain the hierarchy and inheritance in USD we want to output this as a SkelAnimation and layered it on top of our existing SkelRoots in Solaris. If you were to export this data separately you would have a very small footprint on disk, especially compared to other workflows that usually involve baking out the deforming geometry.
In order to set this up we need to update the path attribute of our agents. We'll do this using a wrangle set to run over Primitives. Wire the output of the Agent Pose from Rig into the first input, and the foreach_begin containing our animated skeletons into the second input. Then drop in the following code which grabs the usdanimpath from our original imported skeletons (this comes from the USD Character Import node) and applies it to the path attribute on our agent. We remove the /animation part of the usdanimpath so that the path points directly to the path of the SkelRoot. This is so that the SOP Import we use later will be able to apply this animation to the proper primitives.
string usdanimpath = prim(1, "usdanimpath", 0);

s@path = re_replace("/animation", "", usdanimpath);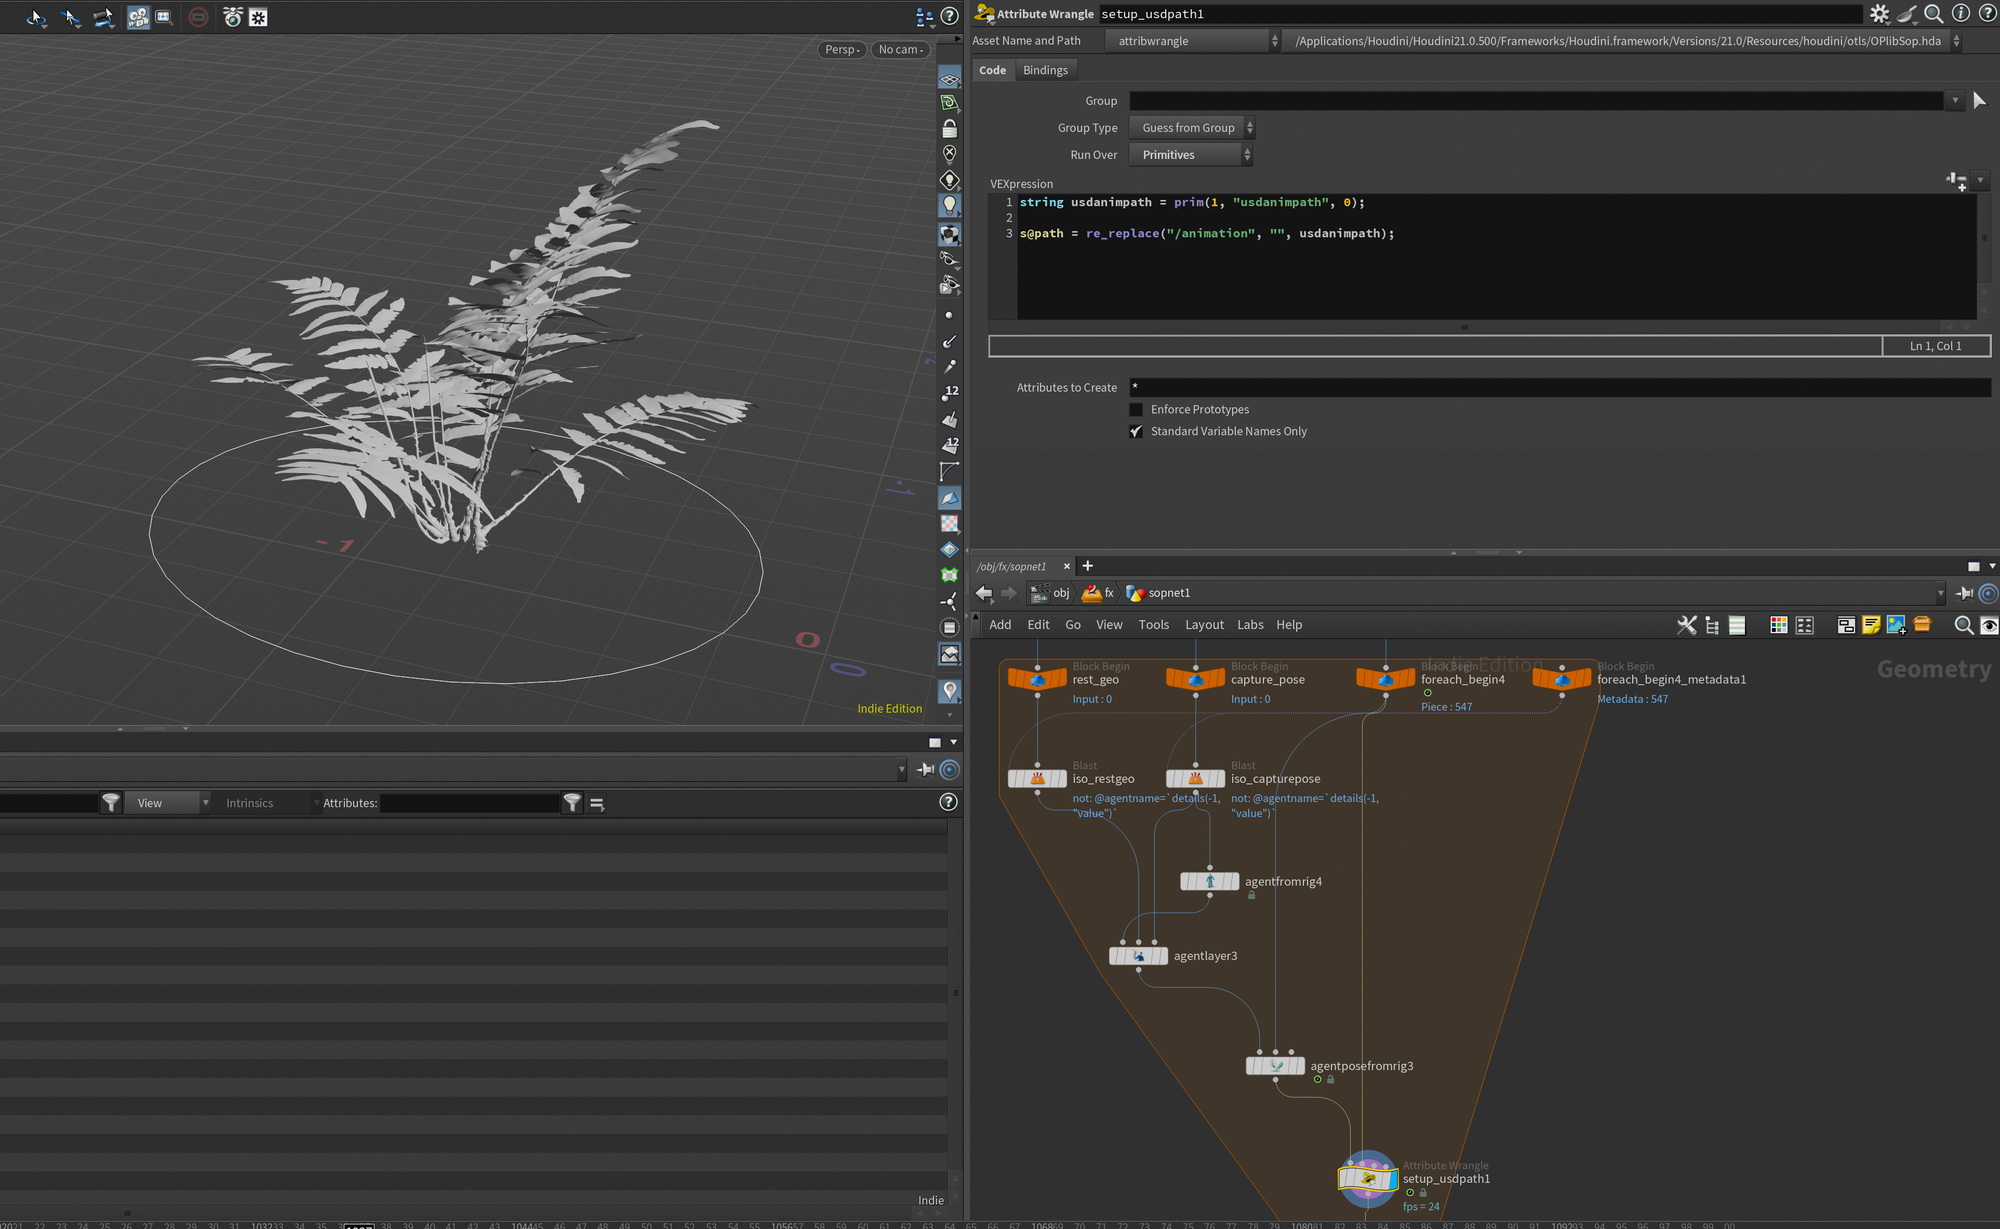
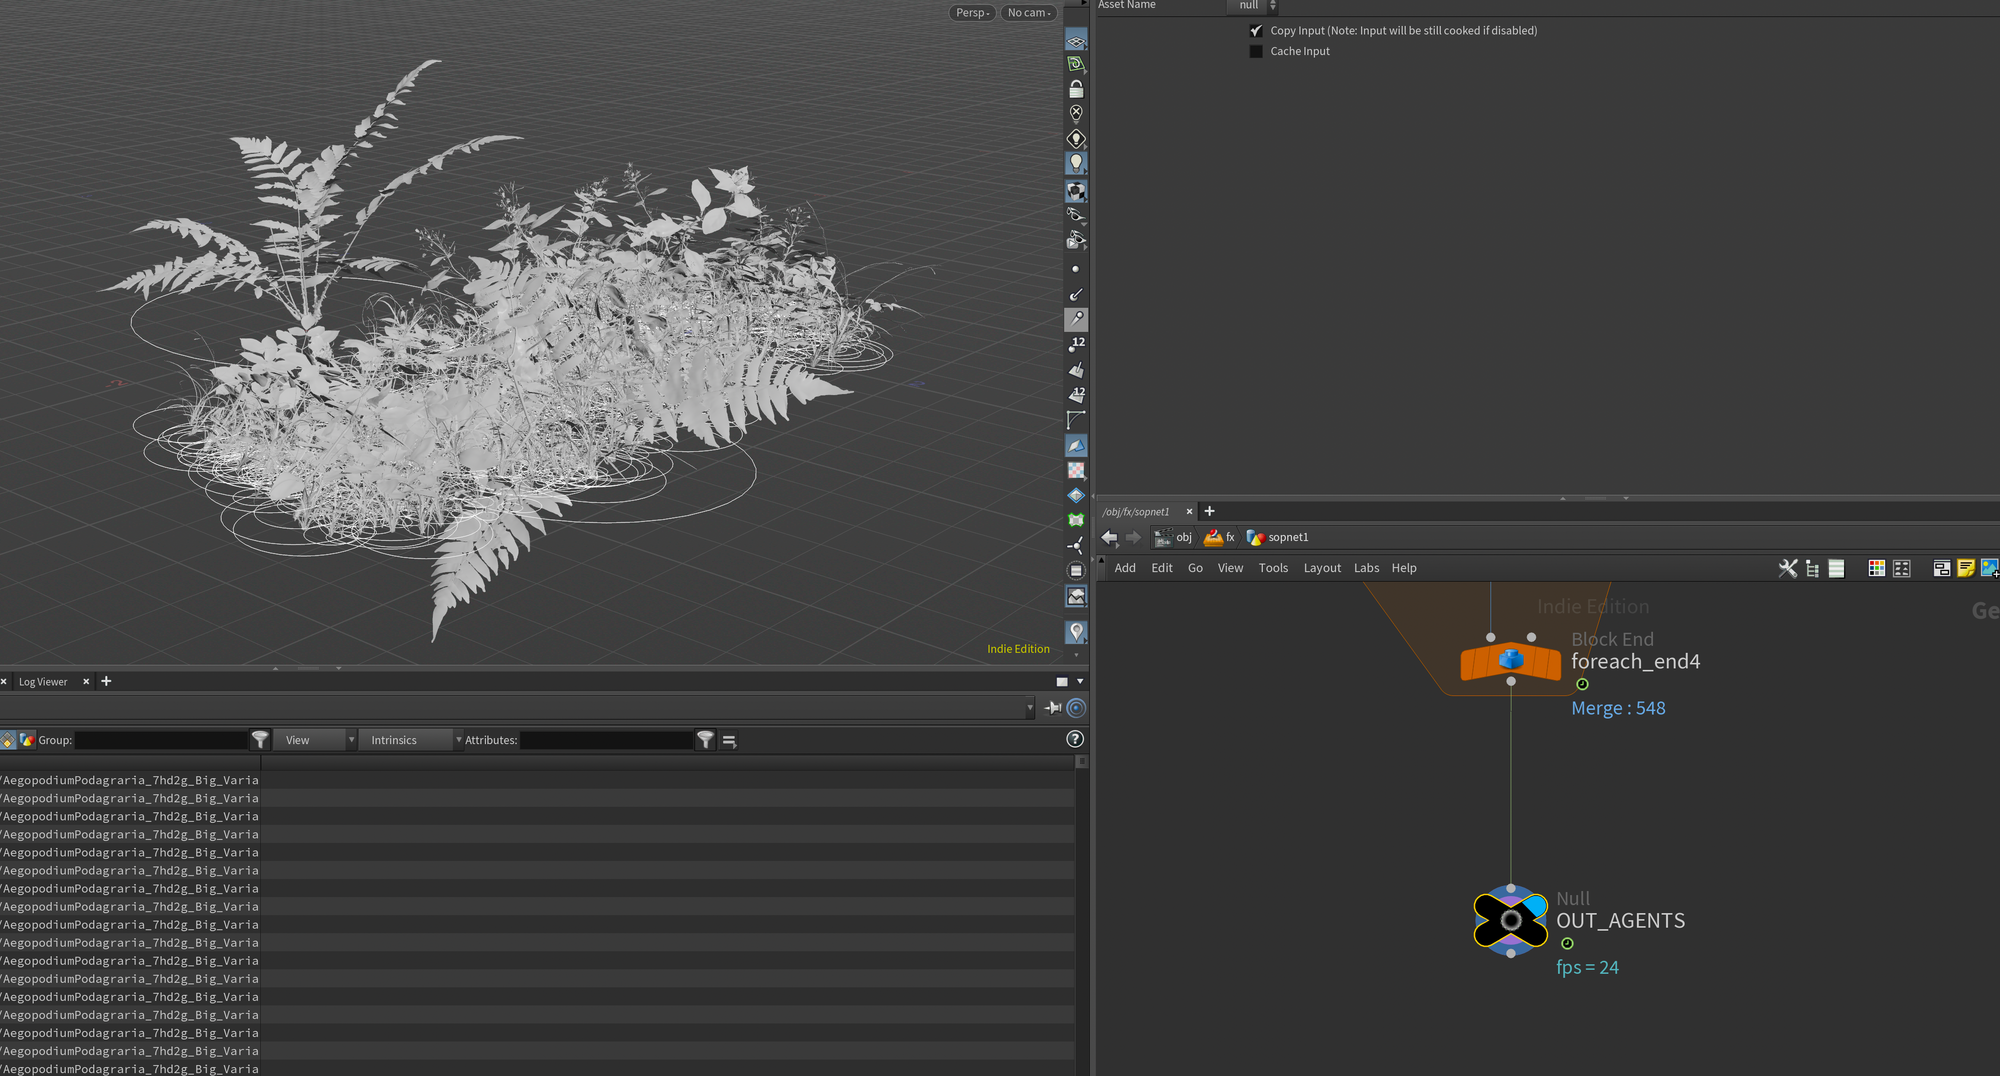
With this done you can wire the output of the wrangle into the foreach_end and you should see your entire layout populate as agents. At this point I added a null called OUT_AGENTS so I can easily find the output node.
Importing Agents in Solaris
Now it's time to load our agents into Solaris so we can layer our new animation on top of our existing UsdSkel Agents.
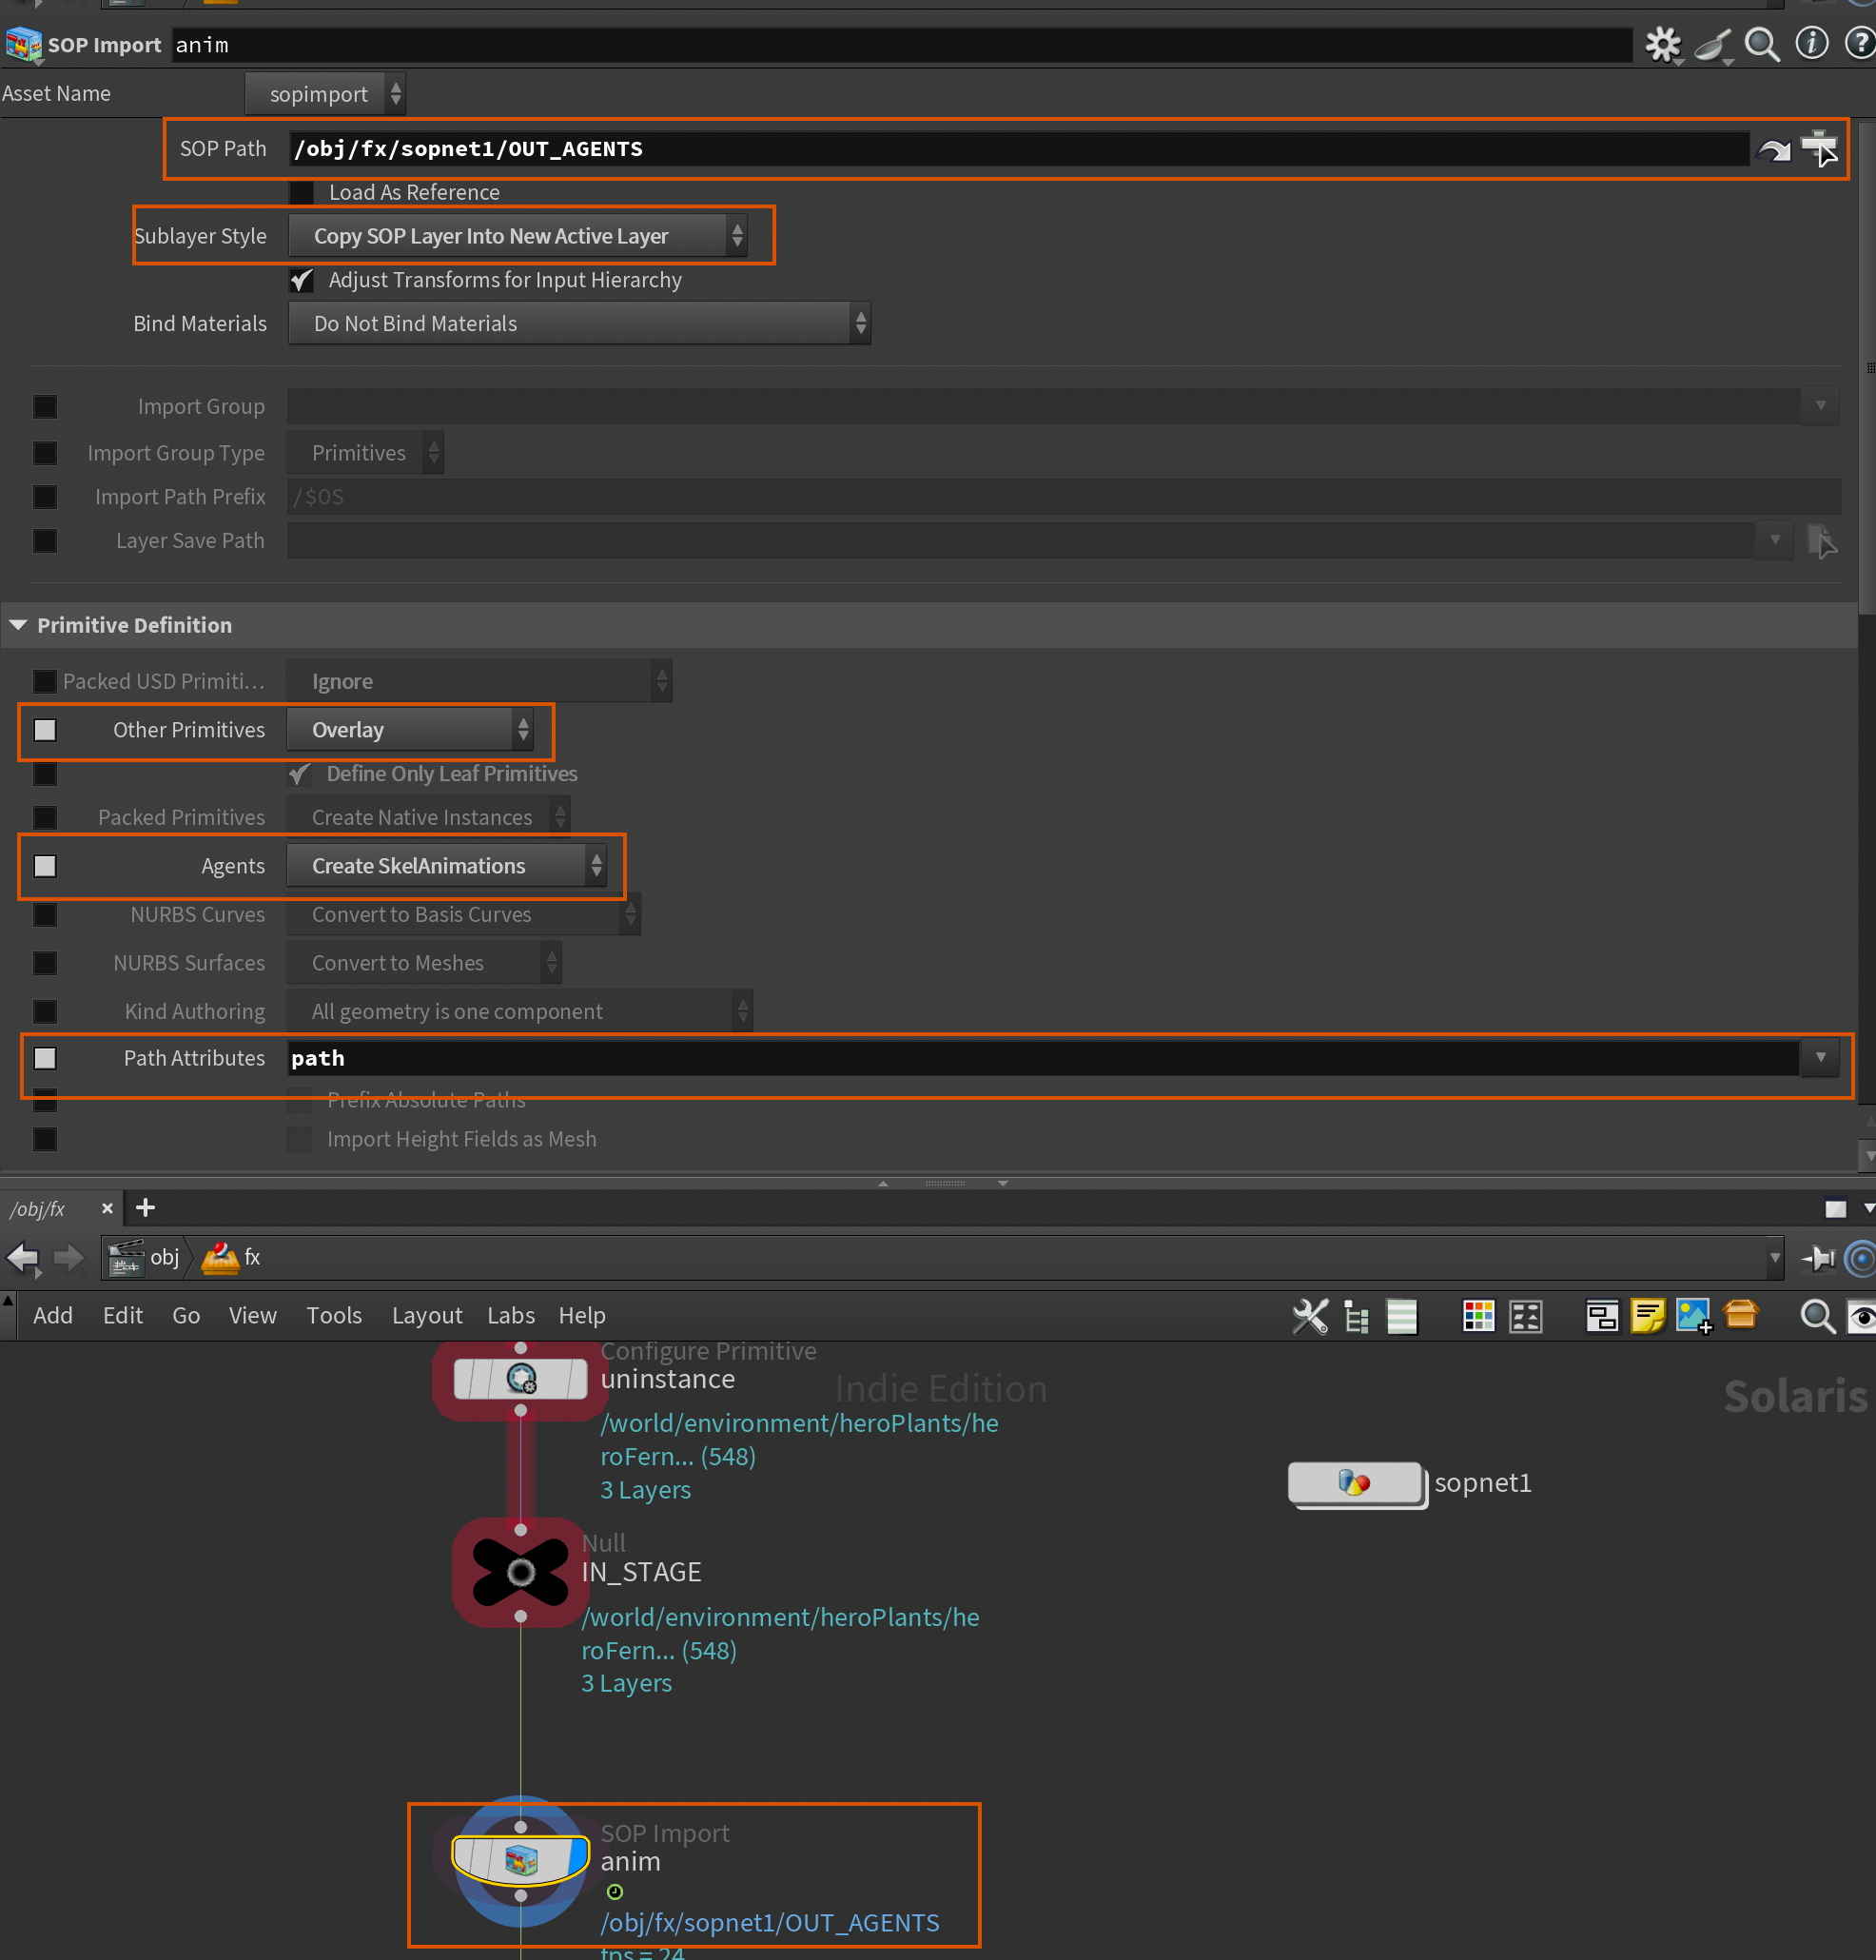
To do this you can drop down a SOP Import after the IN_STAGE and modify a few parameters. Mainly you need to change the SOP Path to the OUT_AGENTS null we created in the previous section, set the Other Primitives to Overlay so that we don't start creating any new primitives - we just want to override our data onto existing primitives. Set the Agents to Create SkelAnimations (since we only want the animation data to layer on top of our existing UsdSkel Agents), and finally set the Path Attributes to path so it reads our path attribute from SOPs.
Finally, I also set the Sublayer Style to COPY SOP Layer Into New Active Layer. This is mainly for a bit of housekeeping - all the changes you perform in Solaris are usually kept in one implicit active layer. This setting adds a new Active Layer containing just these changes. This can also be useful if you wanted to export only the animation in a separate USD (which I would highly recommend in production - that way you would only need to update that lightweight USD anytime you need to update the simulation, unless new vegetation elements were added).
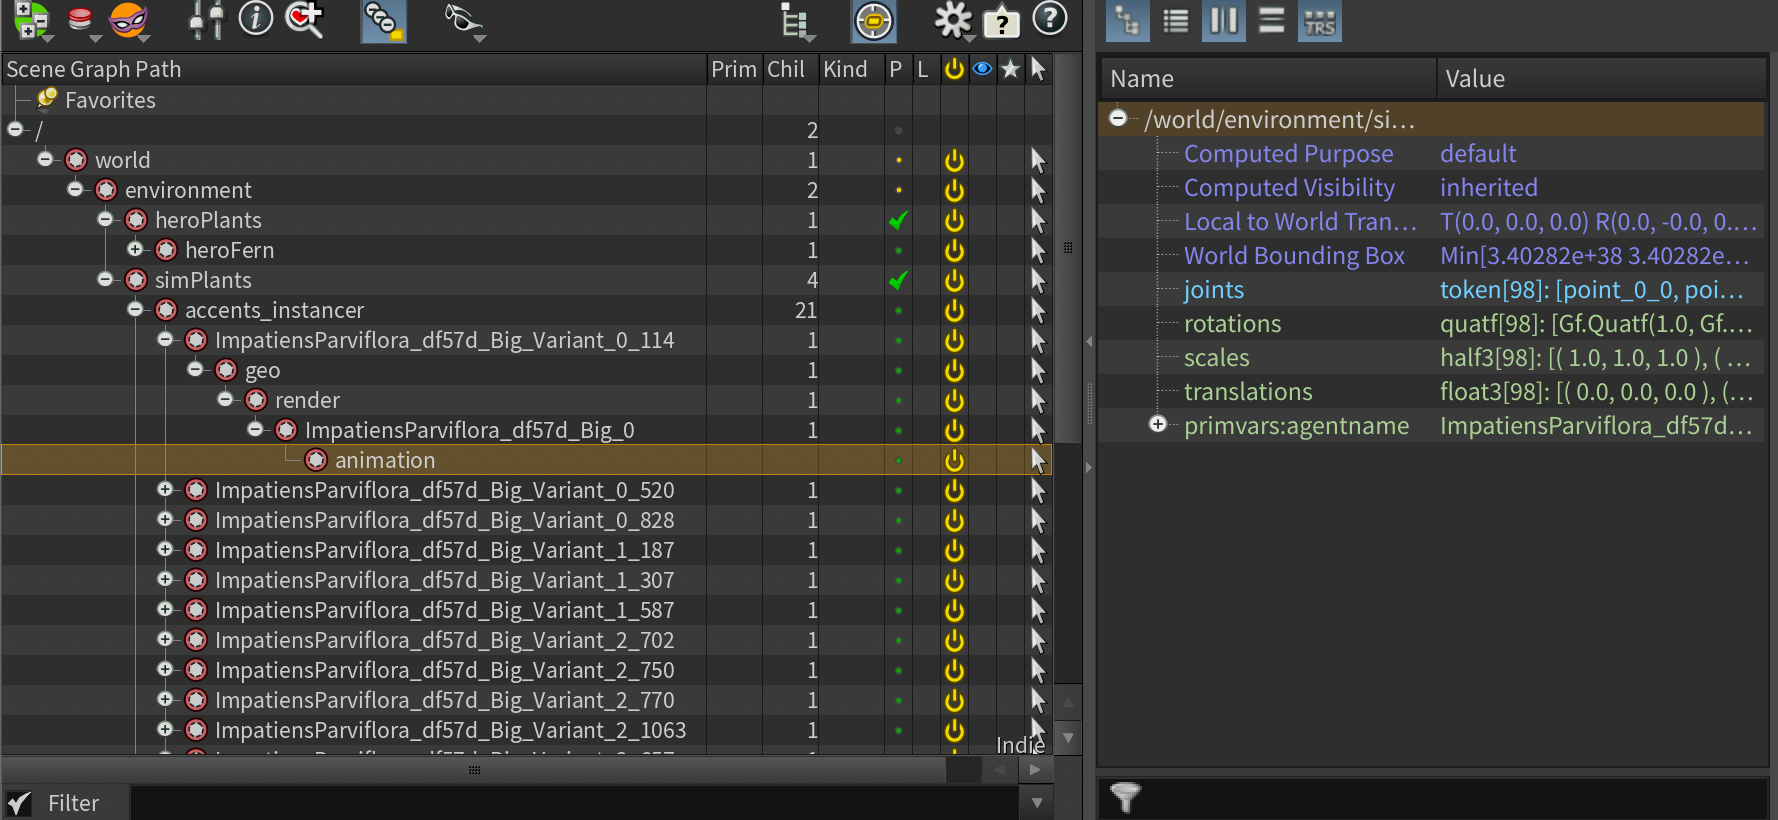
With this added you should now see your SkelAnimation primitives under each piece of vegetation populate with time sampled rotation, scales, and rotations. And the vegetation should be moving if you start a render (since we only have animation on the render purpose primitives).

SkelAnimation with applied animation from our Vellum simulation.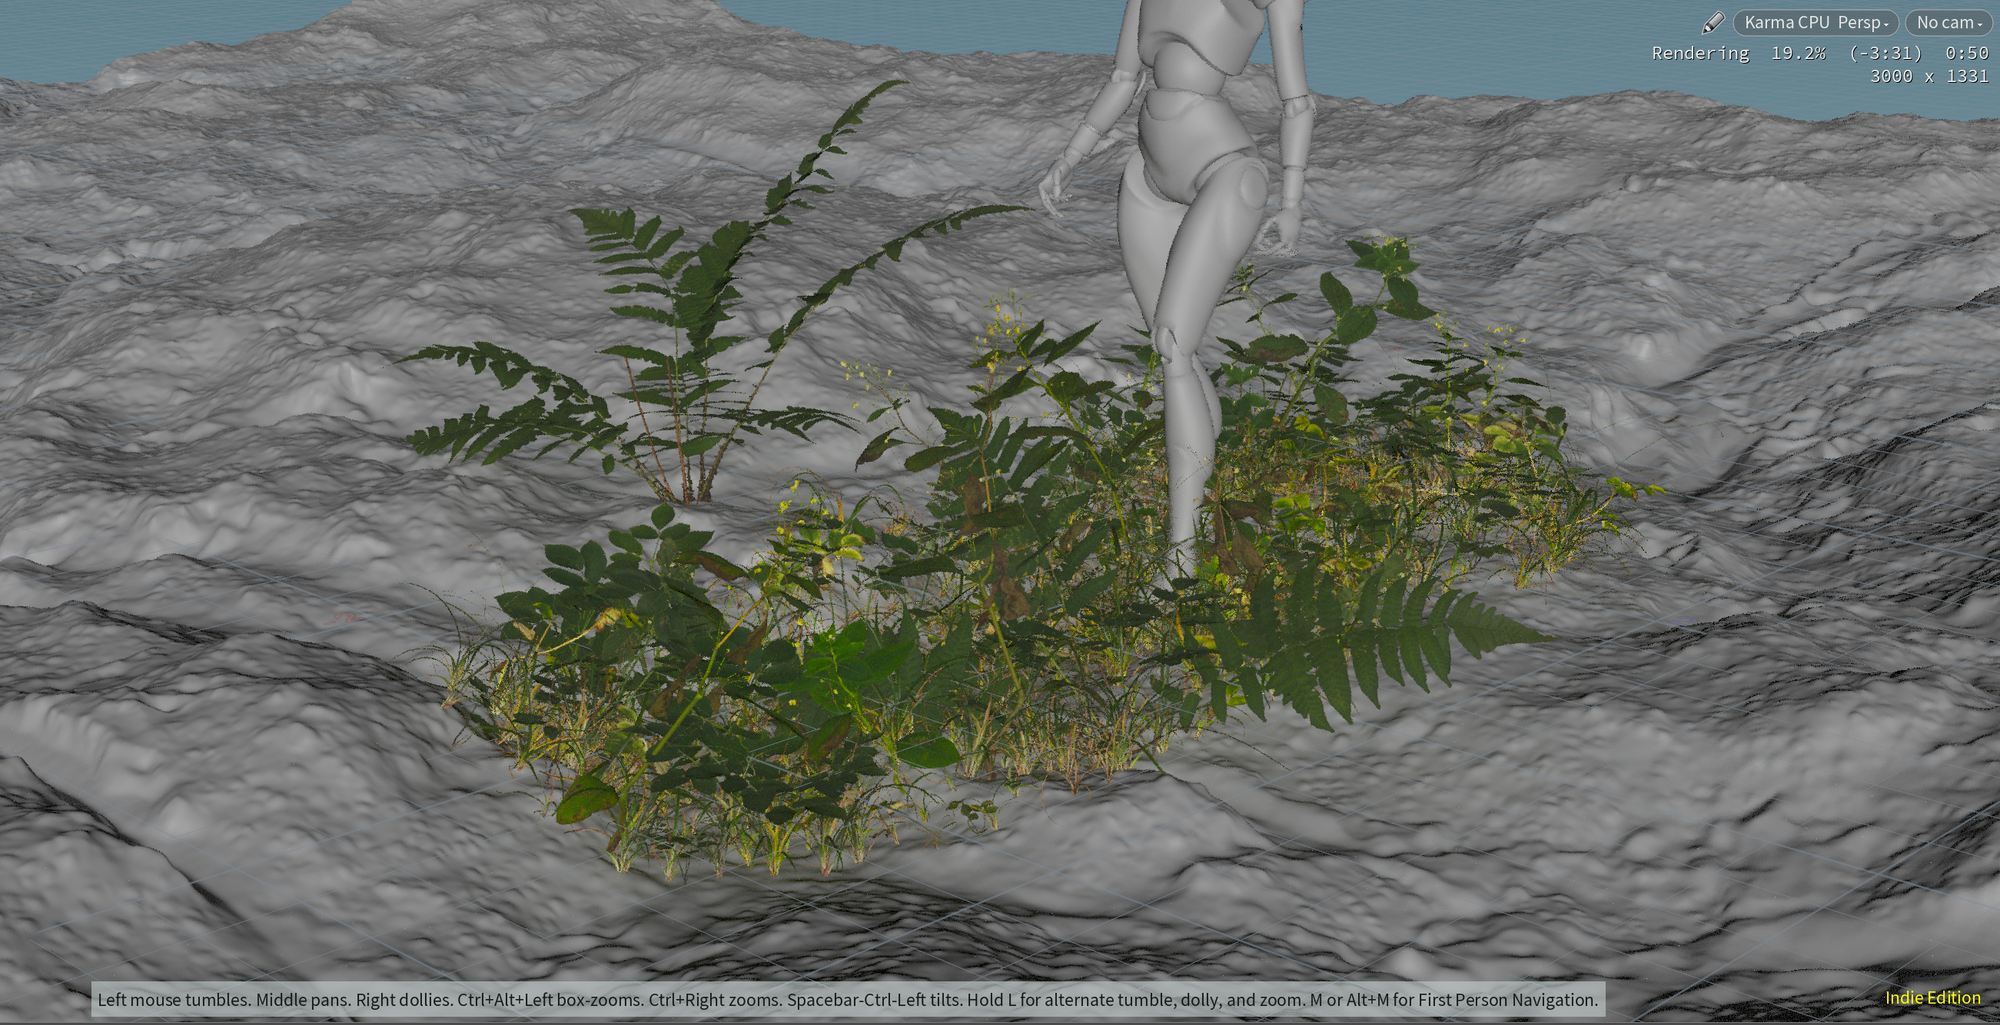
Now we can add a USD ROP and export everything out - giving us a nice and clean USD we can add in our lighting scene using a Sublayer node. Keep in mind this will only contain our new simulated vegetation since we used a layer break earlier.
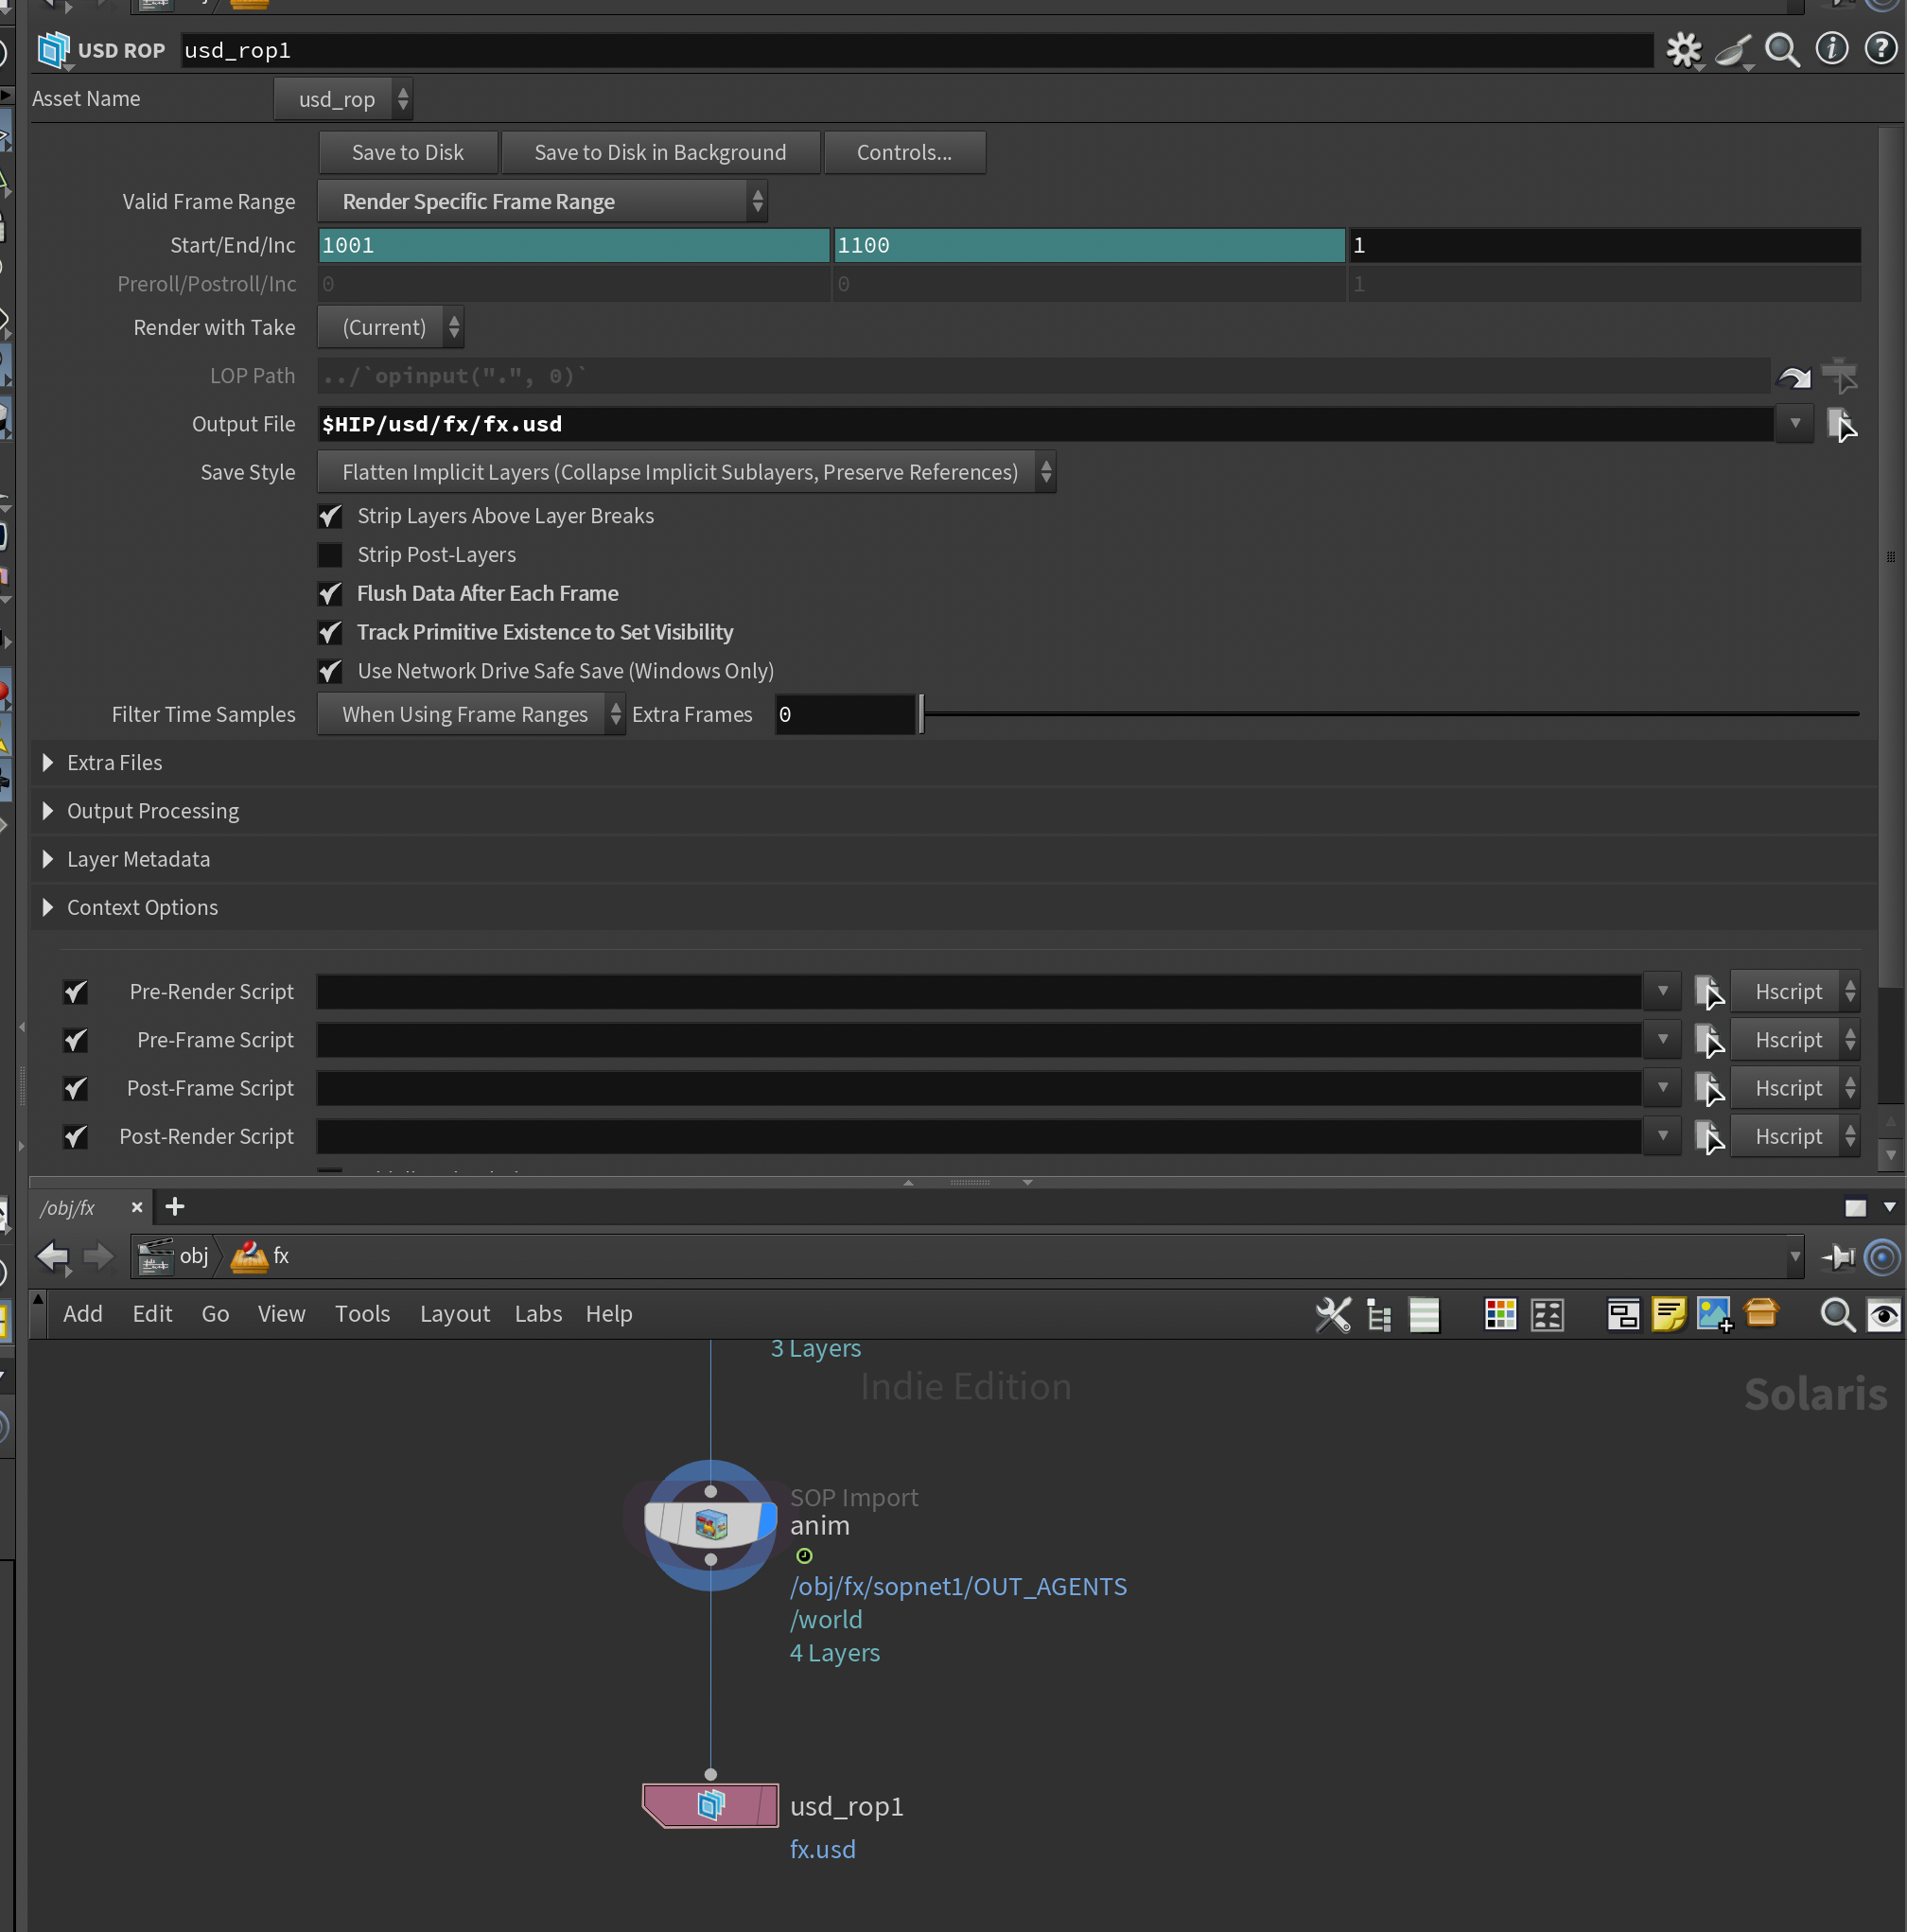
As an additional little detail - below is what our SOP Import looks like if we were to export it on its own. It only contains the added animation - nothing else. Not even data of the original primitives. This means you can keep your simulation iterations very lightweight, since this is the only data needed, unless you need to add more vegetation elements to your simulation.
Lighting & Rendering
Rendering our simulated vegetation in Karma.
With everything exported we can jump into lighting. Since all the shading is already contained within the asset we really only need to add our lights to finalize this shot. All the prep work we've made in the previous sections allows our lighting scene to be very simplistic.
Therefore I will also keep this section somewhat short.
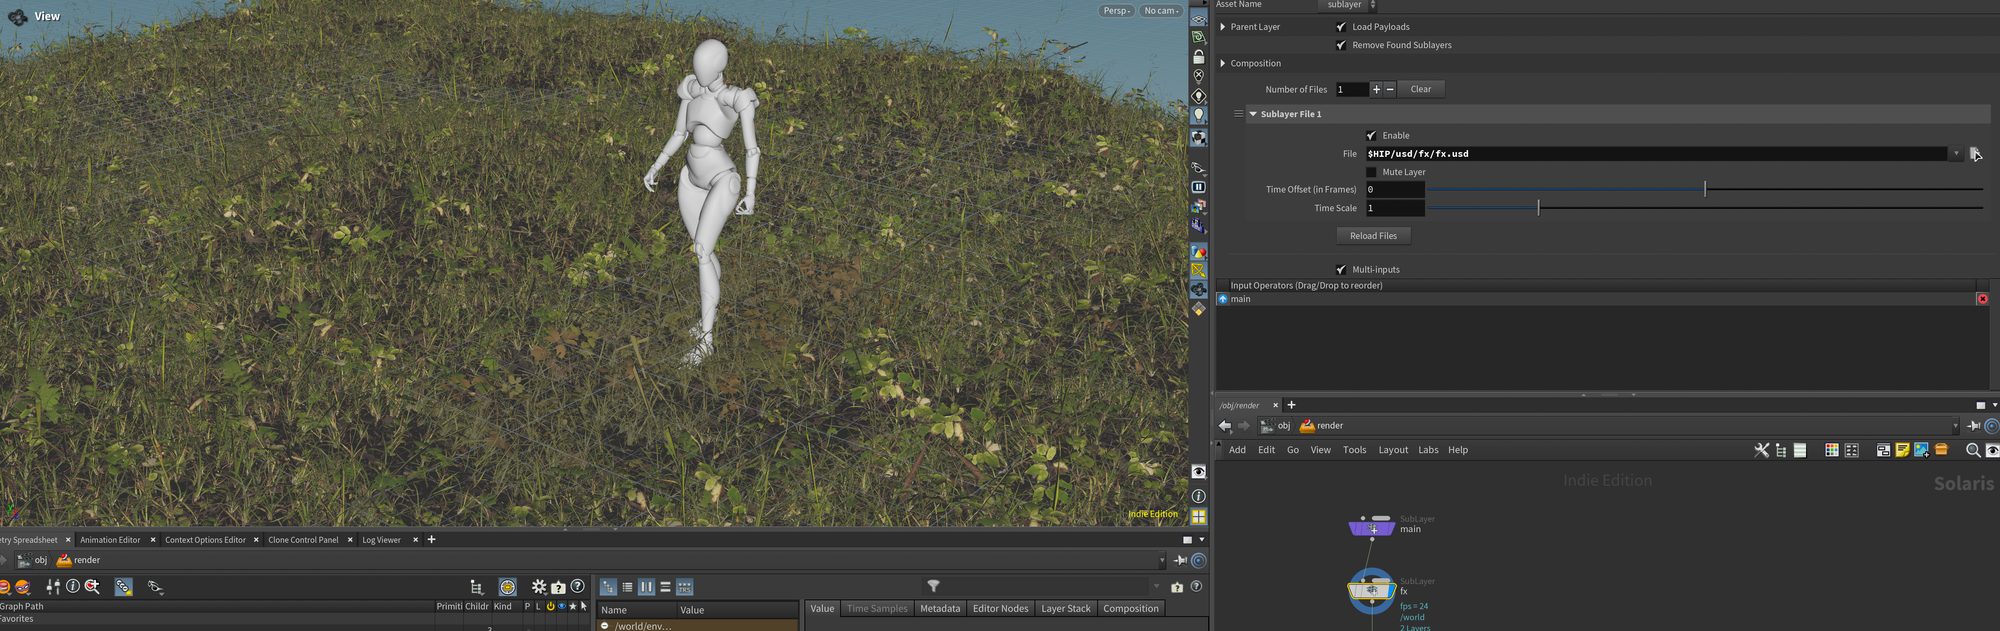
First I load in the original layout+animation using the main.usd we created earlier in a new LOP network (I called this one render). Once again, in production this would likely be a separate lighting hip file that the lighter is working in.
Chained directly after that I created another sublayer loading our fx.usd file. This contains the overrides we made to the instancers (disabling the extracted vegetation) + our animation for our vegetation agents.
And that is about it. The lighting in this case is very simple - consisting of a dome light containing a sunny HDRI from https://polyhaven.com .
I also created a gobo mesh in a SOP Create to help add some shadows for the sun to peek through - helping it look like the scene takes place in a densely vegetated area like a forest. In my case I ended up basing the cutout just used a grid that I cut some holes in using an Attribute Noise and a Blast node.
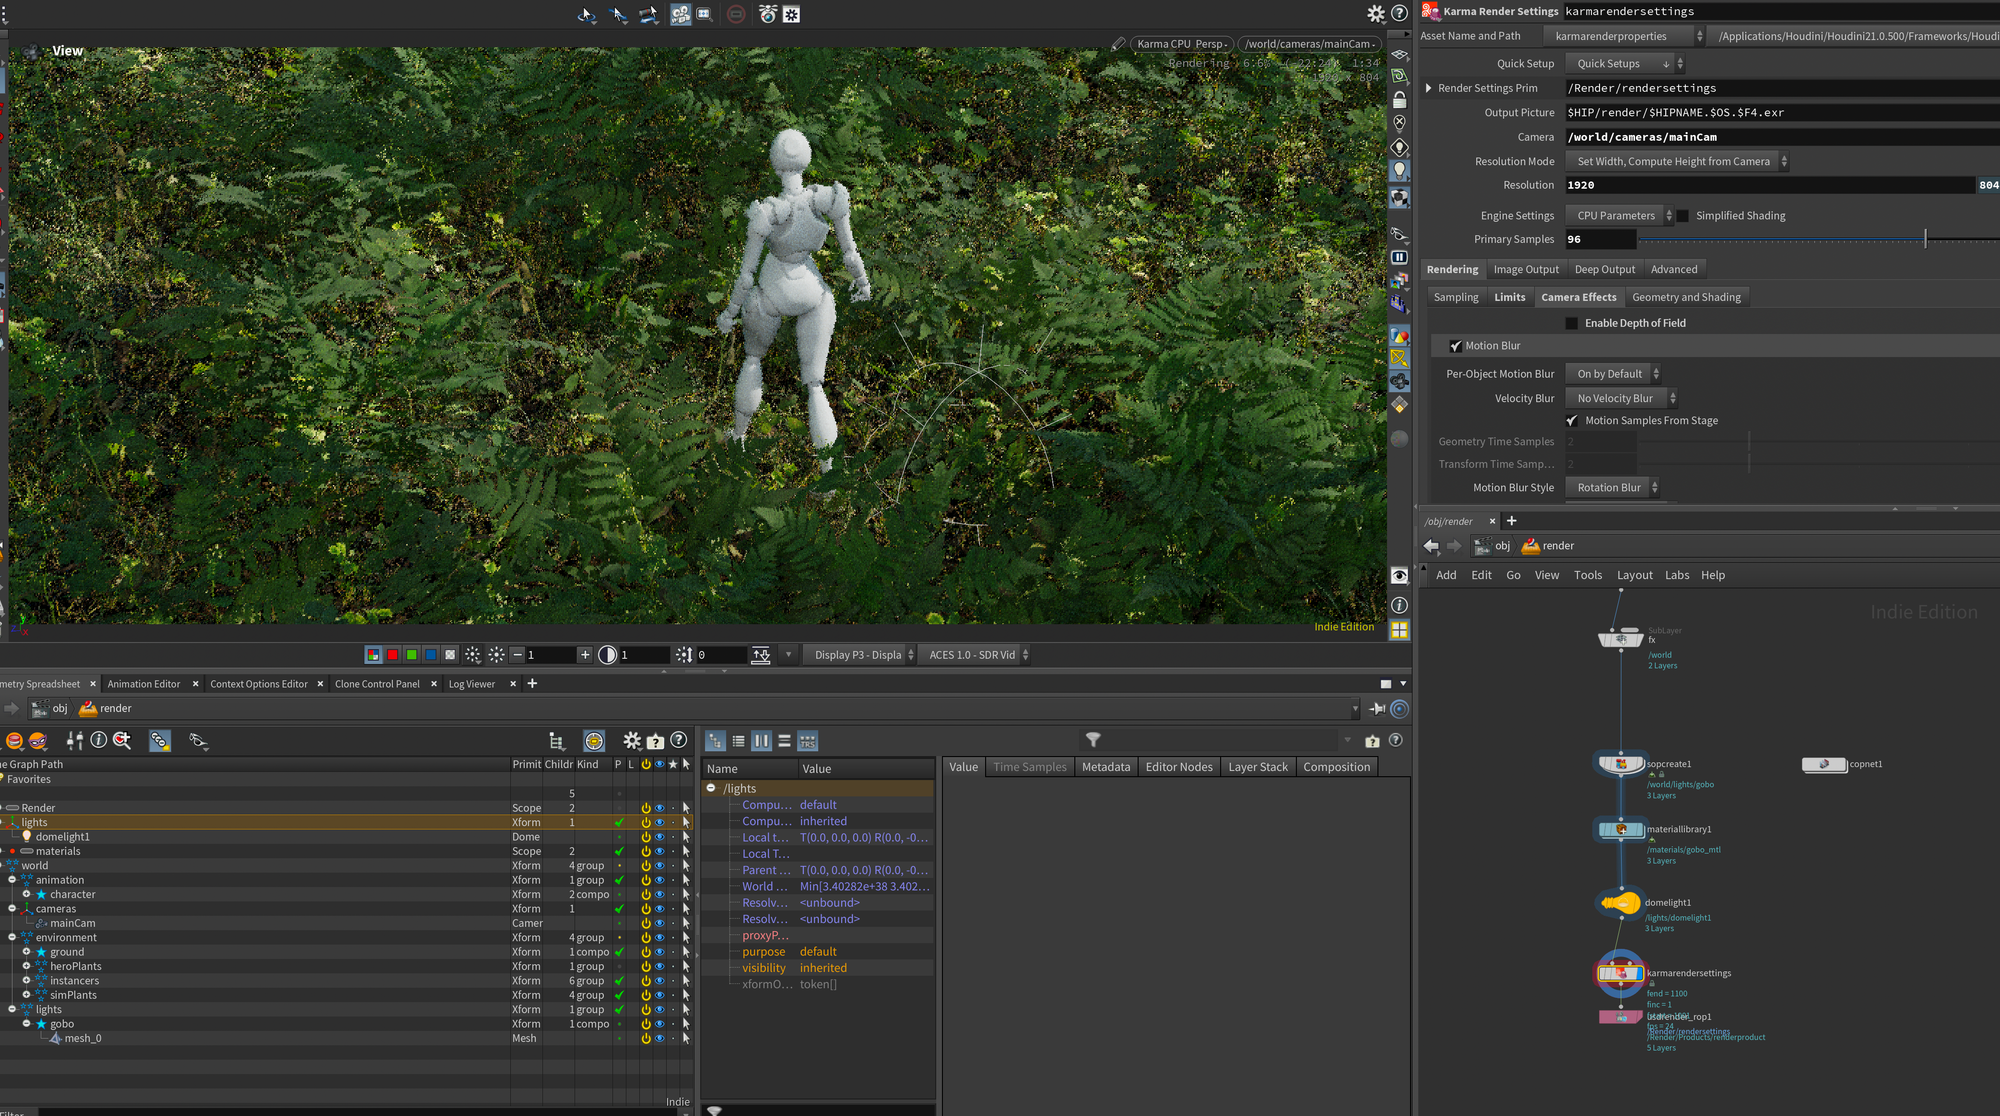
Motionblur-wise you don't need to configure anything either since all our vegetation elements are agents - therefore they automatically get deformation motion blur just like any other character agents.
In the end I also did a bit of grading inside of Nuke to get the colors you see in the final version below - but I'll leave that for another article.
Final composited shot.
Conclusion
And that wraps up this monster of an article. Thanks to all of you who checked it out - if you created anything using the workflows in this series, I would love to see it. Feel free to share it down in the comments below or reach out to me via e-mail or LinkedIn.
As always, if you found it interesting and would like to read more, please feel free to subscribe to my newsletter below to get my posts directly to your inbox.