Rapid Crowd Generation in Houdini 20 (+Agents in USD)
Houdini 20 introduced a new toolset for generating Crowds without the need for simulation called Crowd MotionPaths.
This is a new system for animating crowds directly in SOPs, completely bypassing traditional simulation / DOP networks (although the two can work in tandem if required). It allows artists to very easily create crowds for simpler shots that don't require complex crowd simulations.
In this tutorial, I want to explore and introduce you to this new SOP Crowds toolset as well as explain how Agents (which are the inhabitants of a crowd) work in both SOPs and LOPs/USD.
In my renders, I'll be using characters from BIG/MEDIUM/SMALL, but I'll also explain how to set up your test crowds using the built-in bipedal characters. So you can follow along without purchasing any custom characters.
Let's dive in!
Agents
Setting up agents for your crowd.
Introduction to Agents
Agents are the characters/actors that inhabit your crowd and the first thing you'll need to set up before creating your crowd. In Houdini SOPs Agents are a special type of packed primitives. This is very practical because it means that each agent is essentially just a point containing a lot of data that can be unpacked on demand. This makes working with Agents incredibly fast in the viewport - you can have hundreds without taking much of a hit on performance. The Agent primitive itself contains data such as the rig, shape library (meshes), layers, animation clips, transform groups, and even metadata if required.
Setting up your Agents
Setting up an Agent in Houdini is very straightforward. All you need to do is create an Agent node and connect your character to it. The Character can come from many different places including an FBX, Character Rig (which is just a traditional Houdini Rig), an Agent Definition Cache (which is a special format you can export your agents through for later usage), or even USD.
In this tutorial, I'll be showing you how to do it with the Houdini Mocap Biped so everyone can follow along, but if you have your own rigged FBX Characters you can easily use that instead - do note that you will also need some animation clips, but depending on your rig you may be able to generate some using Mixamo.
To set up your agent using the Houdini Mocap Biped you'll have to do the following:
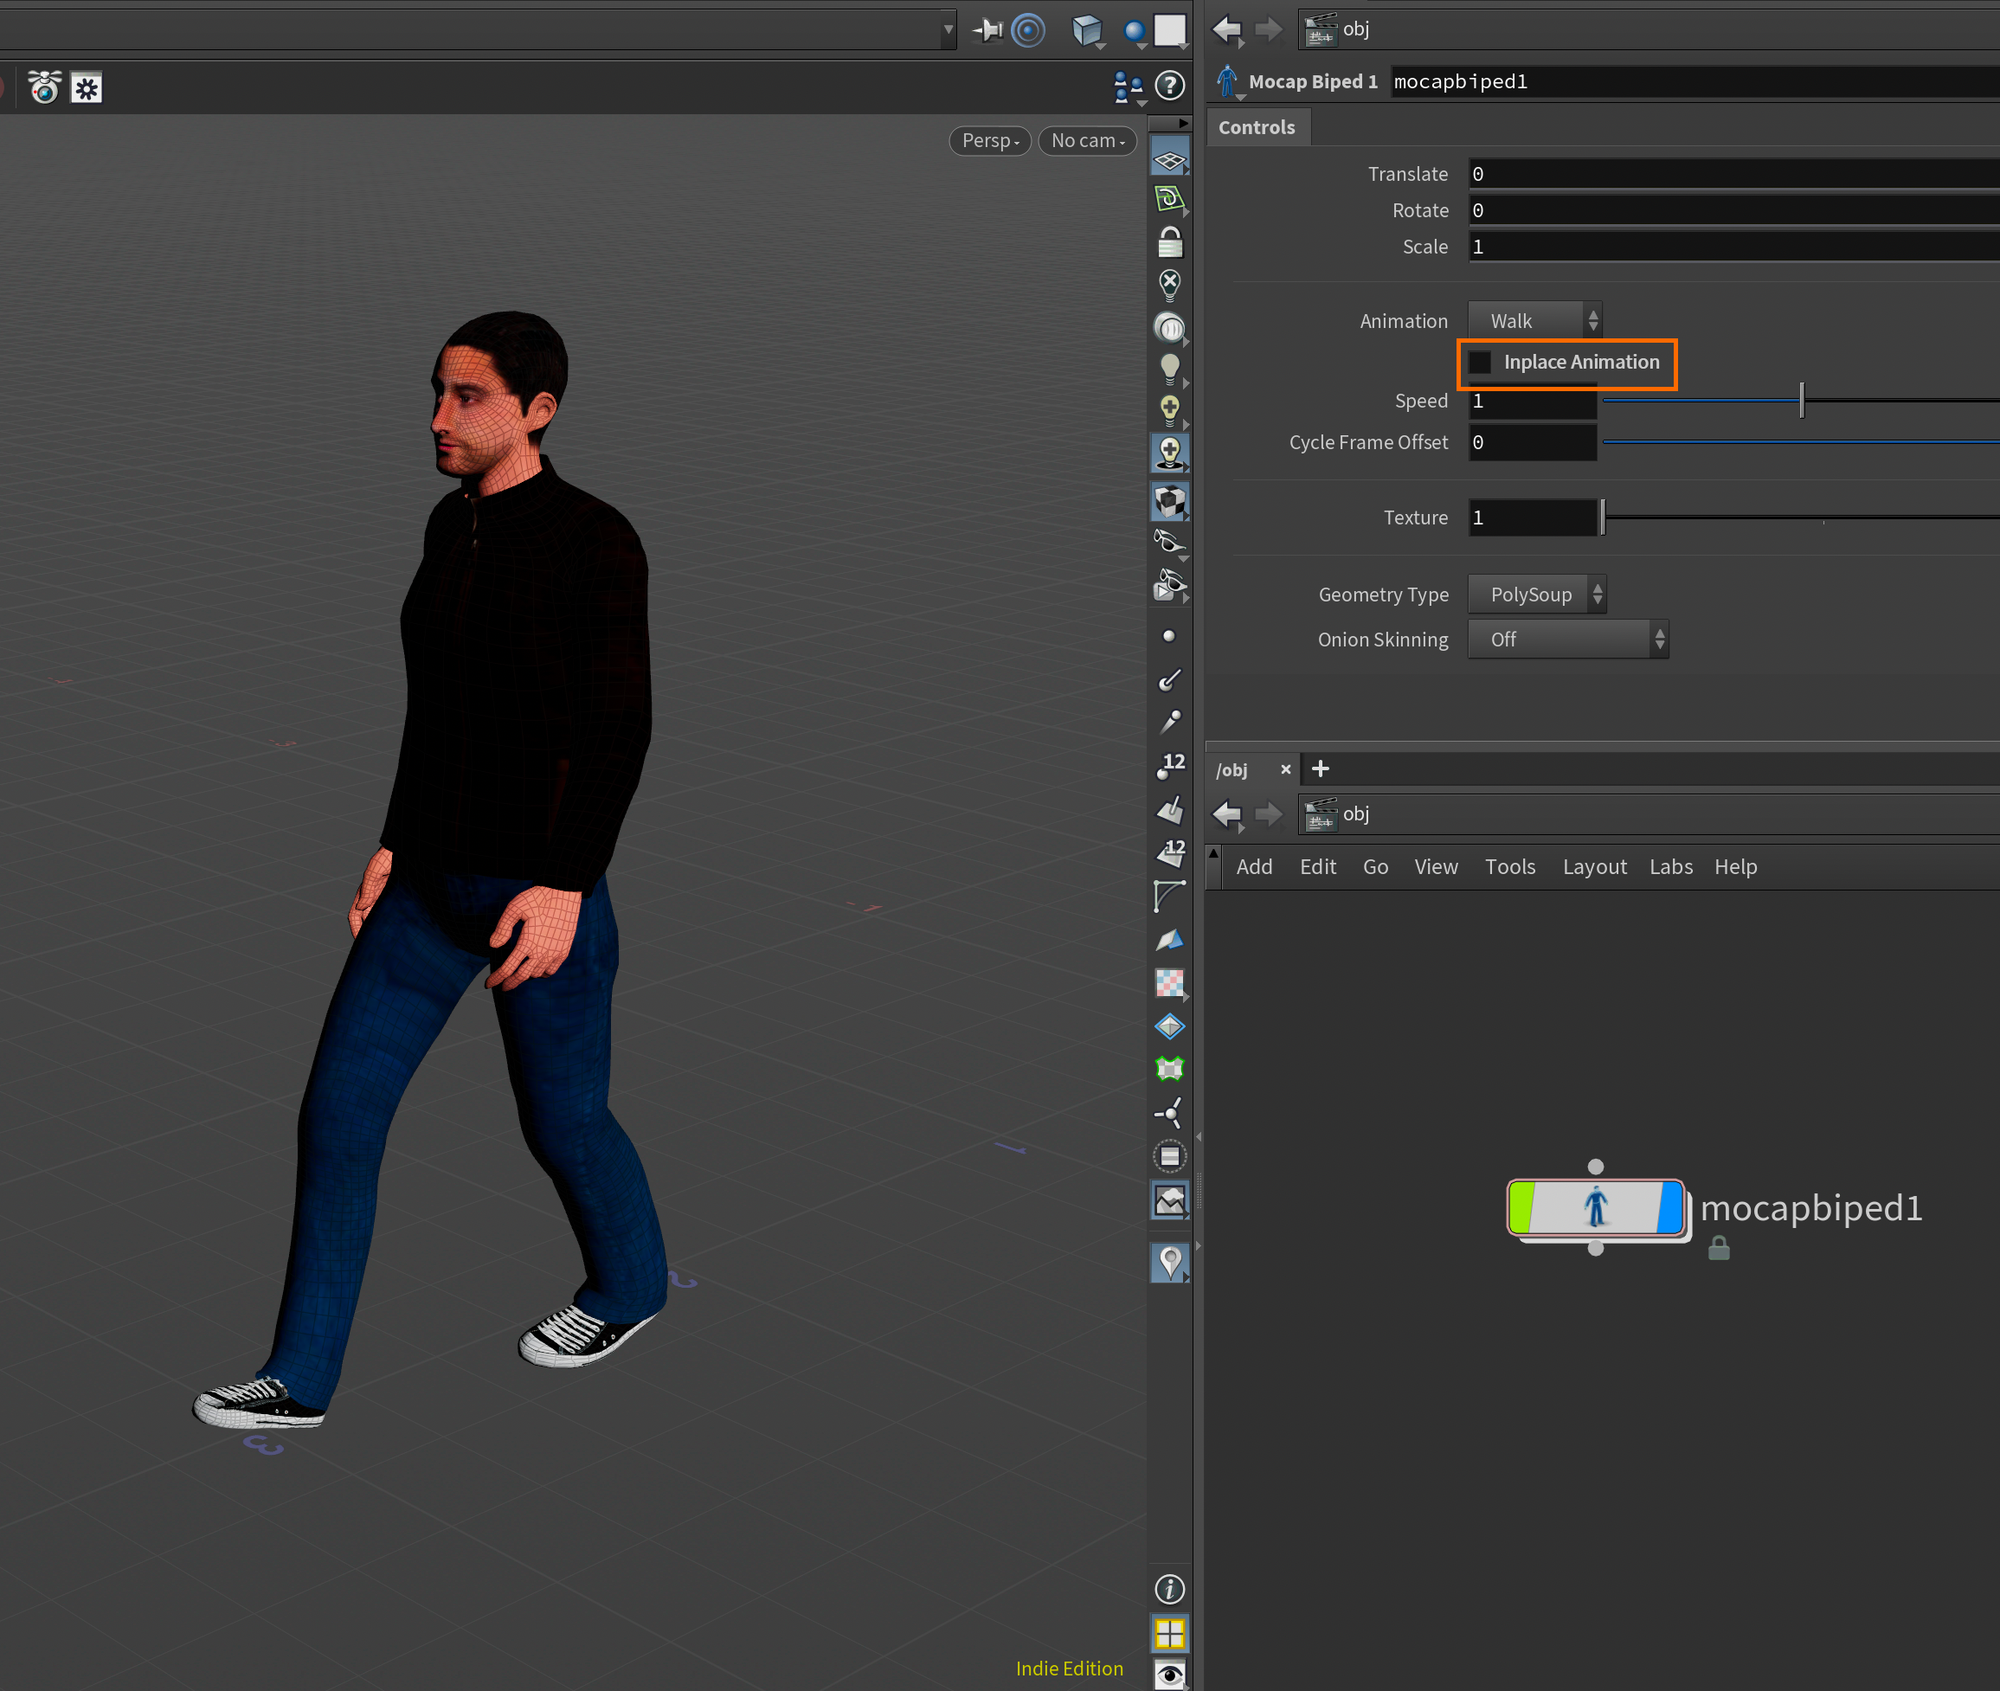
- In
/objadd aMocap Biped 1. In the parameters, you can keep everything default except for the in-place animation. We'll create in-place animation manually later on so we can generate a locomotion joint.
- Now, inside of a new geometry node, create an
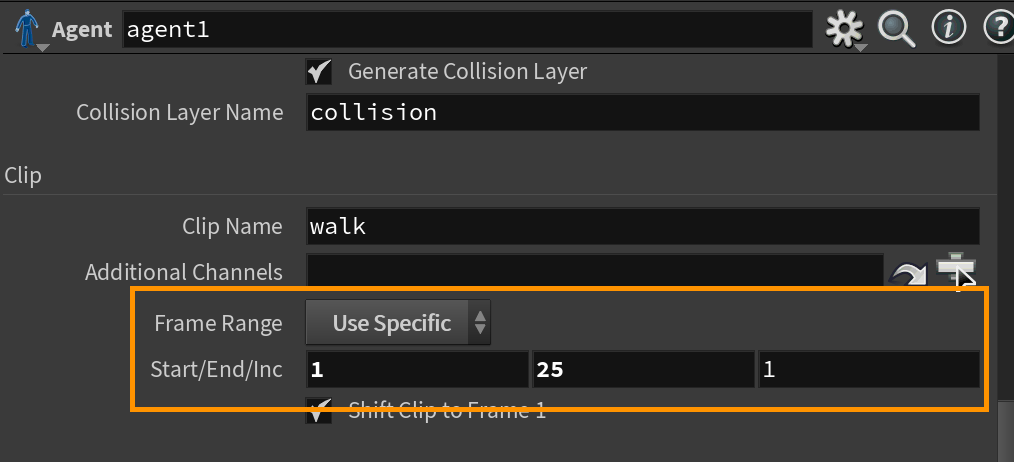
Agent SOPand point it to your Mocap Biped 1 node. You'll also need to turn onConvert to in-Place Animationand set the Locomotion Node to the hip joint of yourMocap Biped 1. This disabled the locomotion (the change in placement as the character moves) while keeping that information available for speed calculations later.
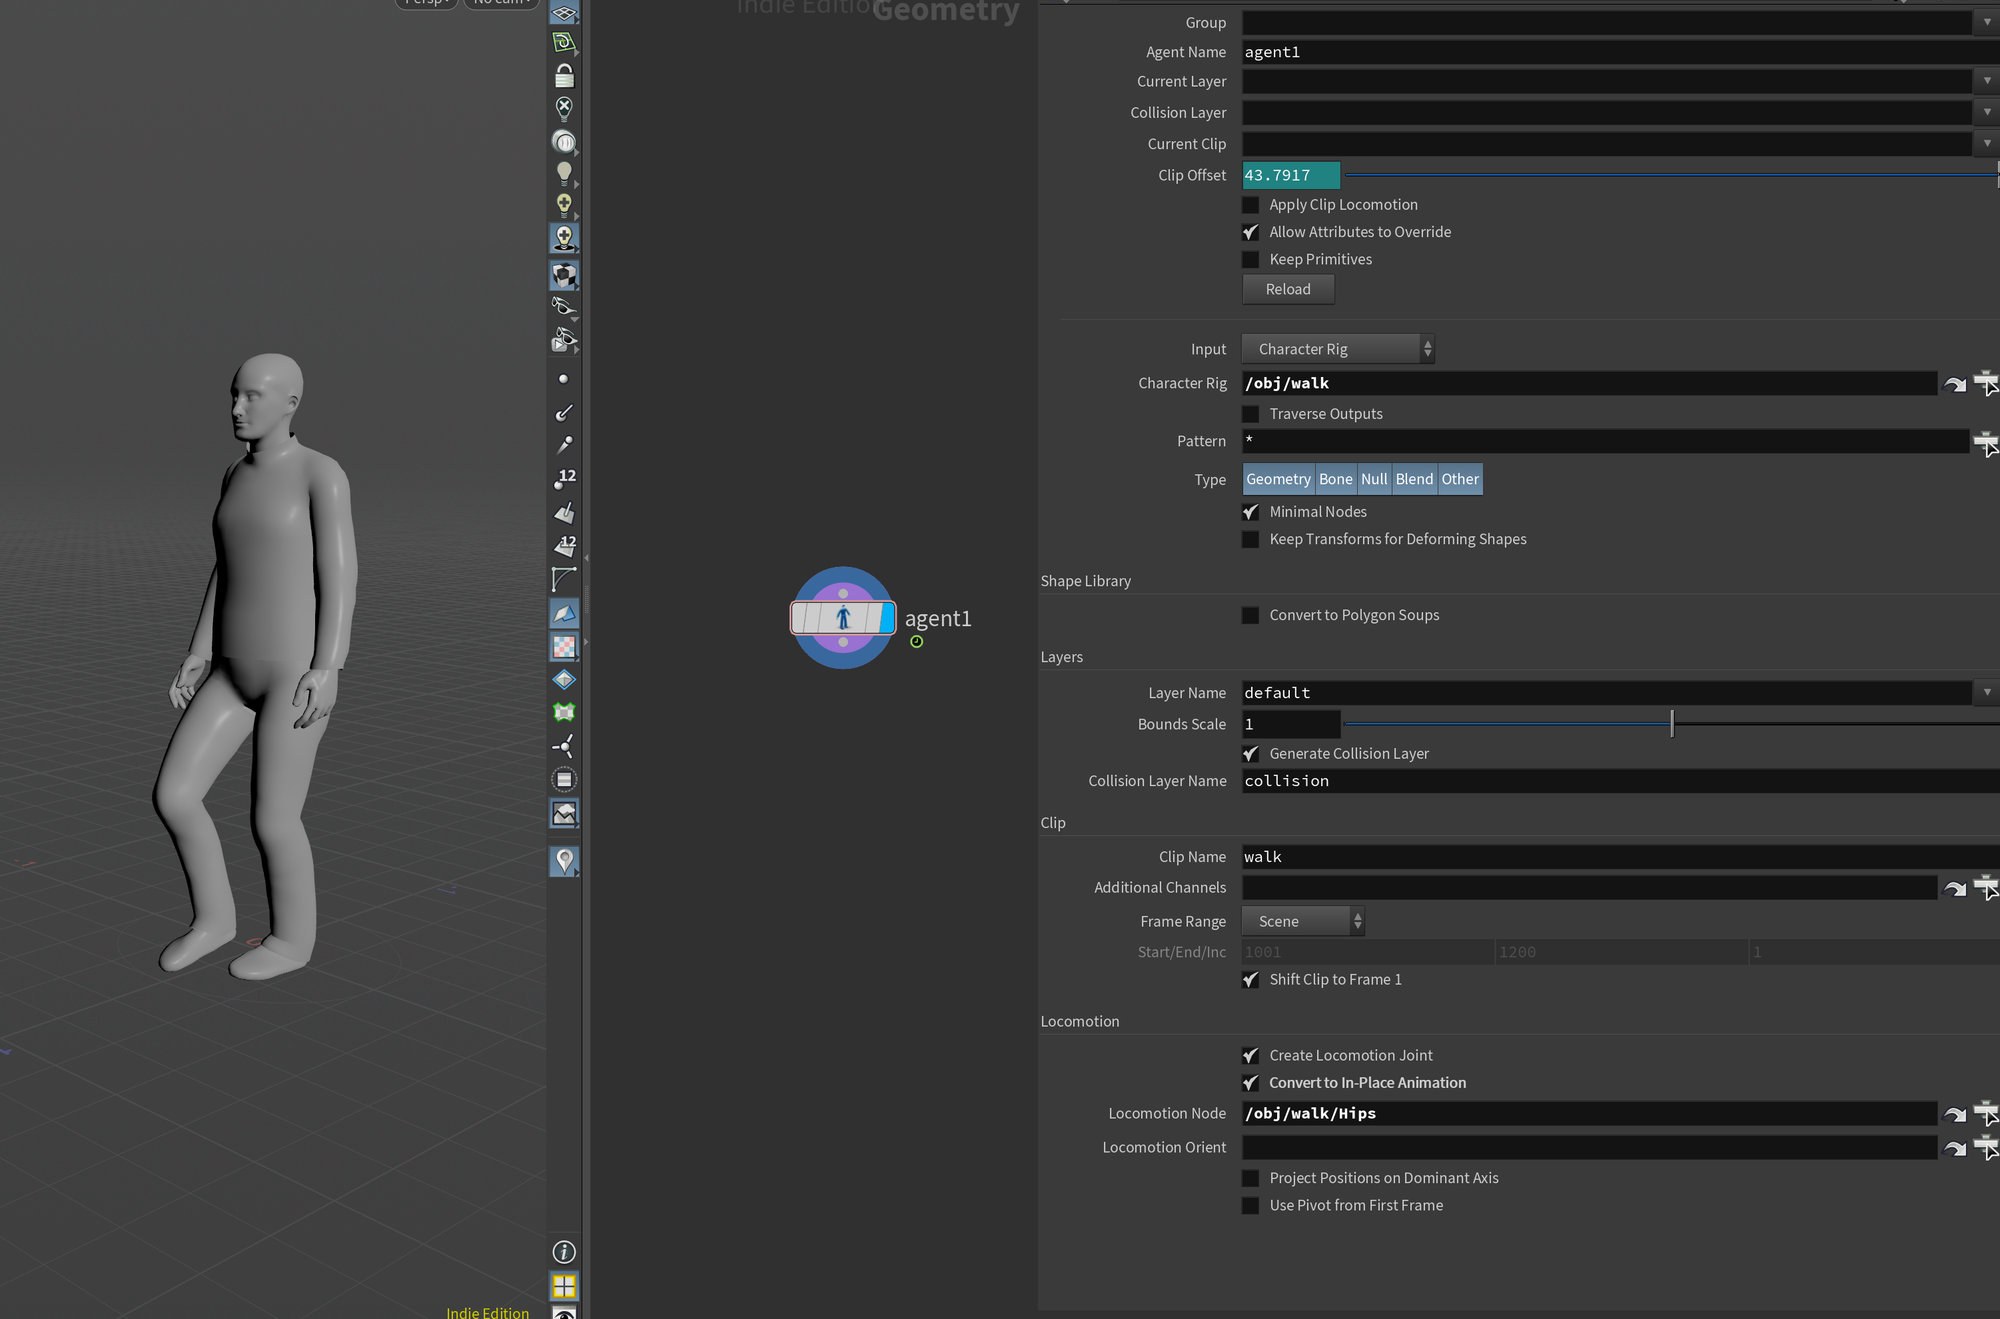
- Finally, you'll need to set the Frame Range of the clip. For the default walk cycle, it's 1-25.
And there you go, you now have your very own Agent with a walk cycle. If this was all you wanted your agent to do, you would be ready to move on to the actual crowd setup. But I want to show you a few more things first.
Adding Animation Clips
The next thing you usually want to look at is attaching more animation clips to your agents so you can vary their movement and have them adapt to your shot. If you're working with an FBX Character Rig you would be able to load any custom animations you've created as well.
Since we're working with the built-in Mocap Bipeds we'll instead load different animation clips directly through the Mocap Biped node. If you look you'll notice that we have different options in the Animation dropdown. Duplicate this node 3 additional times and load a different animation in each one. For this example, I've used walk, run, wait, and zombie
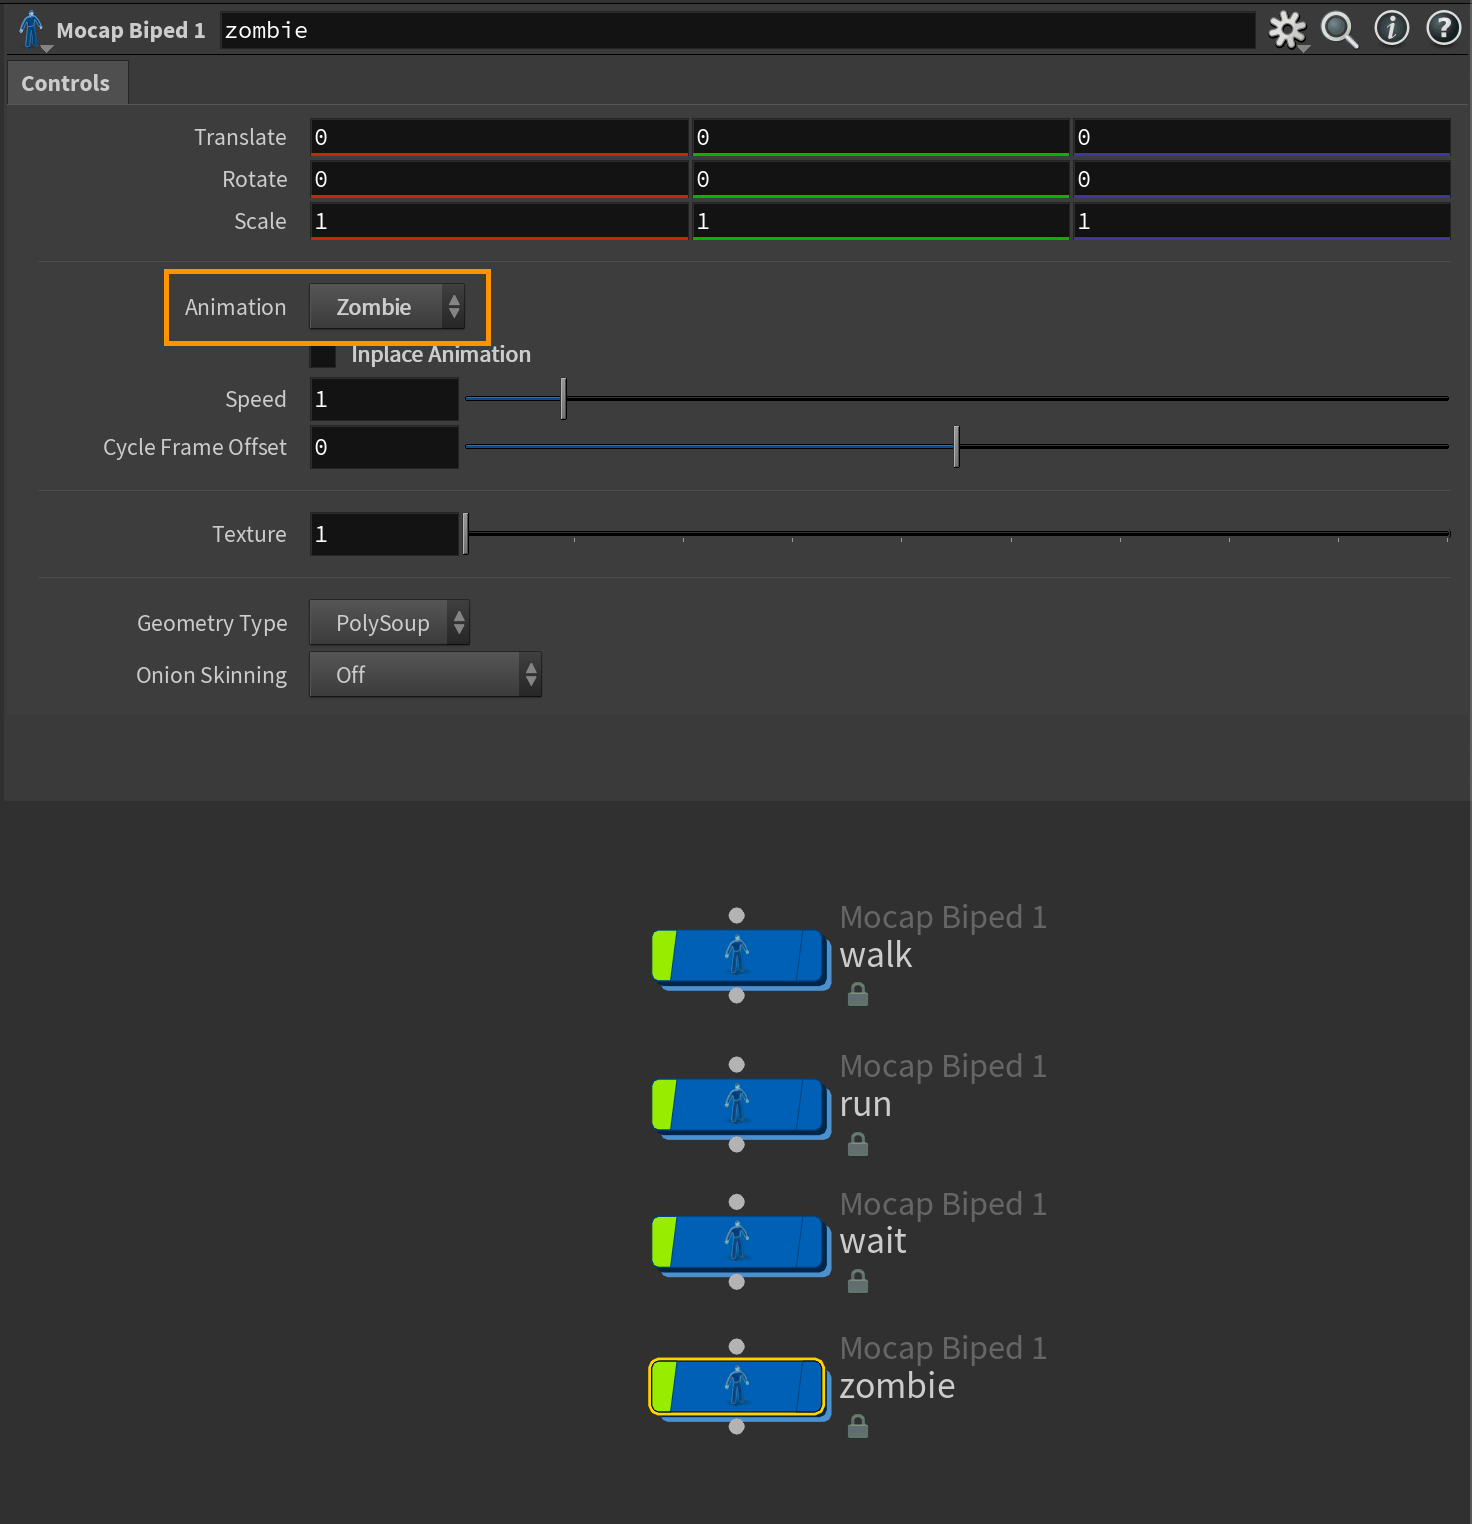
Inplace Animation remains disabled.Now, to add these new clips to our agent we'll have to drop down an Agent Clip node.
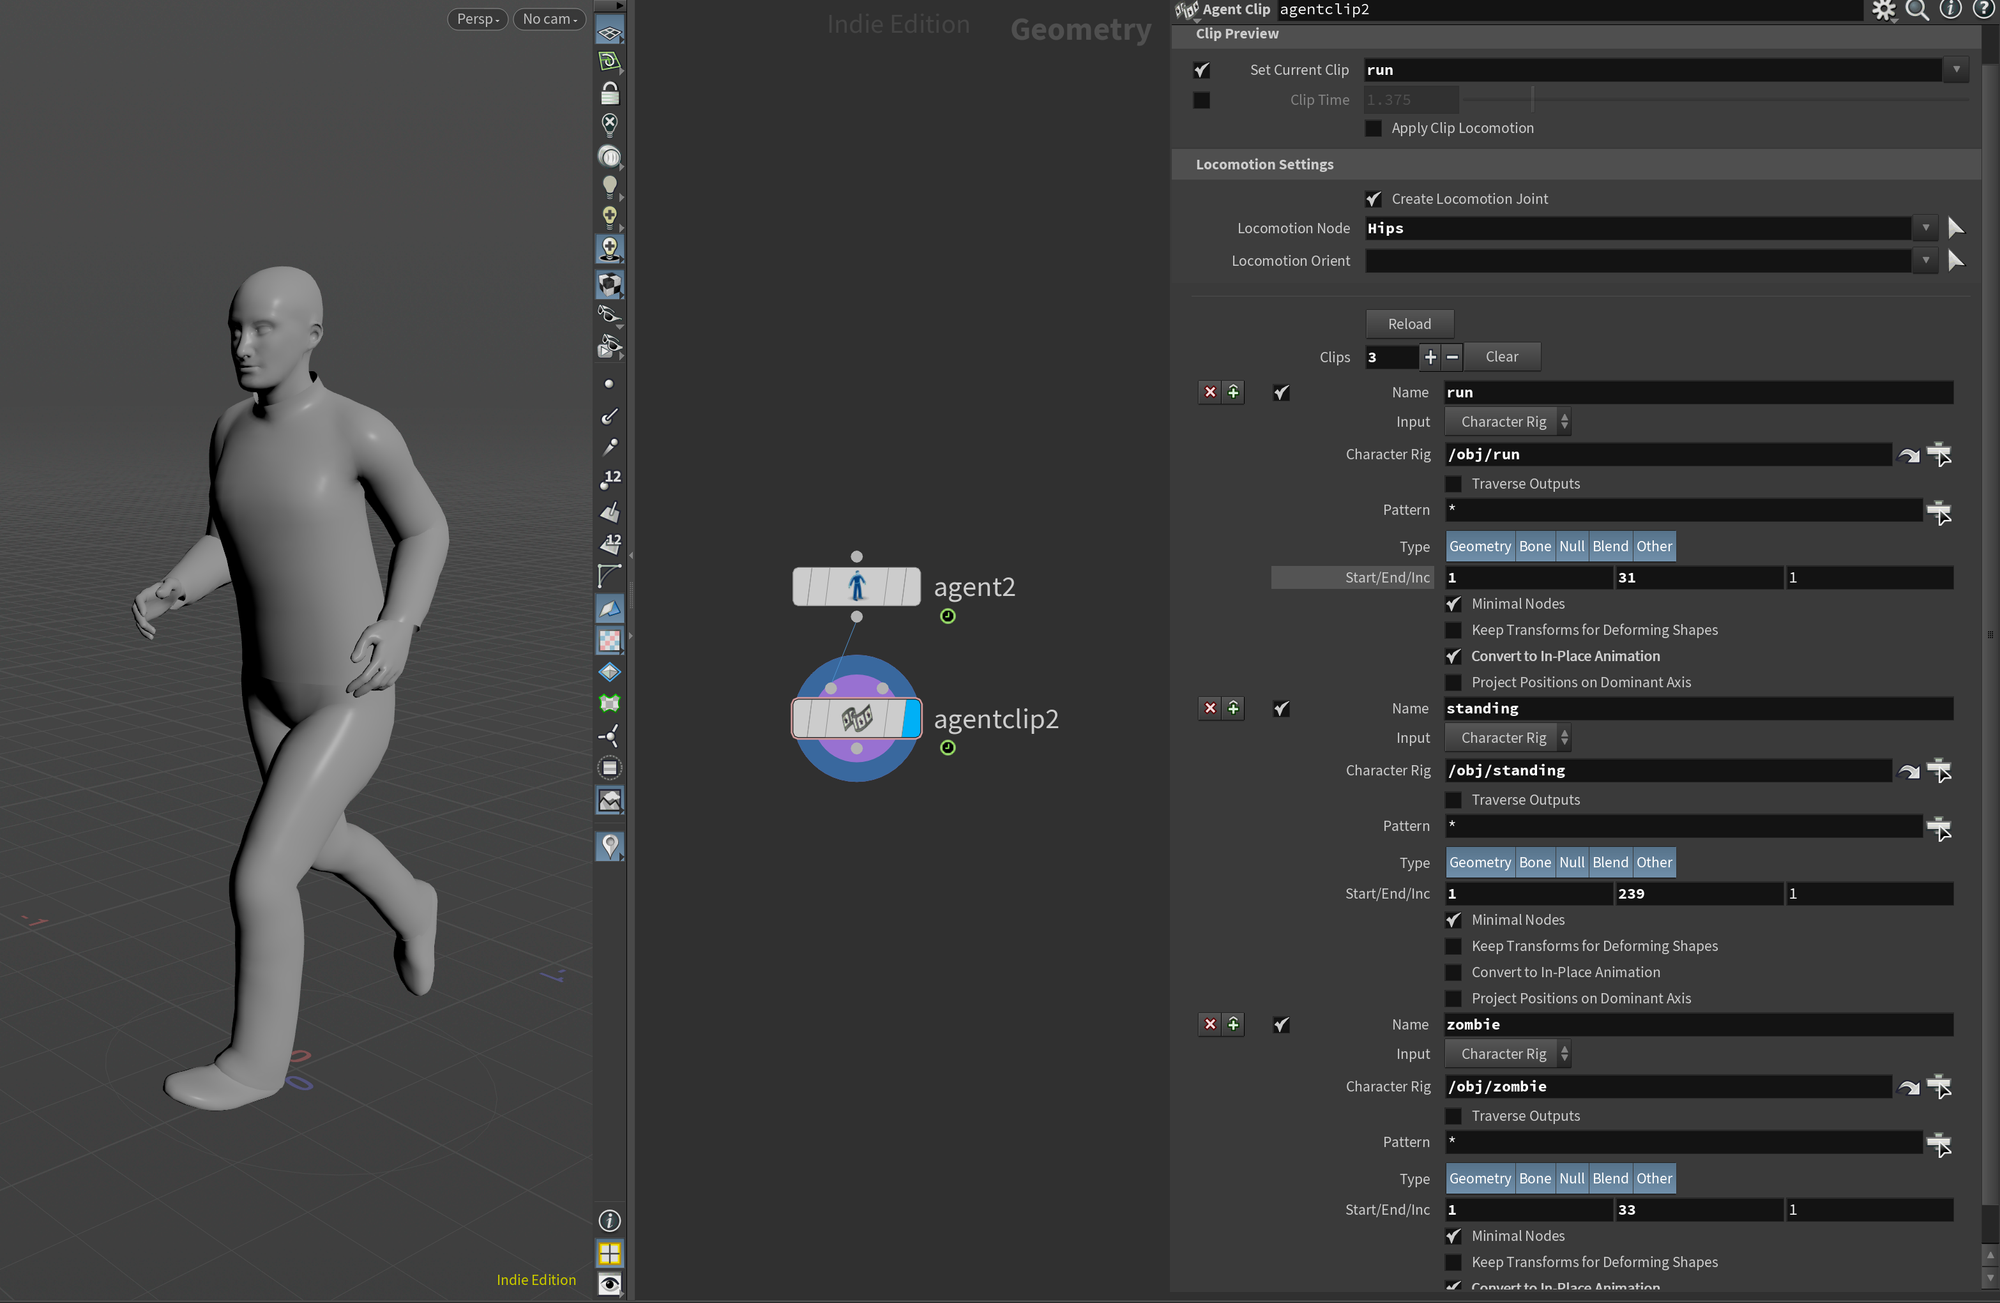
In the Agent Clip node, set your Locomotion Node to Hips like in the Agent node and point the Character Rig parameter to your Mocap Biped node that loads one of your other animations. I started with run in my case. Check Convert to Inplace Animation and name your clip.
You'll also need to set Start/End to the correct ranges for each animation. You can check the screenshot below to see the proper values for each Mocap Biped 1 animation.
You can also preview your new animation clip by setting Set Current Clip to the name of your new animation clip.
You can now continue to add the remaining clips in the same way. Either through unique Agent Clip nodes or by clicking the + sign to add more clips through a single node. Remember to give them all a unique name.
Convert to Inplace Animation as it doesn't have any locomotion. If you try to convert it it'll look pretty strange.Attaching Props
Often it's not enough to just have characters, you may need to add swords, shields, hats, and so forth. In the following section, I'll show you how to do just that.
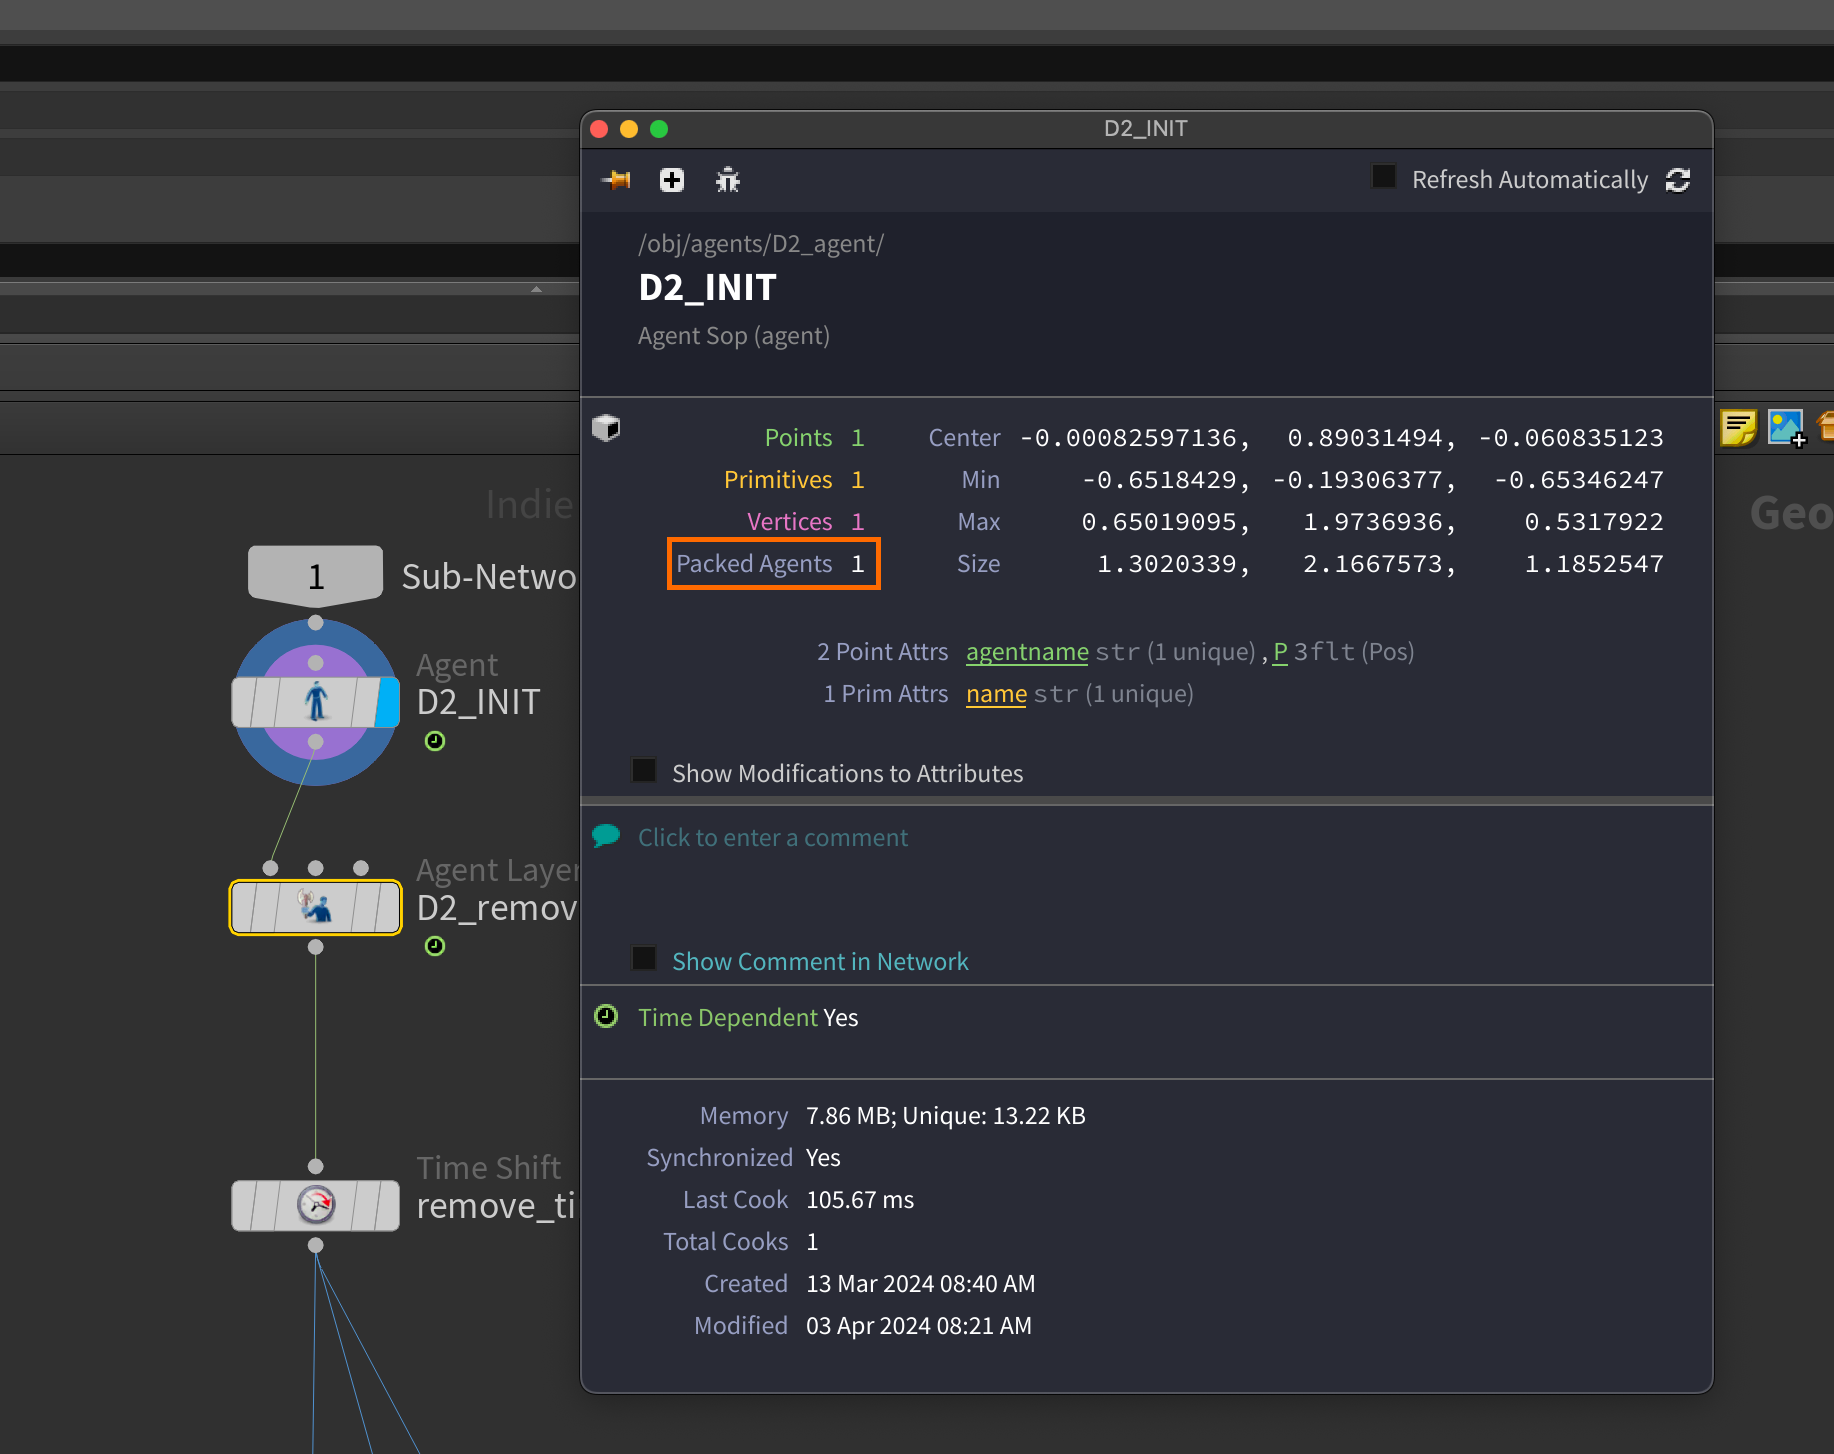
Quick tip: Time Dependency Optimization
First things first I'll show you an important optimization trick. Houdini has a concept called "Time Dependency". I've mentioned this before for LOPs, but it also appears in SOPs. Essentially it signals to Houdini that it needs to recook the graph every frame, starting from the node on which time dependency was introduced.
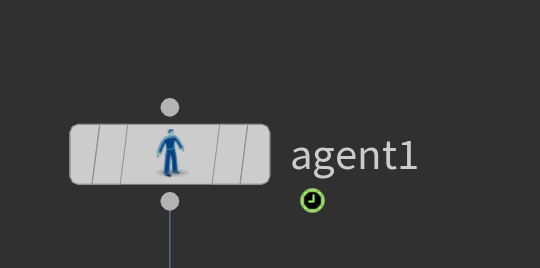
Before we start adding more complexity to our agent setup I recommend that we get rid of this temporarily. Naturally, we'll need to reintroduce it later on since we're dealing with animation, but while we're adding props and other adjustments to the agents we might as well optimize our scene and remove it.
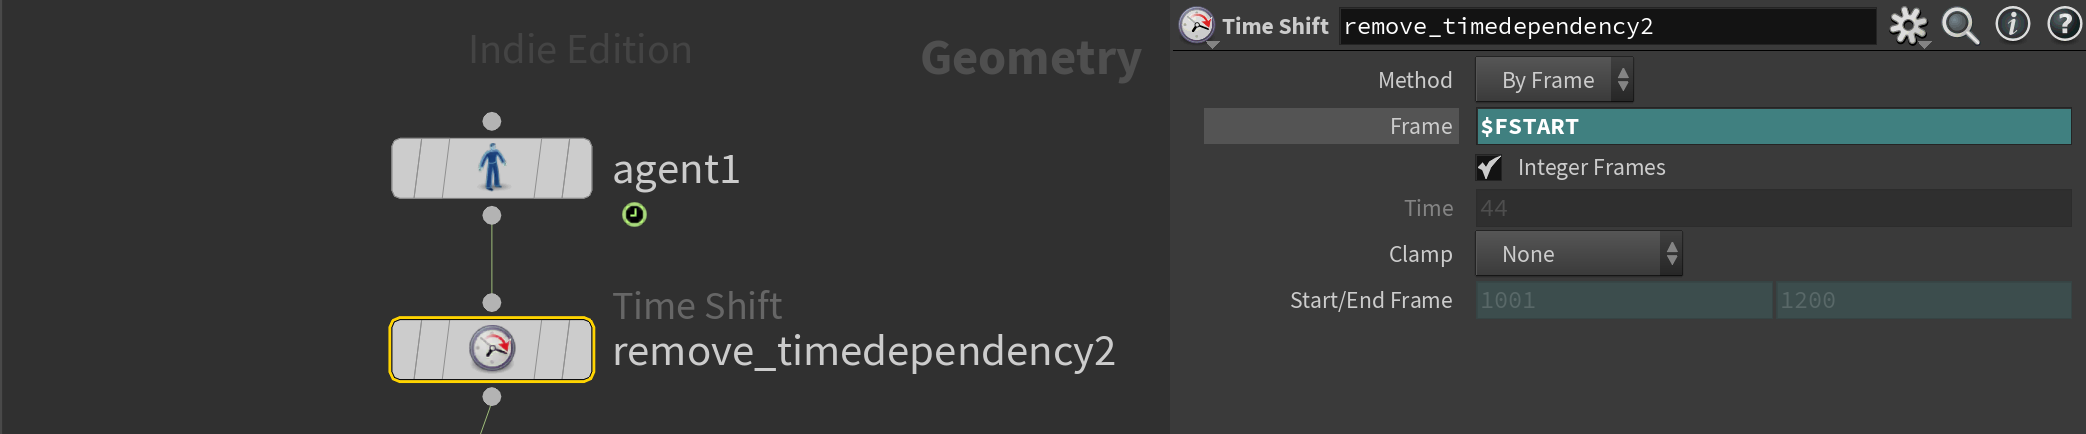
To remove it, add a Time Shift set to $FSTART. Please keep in mind that it samples all animation on that frame, causing it to be static now.
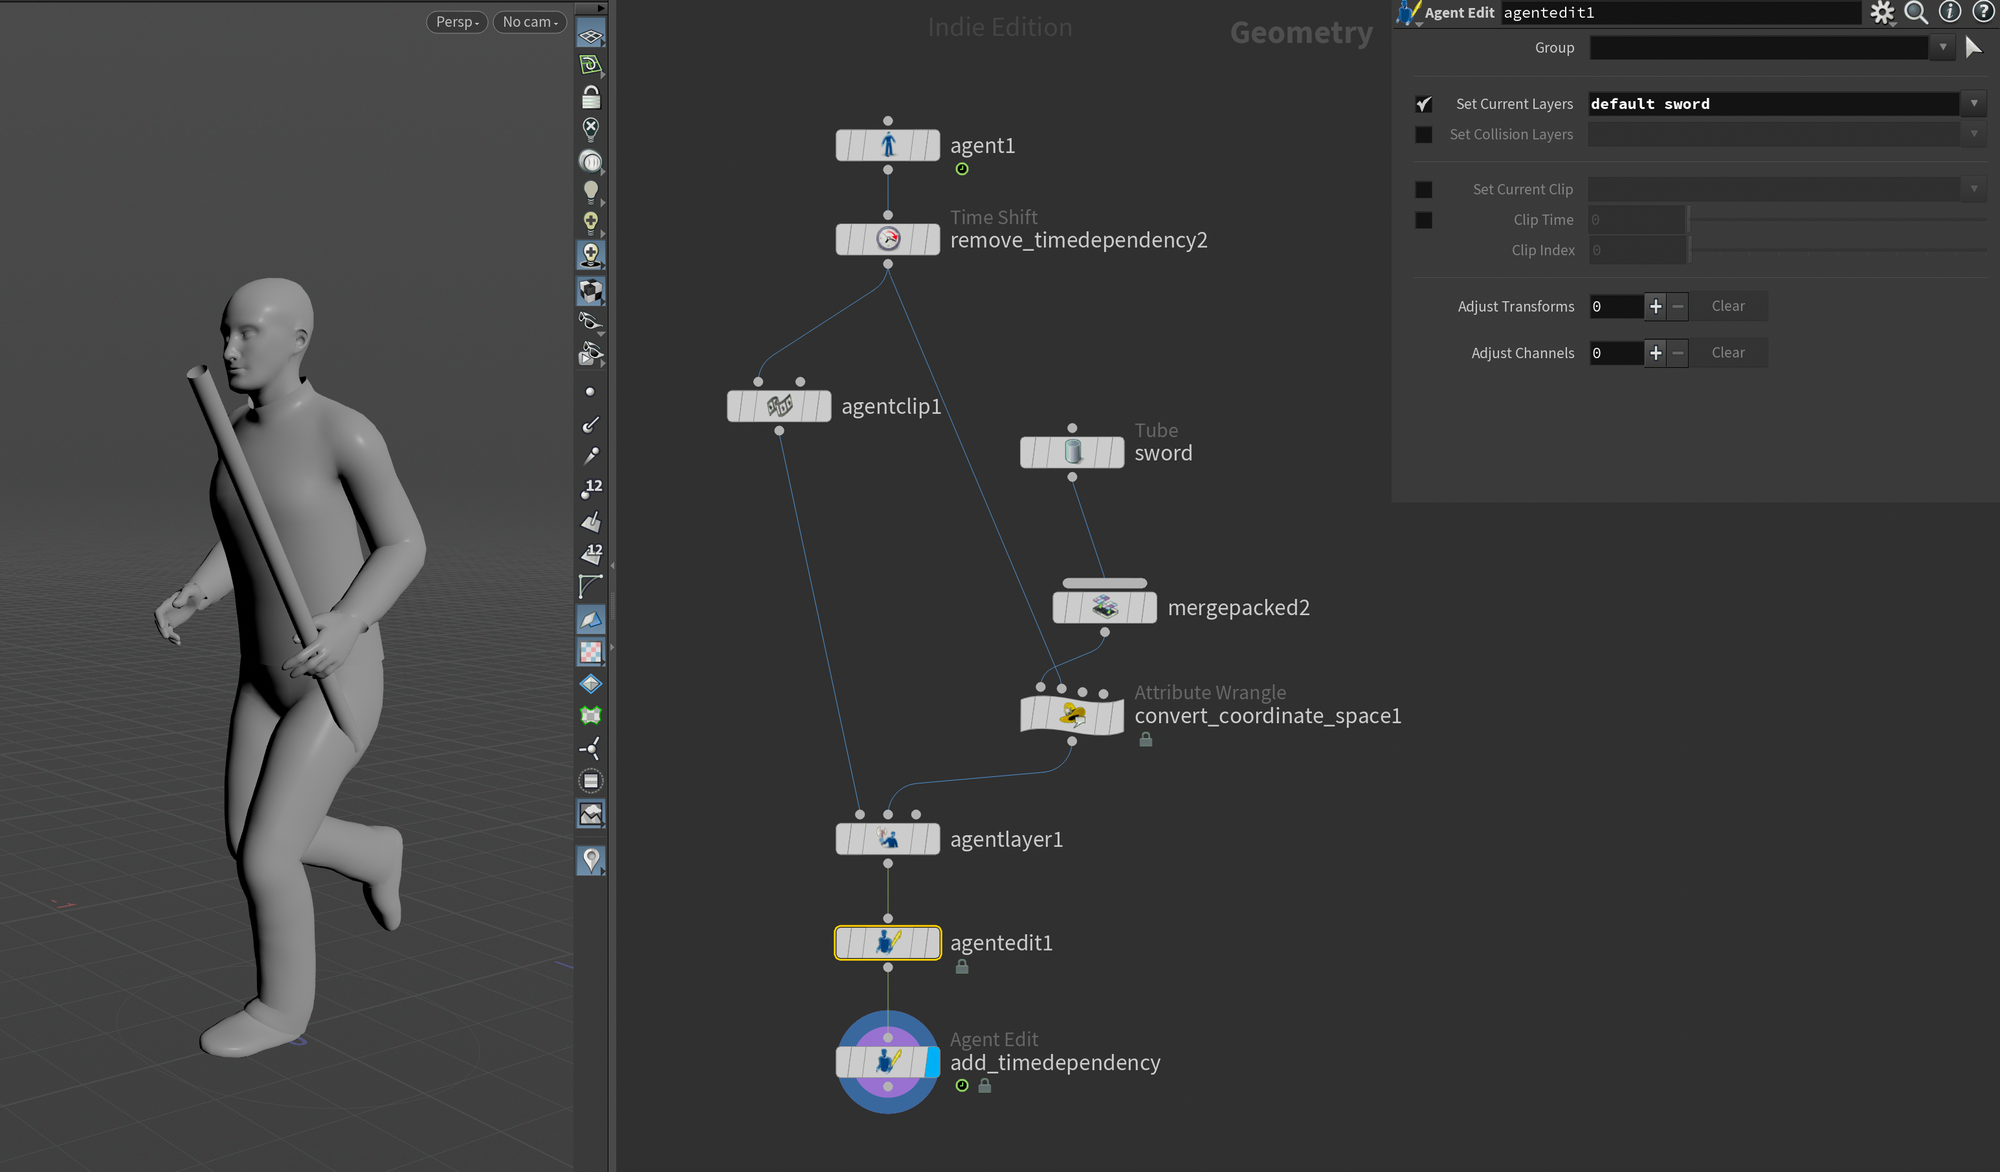
Later on, at the very bottom of your graph (after any adjustments we make in this section) you need to reintroduce time dependency to your agent to have the animation clips function properly. You do this by adding an Agent Edit , turning on Clip Time and setting it to $T . You'll now notice that your animation is back and the clock icon (time dependency) returns after this node.
$T. Agent Clip Time works with seconds, not frames. $T returns the current time in seconds.
Adding props using Agent layers
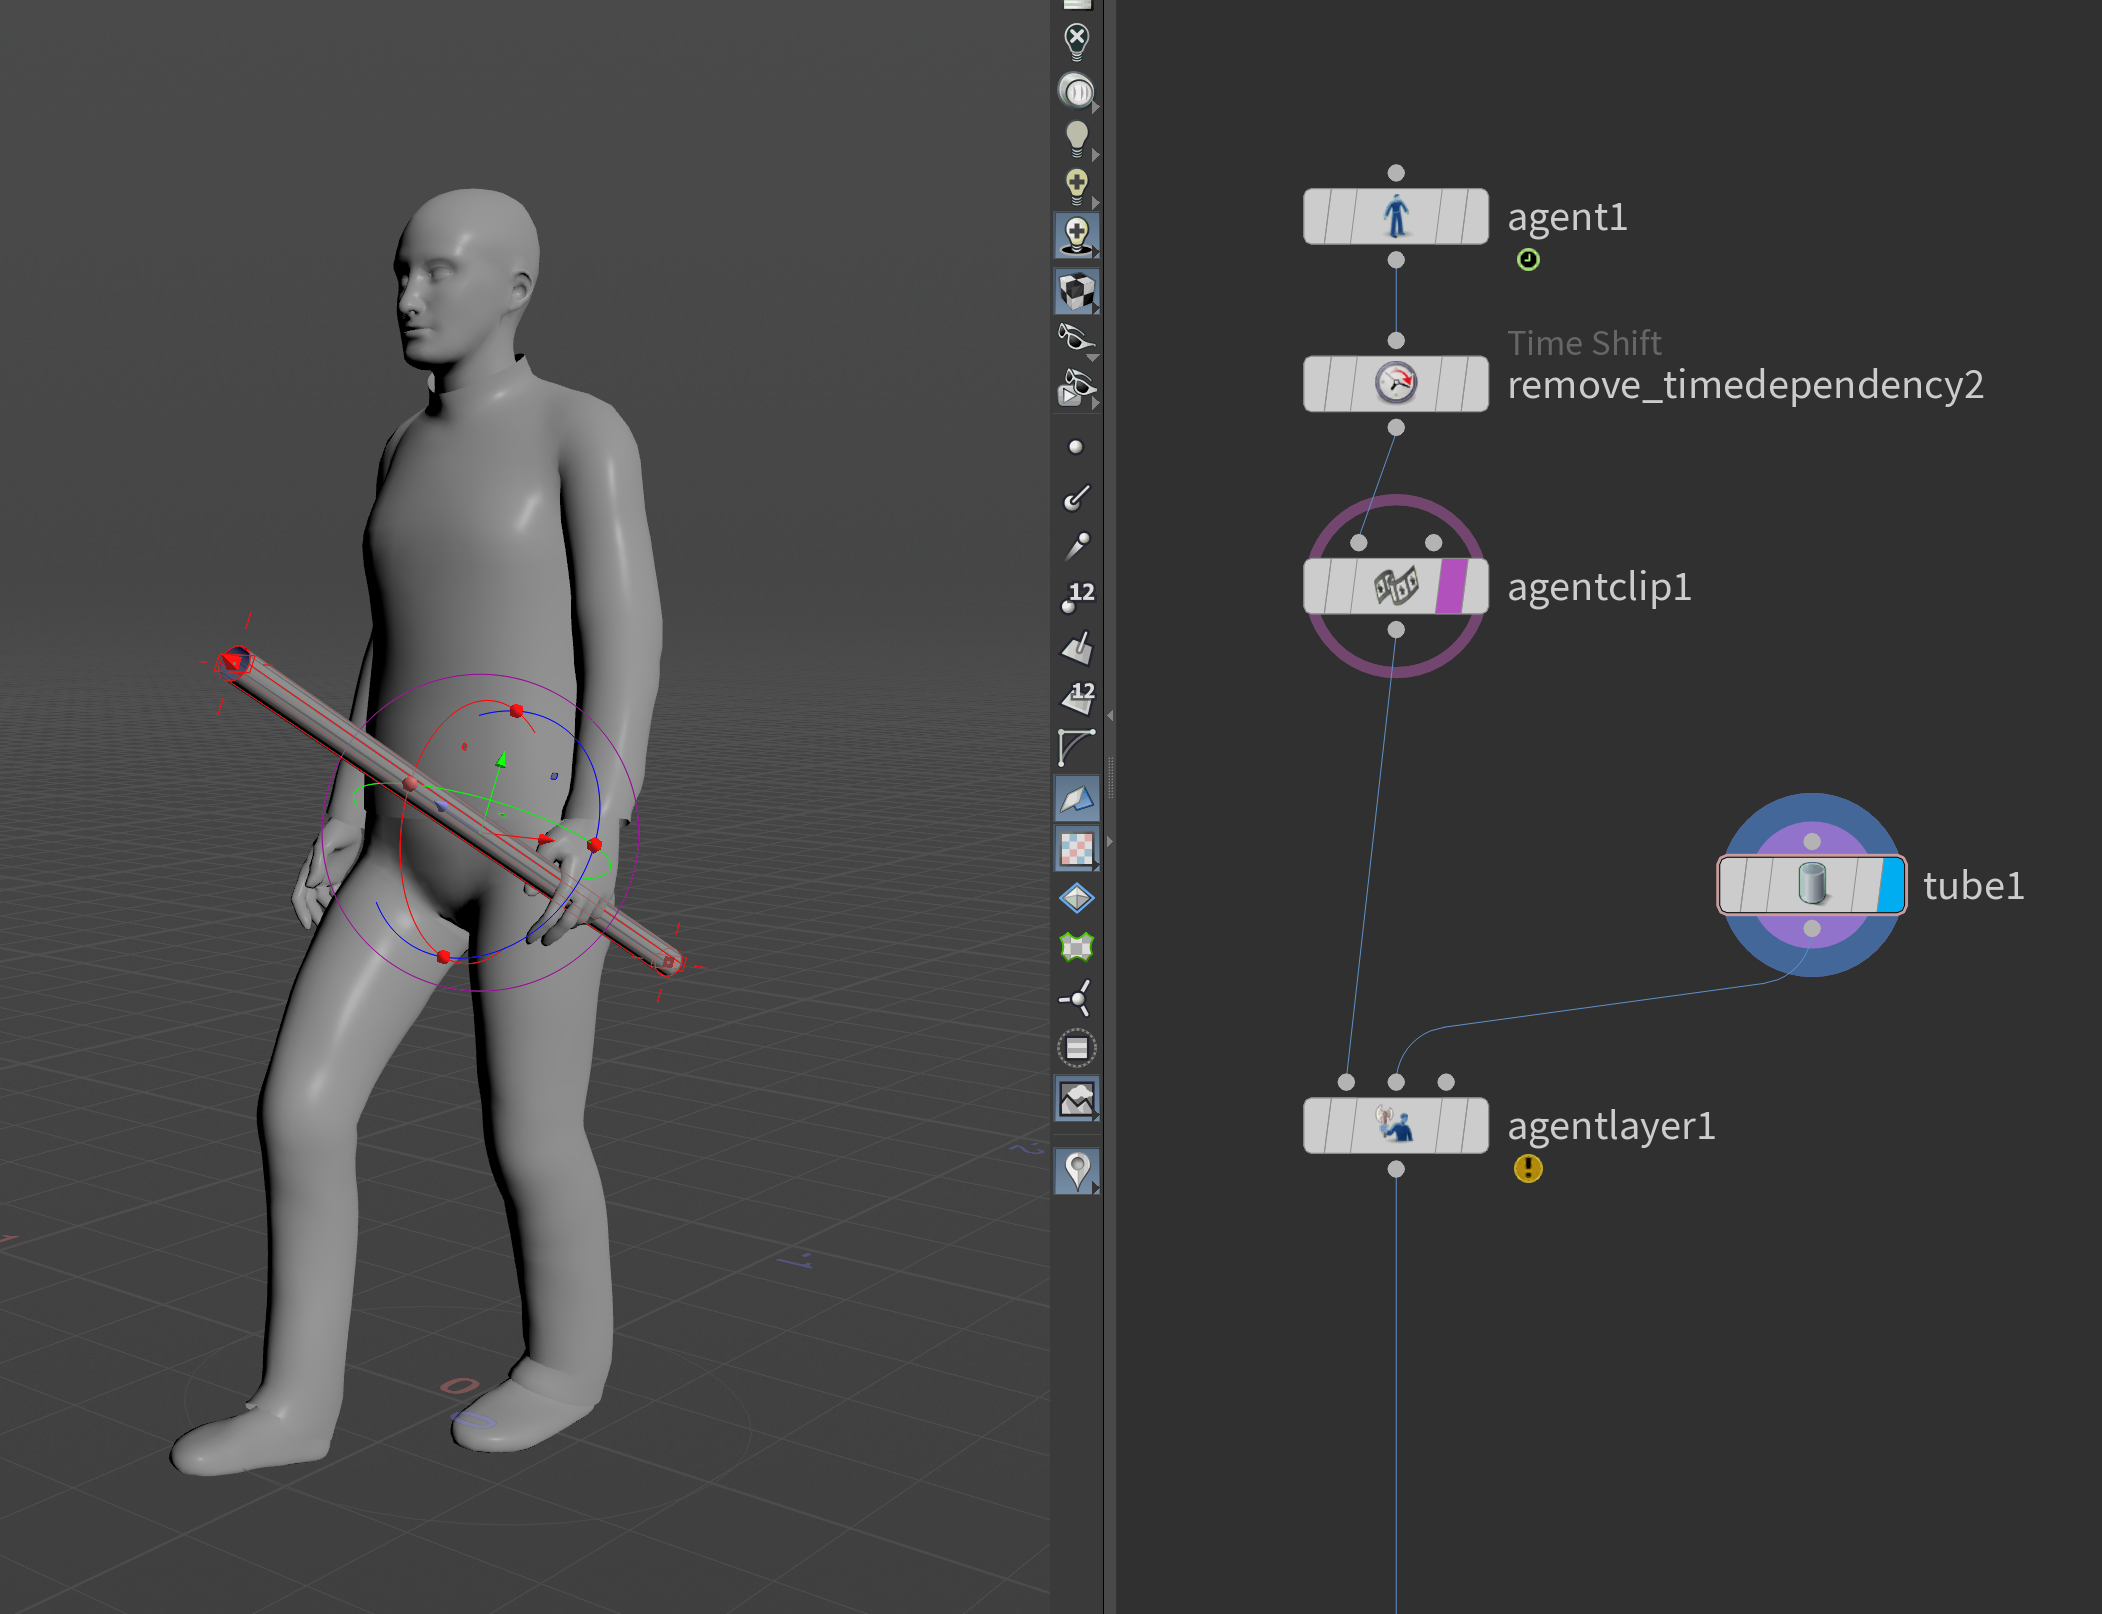
Now, let's jump to attaching some props. The first thing you want to do is drop down an Agent Layer node after your Agent Clip node(s). This node allows you to define new layers for your agents. By default your agent will disappear. This is because by default the node creates an empty Agent Layer called layer1 . In our case, I want to use a more procedural way of setting up props, so we can simply delete this layer so we can see our agent again by clicking the "x".

Next, you need to plug something into the second input of the node (Shape geometry) to enable the Shapes section of the Agent Layer. Let's try to add a makeshift sword using a tube. We can template our original agent to place it correctly in his hand.
Then, add a Merge Packed node and plug your transformed tube into this. You technically don't need to use this specific node, but it's handy because it automatically packs any inputs and gives them a name attribute according to the name of the input node.

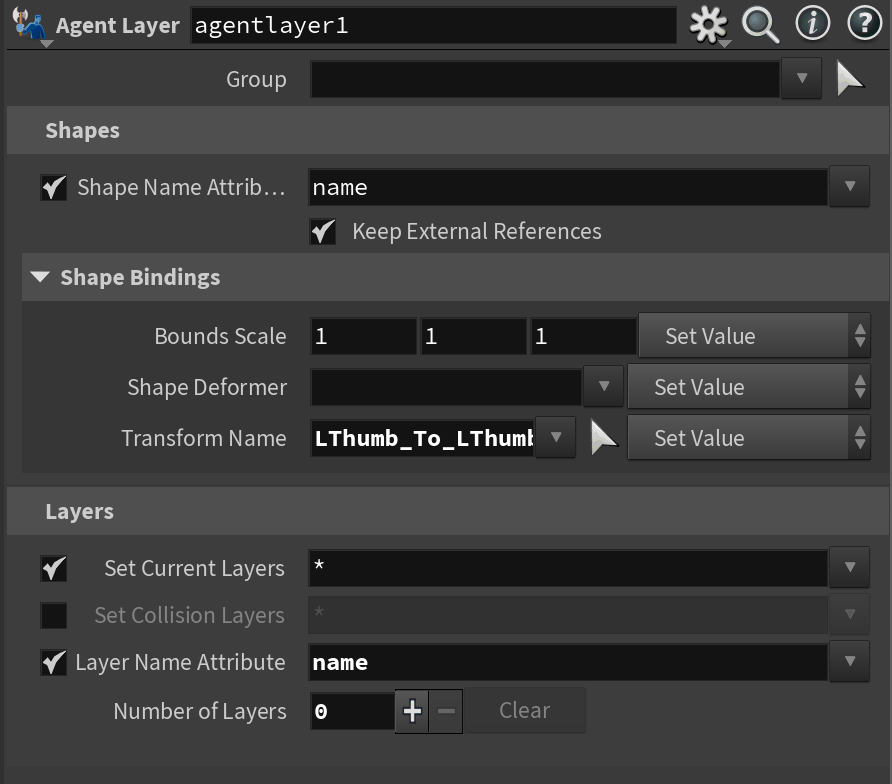
Now, after this, you'll need to set a few parameters in the Agent Layer. First, you'll be able to enable Shape Name Attribute and set it to name. This tells the Agent Layer node how to separate the input geometries.
You'll also need to expand the Shape Bindings section and set your Transform Name. This is the parameter that decides which joint/transform your prop(s) should be constrained to. In other words, your props will follow the animation of whatever joint you specify here. In my case, I chose LThumb_To_LThumbEnd as my joint. Finally, at the very bottom, you also need to enable Layer Name Attribute and set it to name as well. This will split up each named primitive into its own layer (if you had multiple swords for example).
However, now you run into a problem! If you view the agent layer you'll notice that your prop suddenly flies to a completely different area in space. This is because we placed our prop in world-space, but as we attach our prop to the agent joint we are suddenly in a different coordinate space. Fear not though, Mikael Pettersén presented a great VEX snippet in his Houdini 19 Hive Crowds presentation that you can use to convert your packed prop from world space into the coordinate space of your joint. Simply use the snippet below in an Attribute Wrangle and replace the "LThumb_To_LthumbEnd" with the name of whatever joint you constrain to in your Agent Layer node. The first input should be the packed prop geometry, second input should be the agent before the Agent Layer node.
int handId = agentrigfind(1, 0, "LThumb_To_LThumbEnd");
matrix hand_xform = agentworldtransform(1, 0, handId);
matrix xform = getpackedtransform(0, @ptnum);
xform *= invert(hand_xform);
setpackedtransform(0, @ptnum, xform);
Credit for the VEX code goes to Mikael Pettersén in this H19 Hive talk.
After this, we're finally good to go with our prop and you can continue to add as many as you wish! I encourage you to try to add a few more and play around with attaching to different joints. To preview the props you can add an Agent Edit node and set the Current Layers to default and the name of your prop layer separated with a space. If you then switch to the Agent Edit that enabled the animation and created time dependency you can preview the prop with all of your animations.
Prop transform Solaris issue (Please read)
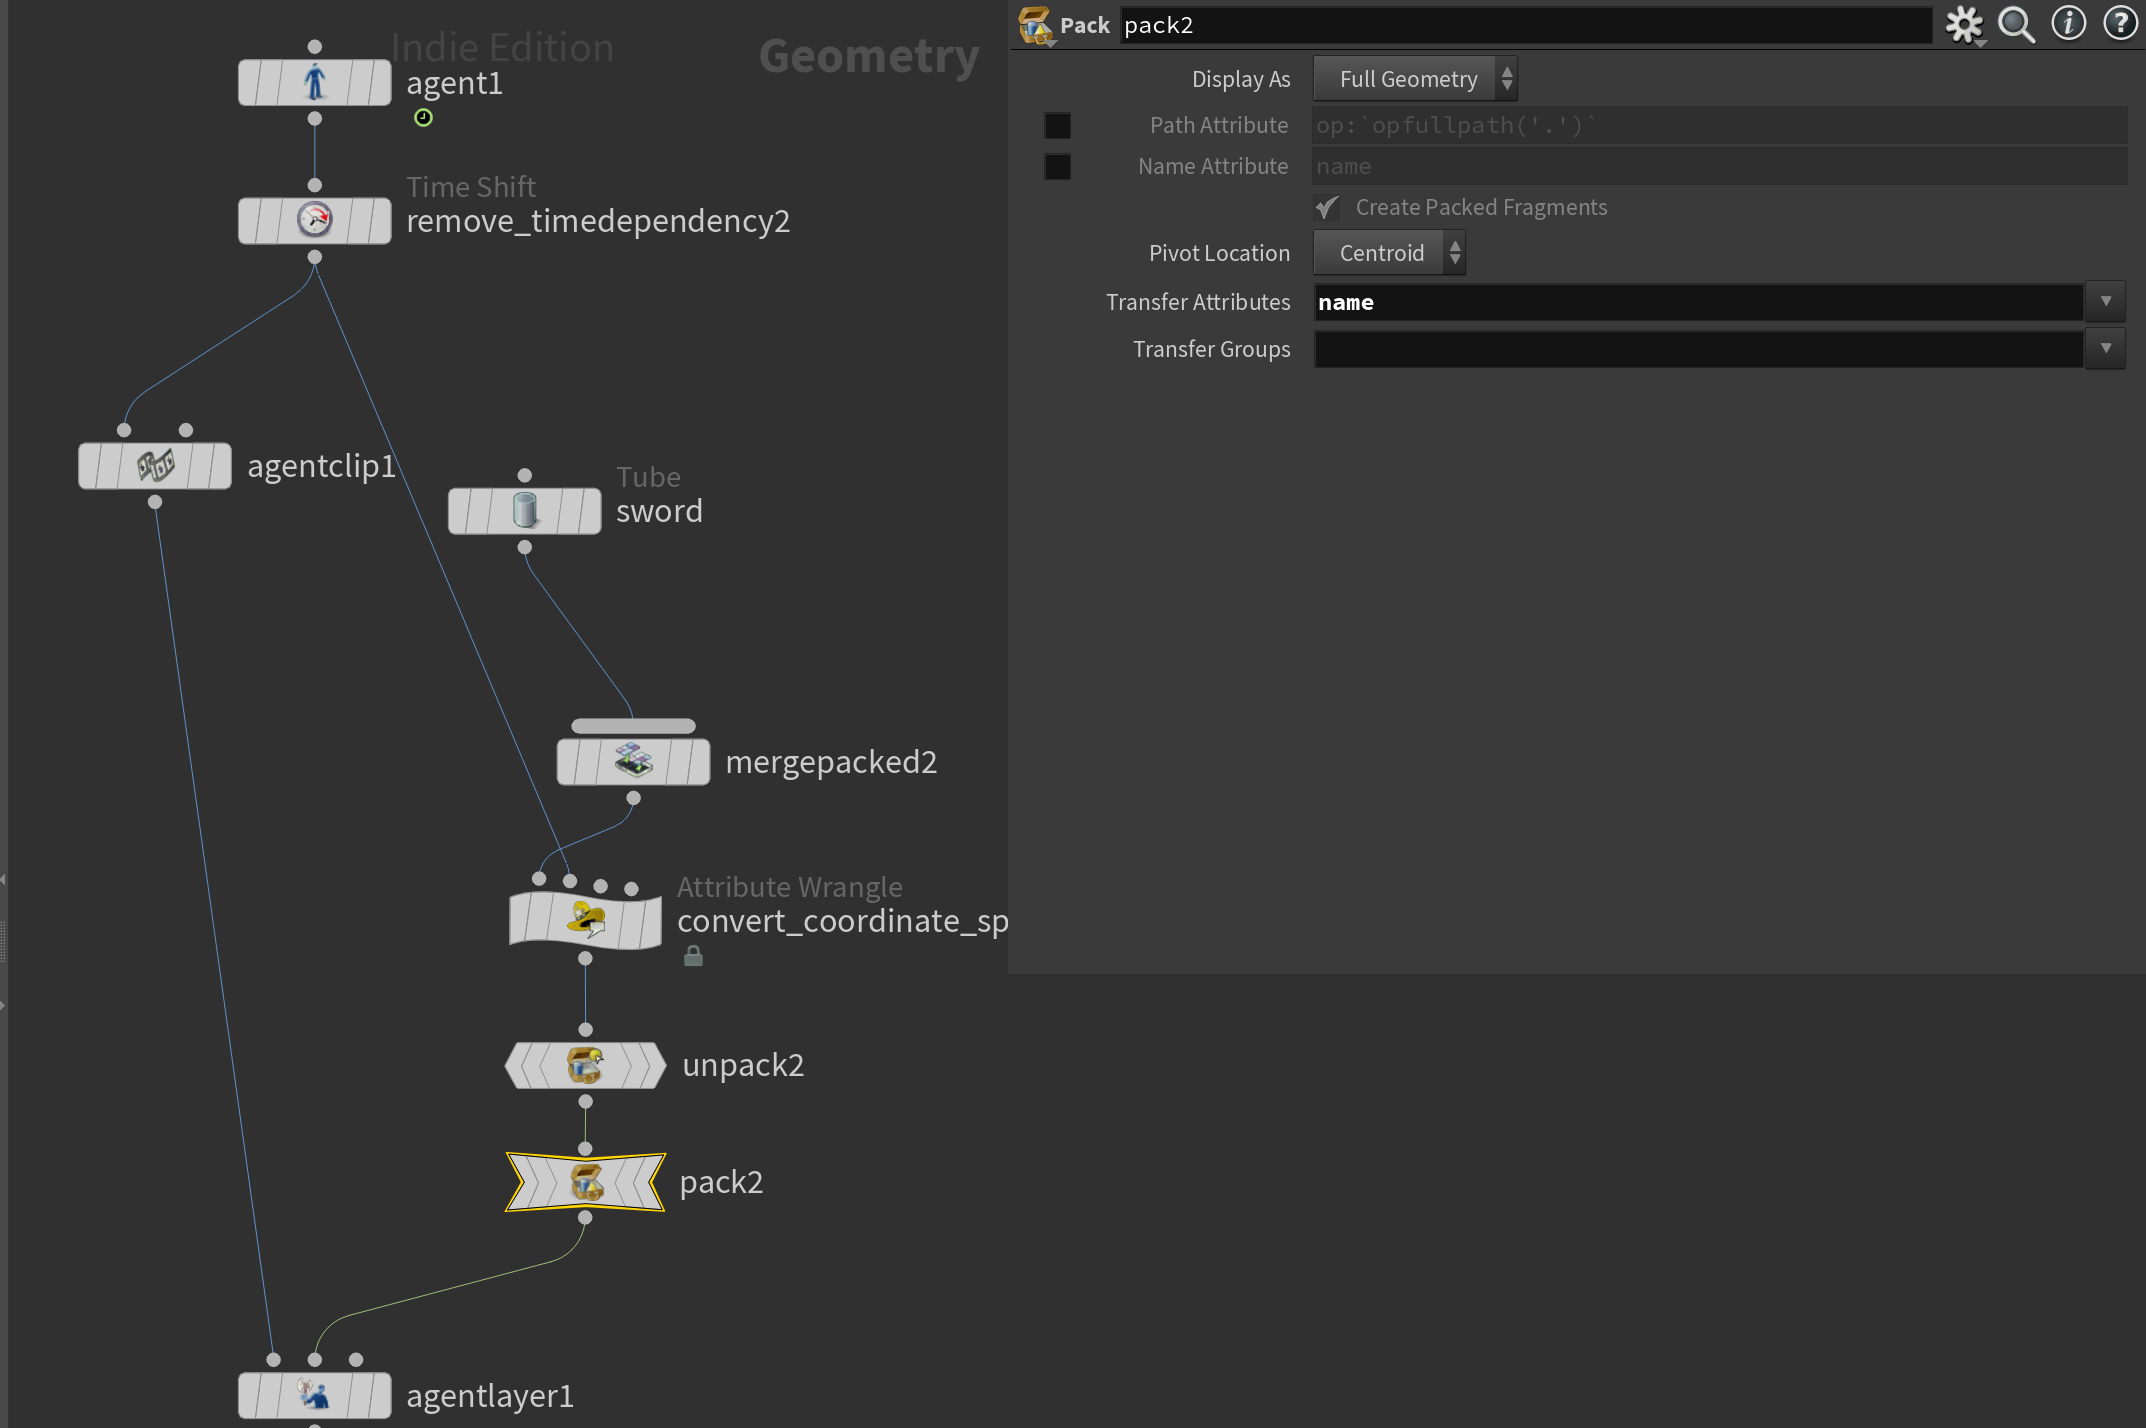
Here's a bit of public service. With this current prop setup, you won't get the proper transforms when you move into Solaris. This is because, for reasons unknown to me, Solaris doesn't seem to read the full packedtransform we are storing our space conversion in.
It is luckily very easy to fix this. All you need to do is add an Unpack after the "convert_coordinate_space" wrangle you see in my screenshot above directly followed by another Pack node. The reason this works is because it discards the packedtransform and applies the tranformations directly to the points themselves.
Remember to set both the Pack and the Unpack to transfer the name attribute.
Motionpath Crowds
Setting up the fast new simulation-free SOP Crowds.
With all the preparations done, we can finally move on to the actual crowd generation and take a look at the new Crowd tools in Houdini 20! We'll start by creating a crowd using the Crowd Source node (which is not new), followed by experiments with the multiple new MotionPath Crowd nodes that were introduced in Houdini 20.
Crowd Source
The Crowd Source node is the heart of your crowd creation. This is the node responsible for scattering your agents and setting up various starting parameters like randomizing the agent state, clip time, heading, etc. You'll likely keep going back to this node as you iterate on your crowd setup.
Add this node right after your Agent nodes (if you want to input multiple agents you can even merge them before adding this node and add them in the first input (just using a regular merge node)).
The second input of the node is for adding a custom surface to scatter them on.
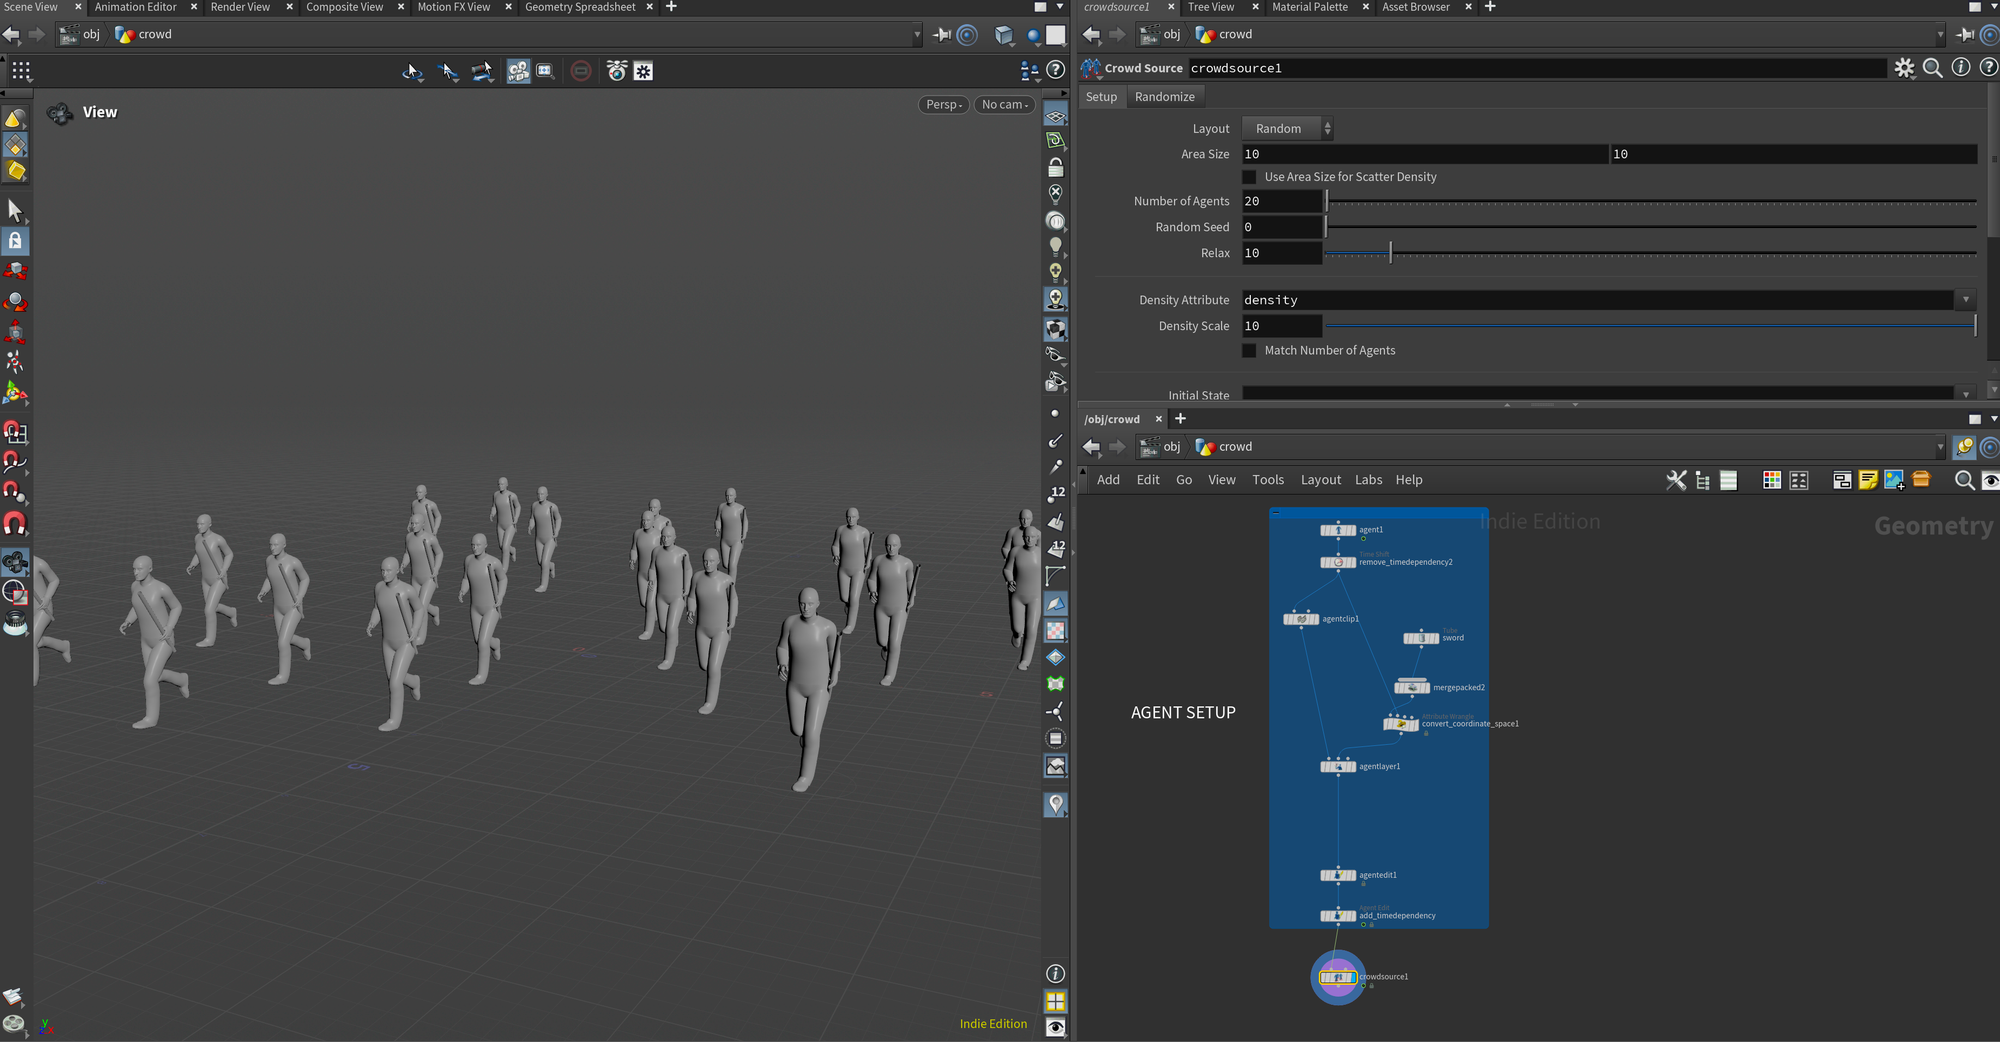
Agent Edit node to set the Current Clip to the "run" animation, and also set the current layers to default and sword (which is the name of my prop layer). This way by default the agents will be running, and they'll all have their prop.The first tab of the Crowd Source node is primarily scattering settings. There are 2 primary modes - Formation and Random. Random works a lot like a regular scatter node, exposing some parameters for relax iterations, controlling the scatter with density attributes, etc. Formation is great for cases where you need the agents to be lined up - for example if you're doing a marching army.
The second tab of the Crowd Source is a bit more interesting. Here you can add a ton of randomization to your crowd, which is super important to avoid the agents just looking like copy-pasted characters. I recommend at least enabling Randomize Clip Time (defaults are usually enough), Randomize Initial State (so the agents have random animations - called "states" here), and Randomize Agent Primitive only if you have more than one agent.
For the Randomize Initial State you can add the animation clips/states you want your agents to use by clicking the "+" and tweaking the weights to your liking.
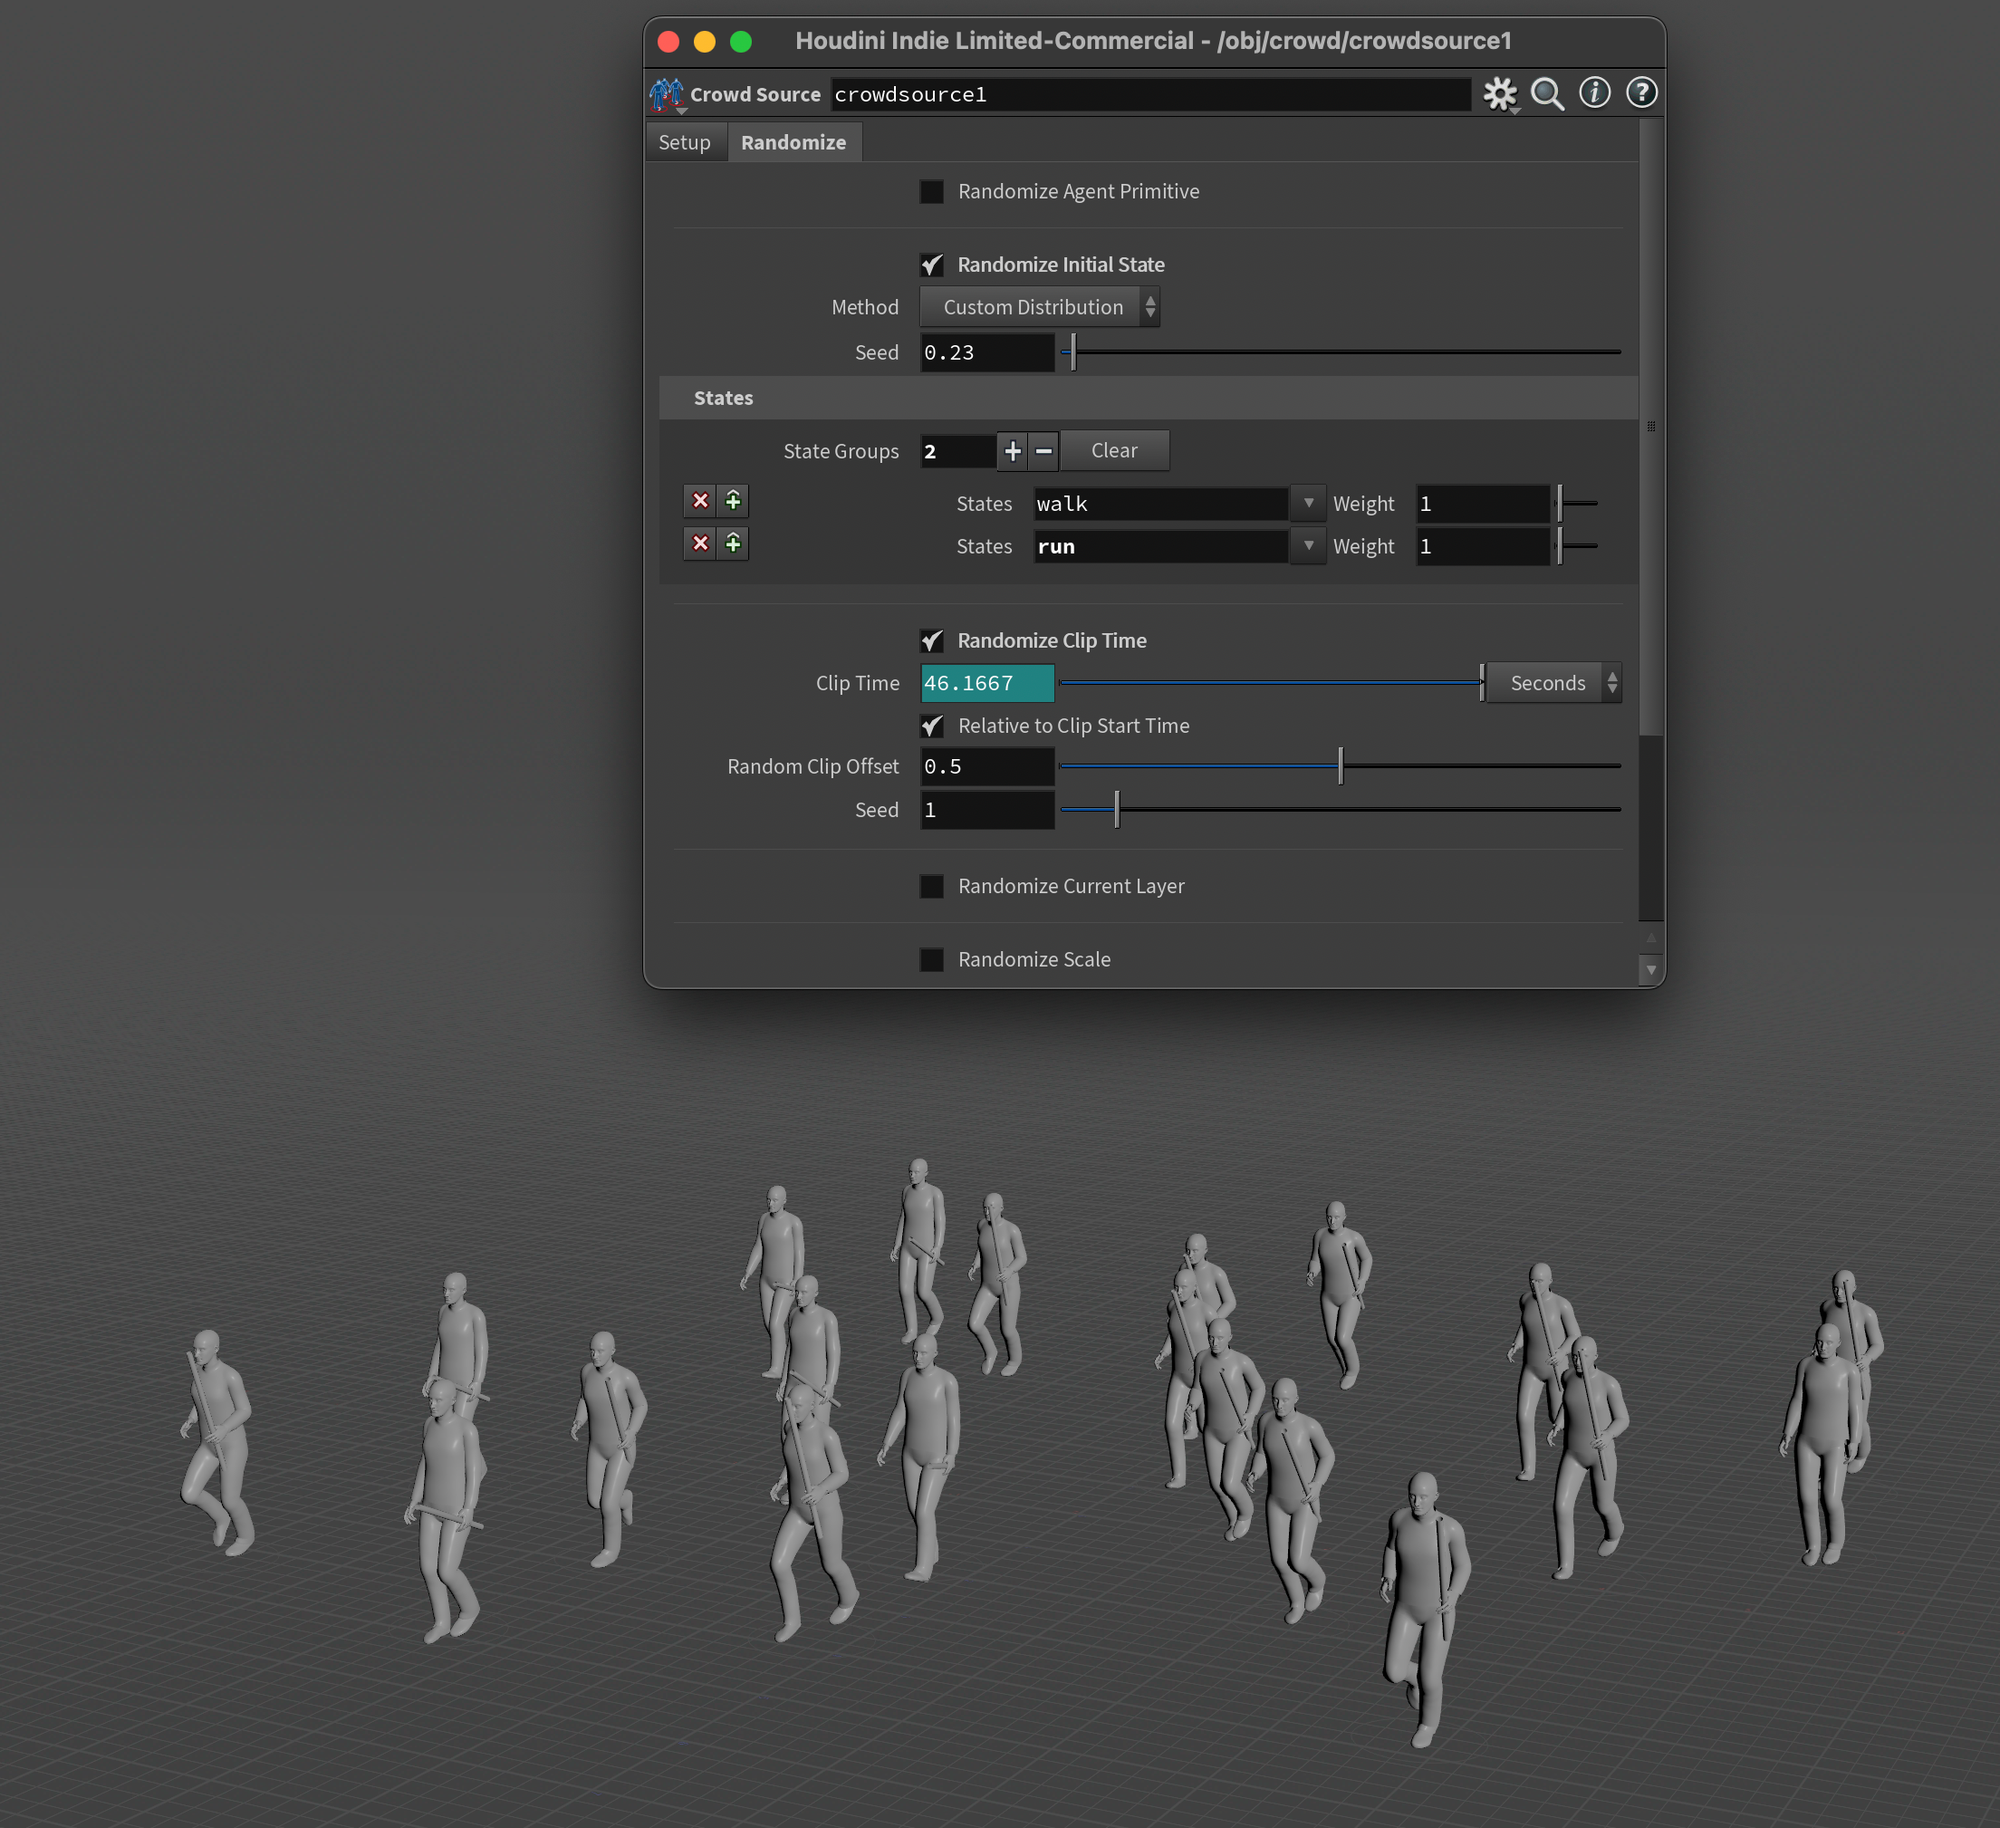
Don't worry about randomizing the layers, I would like to show you how to do that using a Crowd Assign Layers instead.
If you play the scene now you'll see that all the agents have randomised animations and timings creating a lot of great variation. They have no locomotion of course, but we'll address that in the next sections.
Crowd Assign Layers
Lastly, before we dive into creating the MotionPaths I want to show you how to randomize layer assignments so not everyone has the same prop. This is most efficiently done through a Crowd Assign Layers node.
Before plugging your crowd into this node I recommend adding an Agent Edit node and setting the Set Current Layers to default . This was you have a "clean" starting point without any props attached to your agent.
You can do a lot of different things in the Crowd Assign Layers but for this example, I'll just show you how to switch between different props. In the Layer Selection part of the parameters, click the "+" to add a layer corresponding to each type of prop (and an extra one for no props if you want) and type in the name of the layers in each one.
This will randomly switch between the specified layers for each agent. You can adjust the Weight on the side to have the props be more or less common.
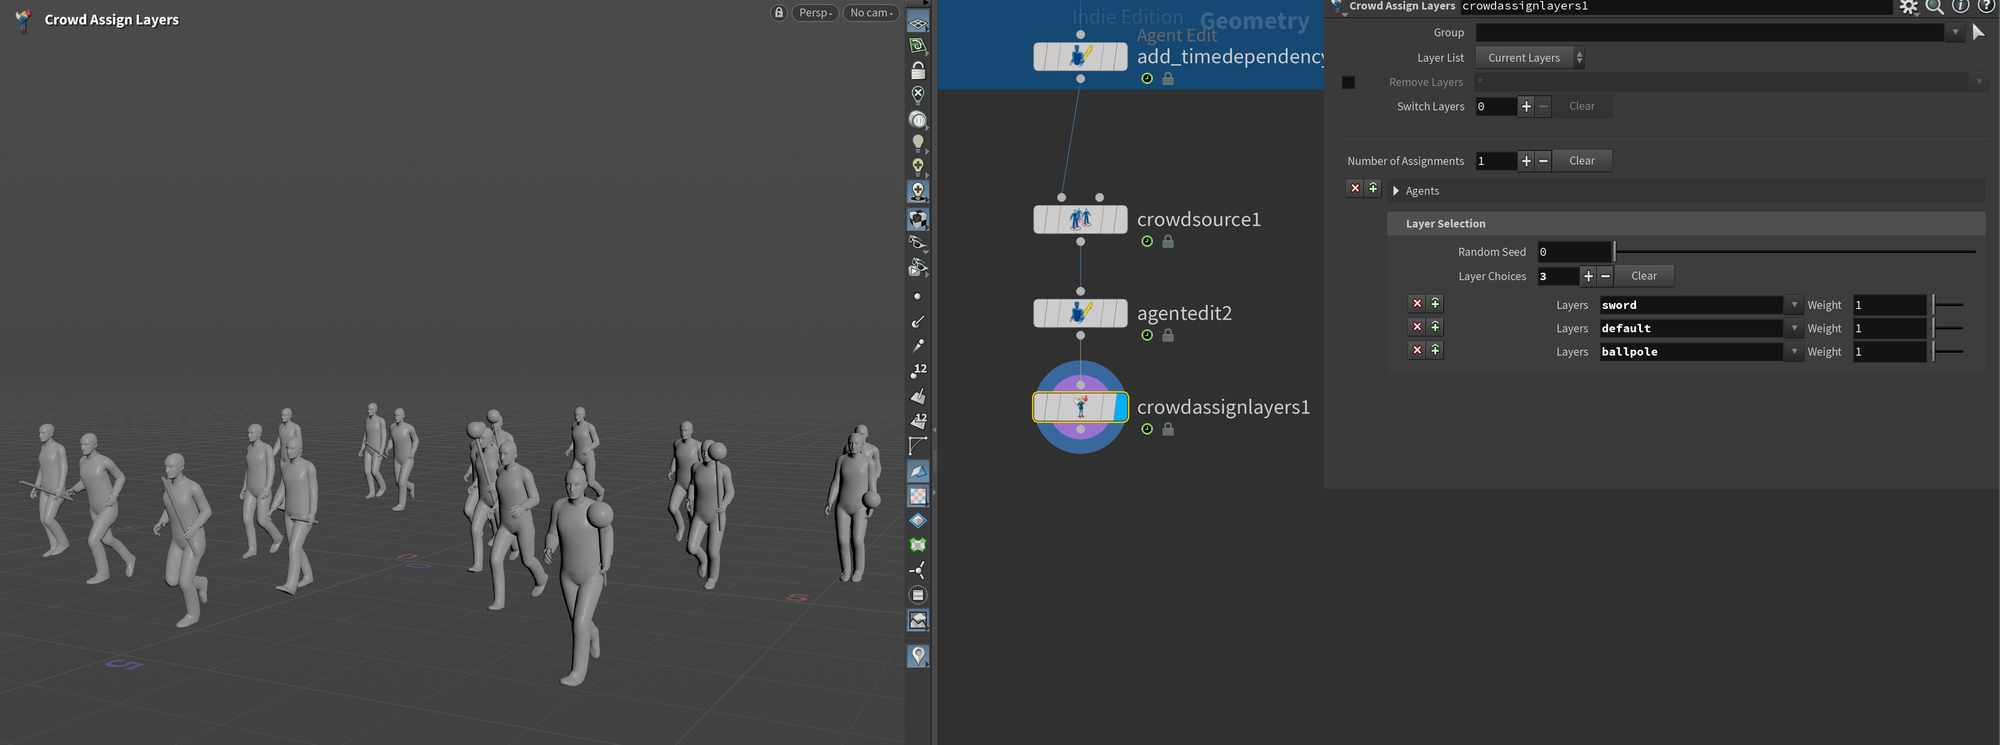
In my example, I've added a default (for no props), a sword for my sword prop, and an extra ballpole which is an additional prop I created featuring a ball on a stick. As you can see my crowd now gets those randomly assigned.
You can do more complex assignments if needed in this node by increasing the Number of Assignments but for now, I'll just leave it at this and you can explore more yourself.
Basics of Crowd MotionPaths
Let's dive into the crowd animation itself. MotionPath Crowds are a new set of tools introduced in Houdini 20 that allow for quick and simple crowd setups without the need for simulation. It can be used alone (as we will here) or in conjunction with simulated crowds.
It's very easy to set up, all you have to do is add it after all the the setup we did before, and it will automatically add locomotion to your crowd.
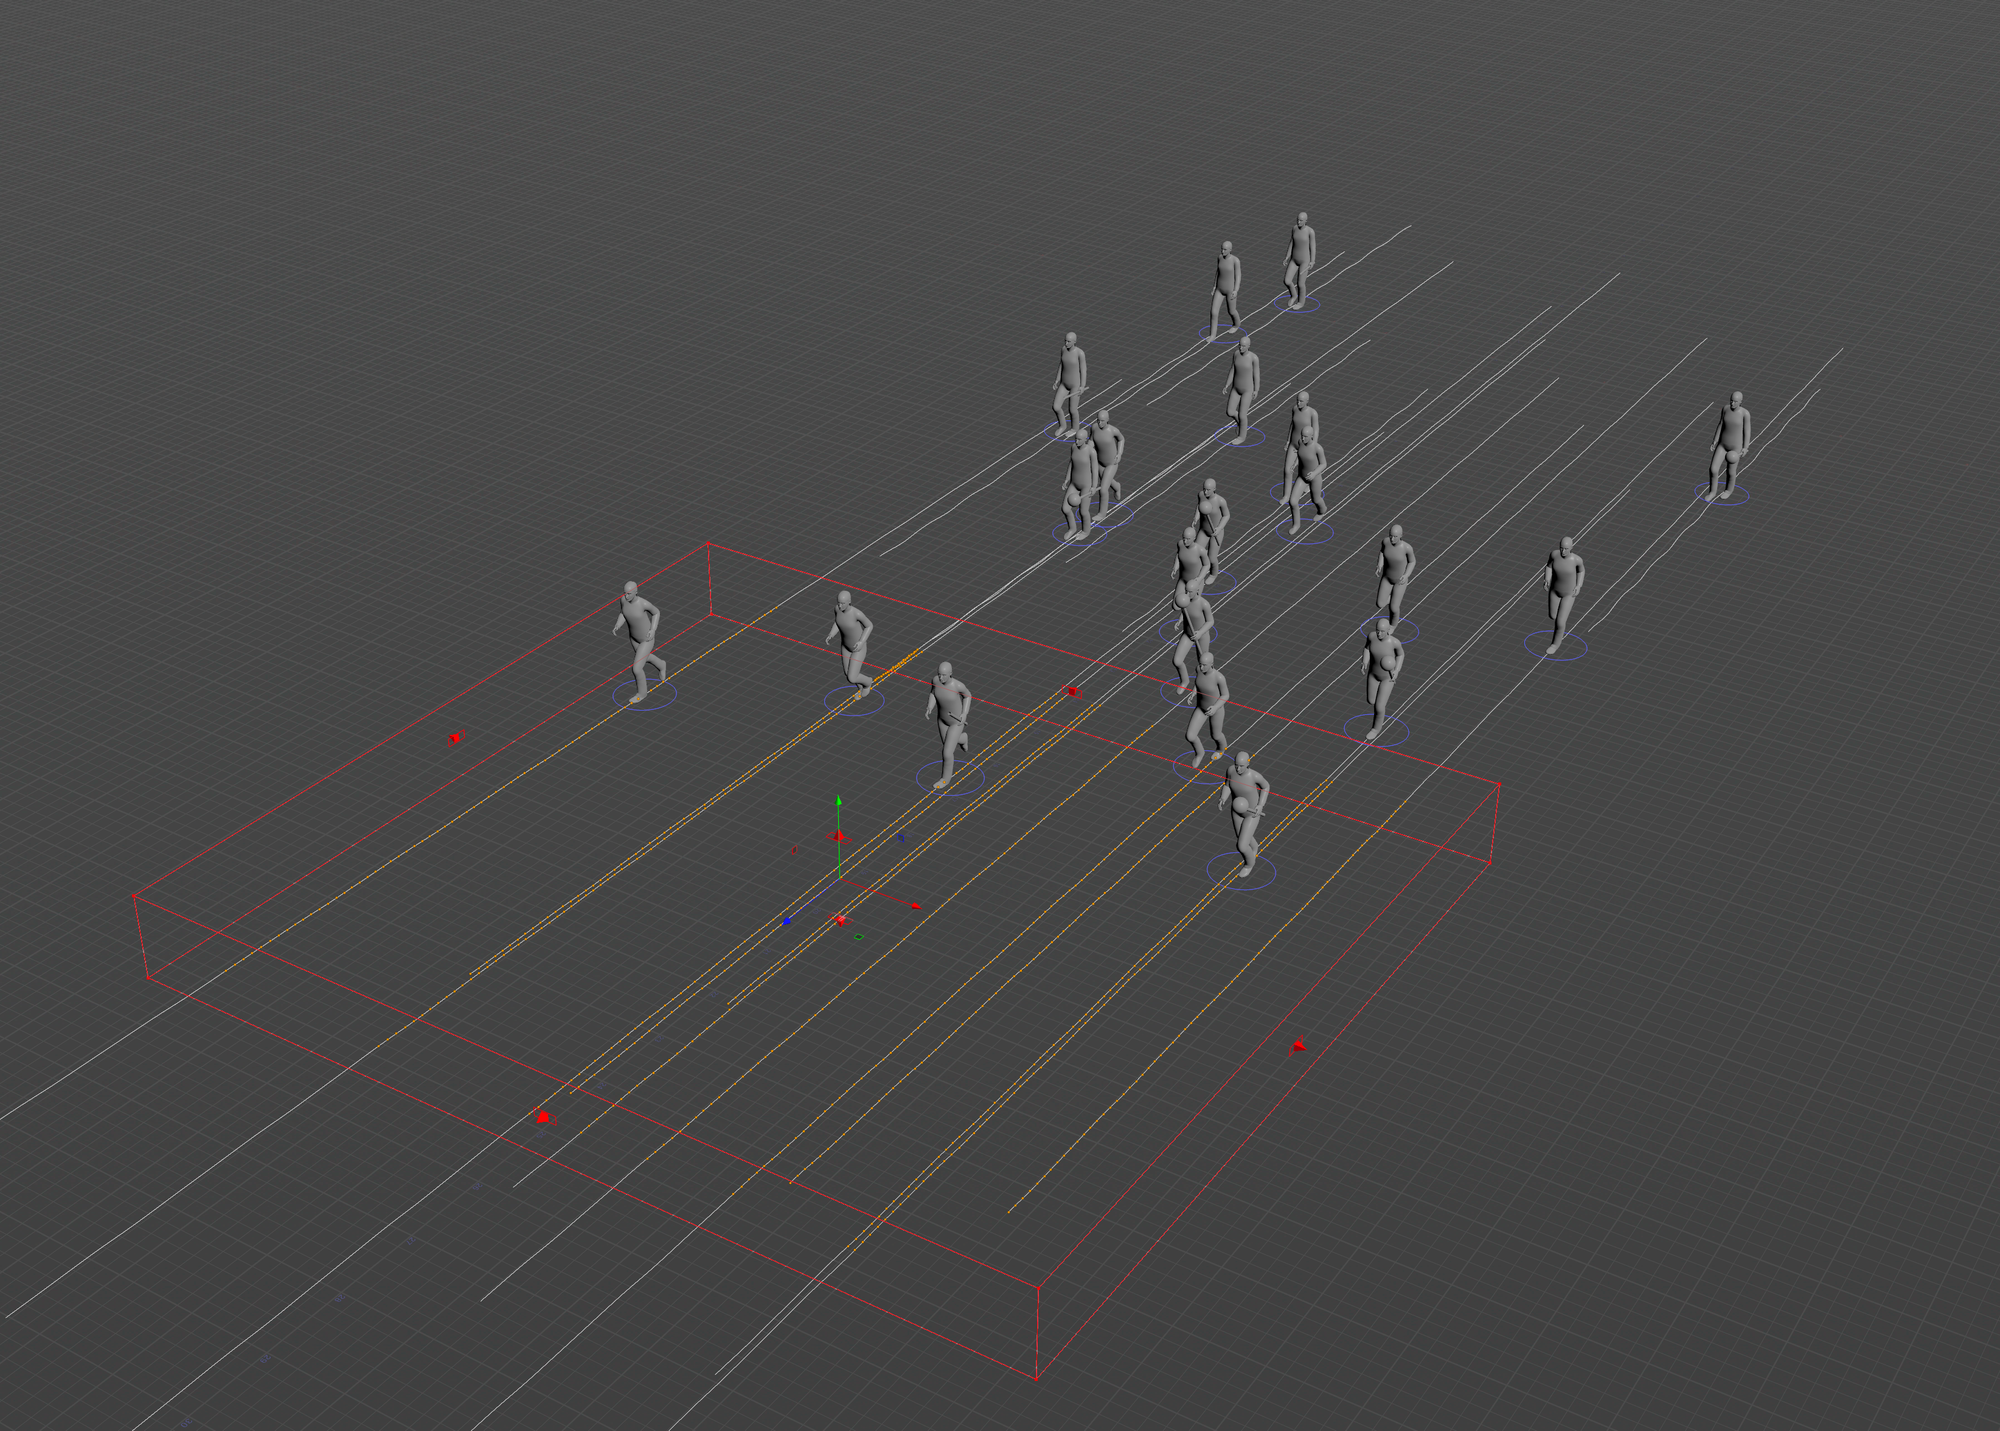
The anatomy of the Crowd MotionPath toolset is very elegant. You always have two outputs for each node in this category - one containing the agents (the right output), and one containing the curves - a.k.a. the "MotionPath".
The MotionPath is in essence just a SOP curve. You can do anything you want with it, exactly like you would with a regular curve, and plug it back into your crowd system.
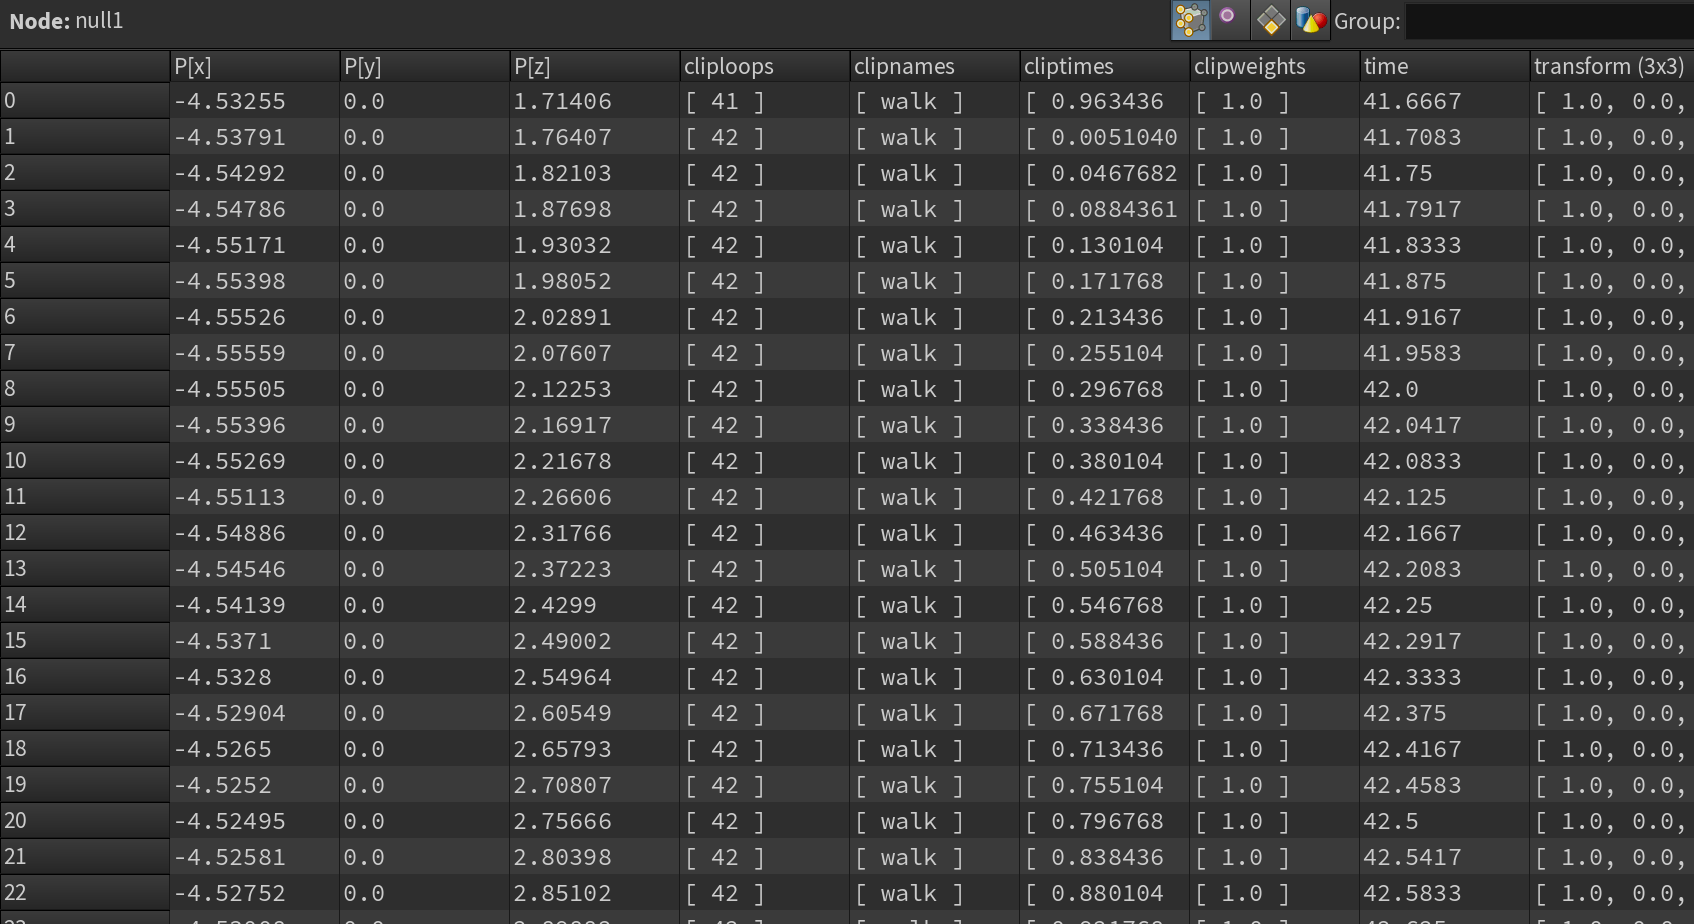
So how does it work? The Crowd MotionPath node generates these initial curves based on the locomotion of the currently attached animation clips. On the curves, each point defines various data such as the agent's position in world space, cliploops, clipnames, cliptimes, etc. On the primitive attributes, the curves also contain an agentname attribute describing which agent belongs to each curve. It assigns all this data to each agent - outputting a crowd animation that doesn't require any kind of simulation.
The remaining nodes in this toolset are essentially just designed for easy manipulation of these MotionPath curves since you usually don't want to manipulate them manually (as you can imagine - if you don't maintain the distance between each point for example, things will start looking strange). Below I'll cover major ones and explain when you may want to use them.
Crowd MotionPath nodes
Edit
The first node to cover is the Crowd MotionPath Edit node. This is the simplest node of the bunch and allows you to edit your curves in a very efficient way through a custom viewer state. While you can manually edit your curves (without this node, using standard SOP tools) it's usually not particularly easy since you'll break the locomotion speed if the distance between the points isn't correct.
To use this node simply drop it down and press enter in the viewport. You'll then be able to move the ends of your curves, as well as add unique points by left-clicking anywhere on the curve. The node will then try its best to interpolate the curve between those points. It's a fantastic tool for art-directing your crowd.
Follow
What if you want to drive the path of your MotionPath Crowd using an input curve? Or just design their path in broader strokes? This is where Crowd MotionPath Follow comes in.
This node allows you to input a curve, from which the node will try its best to move the MotionPath along said curve. It even tries to split the MotionPath accordingly if you insert multiple curves.
Rendered example of Crowd MotionPath Follow.
Avoid
Crowd MotionPath Avoid is another interesting node. This one should probably go into almost every MotionPath Crowd. It does two things.
Firstly, it calculates when your agents may intersect with one another and tries to get them to turn to avoid this.
Secondly, it allows you to input a custom mesh into the 3rd input which you can use as an obstacle for your agents.
The parameters contain a lot of different options for controlling how much the agents should turn and how far away from each other they should be. The great thing here is that whenever you update any parameters you'll immediately see the result since no simulation is involved.
Rendered example of Crowd MotionPath Avoid.
Trigger
The Crowd MotionPath Trigger provides a toolset for creating "triggers" for your crowds. This could be used for several things, but primarily serves the function of triggering an animation transition as you'll see in the next section.
There are several ways you can define a trigger (using the Type dropdown):
- Time - Sets the trigger at a specific time
- Bounding Region - Allows you to draw a bounding region of where the trigger should activate
- Object Distance - Triggers if the agent is close to an object
- Object Raycast - Triggers if a ray from the agent hits an object
- Neighbour Distance - Triggers if there are nearby agents
- Animation Clip - Triggers if certain Animation Clip conditions are met
Transition
Finally, Crowd MotionPath Transition provides a way for your agents to transition smoothly from one animation to the next based on a trigger (or a combination of triggers if you want - check the Combine Triggers section in the node).
In the example below I've switched my agents from a running animation to a fall animation when they enter a certain area.
Rendered example of Crowd MotionPath Transition + Trigger.
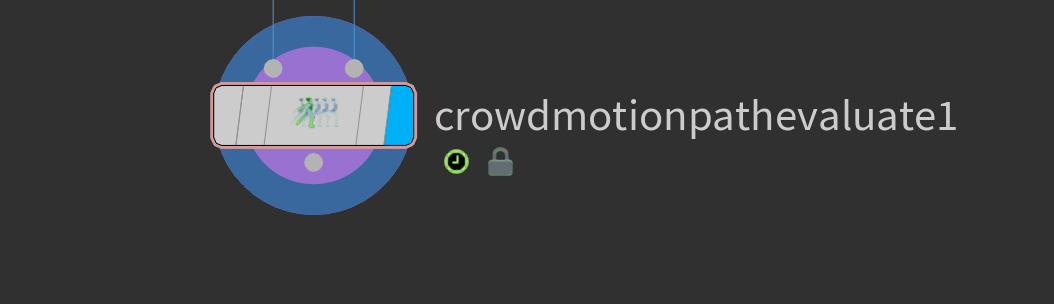
Crowd MotionPath Evaluate
The last node I want to cover before moving on to rendering in Solaris is the Crowd MotionPath Evaluate. This will usually be the last node in your MotionPath setup as it evaluates your Crowd at a specified time (by default the current frame) and outputs agents with their transforms and animation clips. I recommend you cache the output of this node using a filecache so we can stream the data from the disk.
Crowds in USD/Solaris
How to render your crowds.
Now let's dive into the process of rendering a crowd. I also want to take this opportunity to explain how agents (and by extension, rigged characters) work in USD.
Agents in USD (UsdSkel)
UsdSkel is a Schema (schema is essentially USD-lingo for a class) and API in USD that provides an efficient feature set for deforming geometry based on a skeleton. Without these features, you would usually have to bake the points of the deforming mesh and load them directly into memory, which can be quite heavy. Especially when dealing with crowds.
In this section, I want to give you an overview of the anatomy of animation loaded this way, with a specific focus on crowds/agents in Solaris.
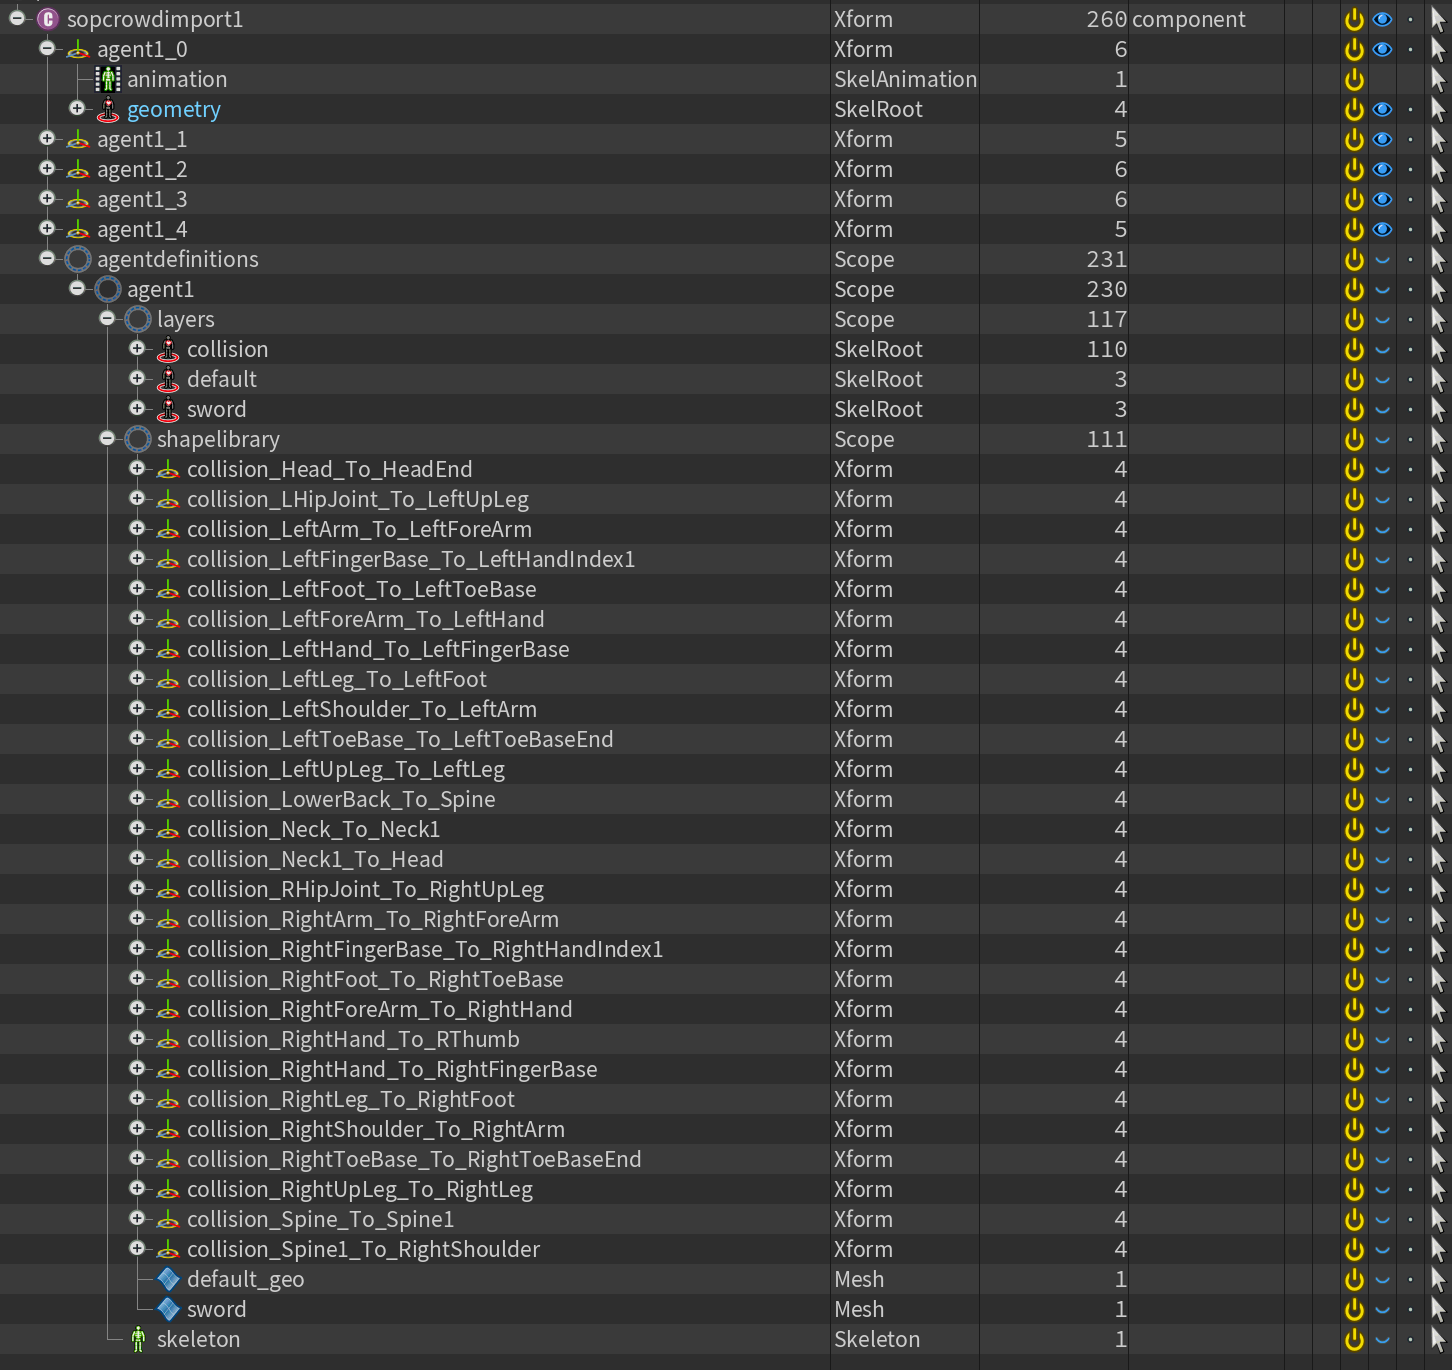
When you import your crowd using SOP Crowd Import in Solaris (covered in the next section) you'll get a scenegraph that looks similar to the above.
Each agent (in the example above named agent1_0, agent1_1, and so forth) contains an instance of the SkelRoot that belongs to that agent (as you can see in the agentdefinitions/agent1/layers/ path this is a collection of all the available agent layer variations). All skinnable primitives/geometry in USD must be inside a SkelRoot container.
Inside these SkelRoot primitives, you also find a Skeleton primitive, which contains the bind skeleton for the rig. It stores several important attributes, including details of the joint hierarchy, bind transforms, etc. A relationship is formed between this and the mesh which in turn contains information on weights and the type of skinning used. Together these two form an agent. In the example above the geometry itself is a reference to a mesh inside the agentdefinitions/agent1/shapelibrary .
So what about the animation? Instead of storing it directly on the skeleton it's stored on a different type of primitive called SkelAnimation which is found under each agent (since each agent will have a slightly different animation). The top groups (in the example above named agent1_0, agent1_1, and so forth) each point to their own animation using a skel:animationSource relationship. The skelAnimation primitives simply contain timesampled rotation, scale, and translation attributes for each joint. When all of this is combined we get animated agents for our crowd that match the SOP output.
While this quickly becomes very technical I hope it serves as a decent overview of agents and crowds work in USD. If you would like to read more I recommend checking out the UsdSkel Schema page in the official USD Documentation here. Again, you don't need to know this to render your crowds - but I think it's important to have some sort of overview of the technical aspects of how USD interacts with your exports.
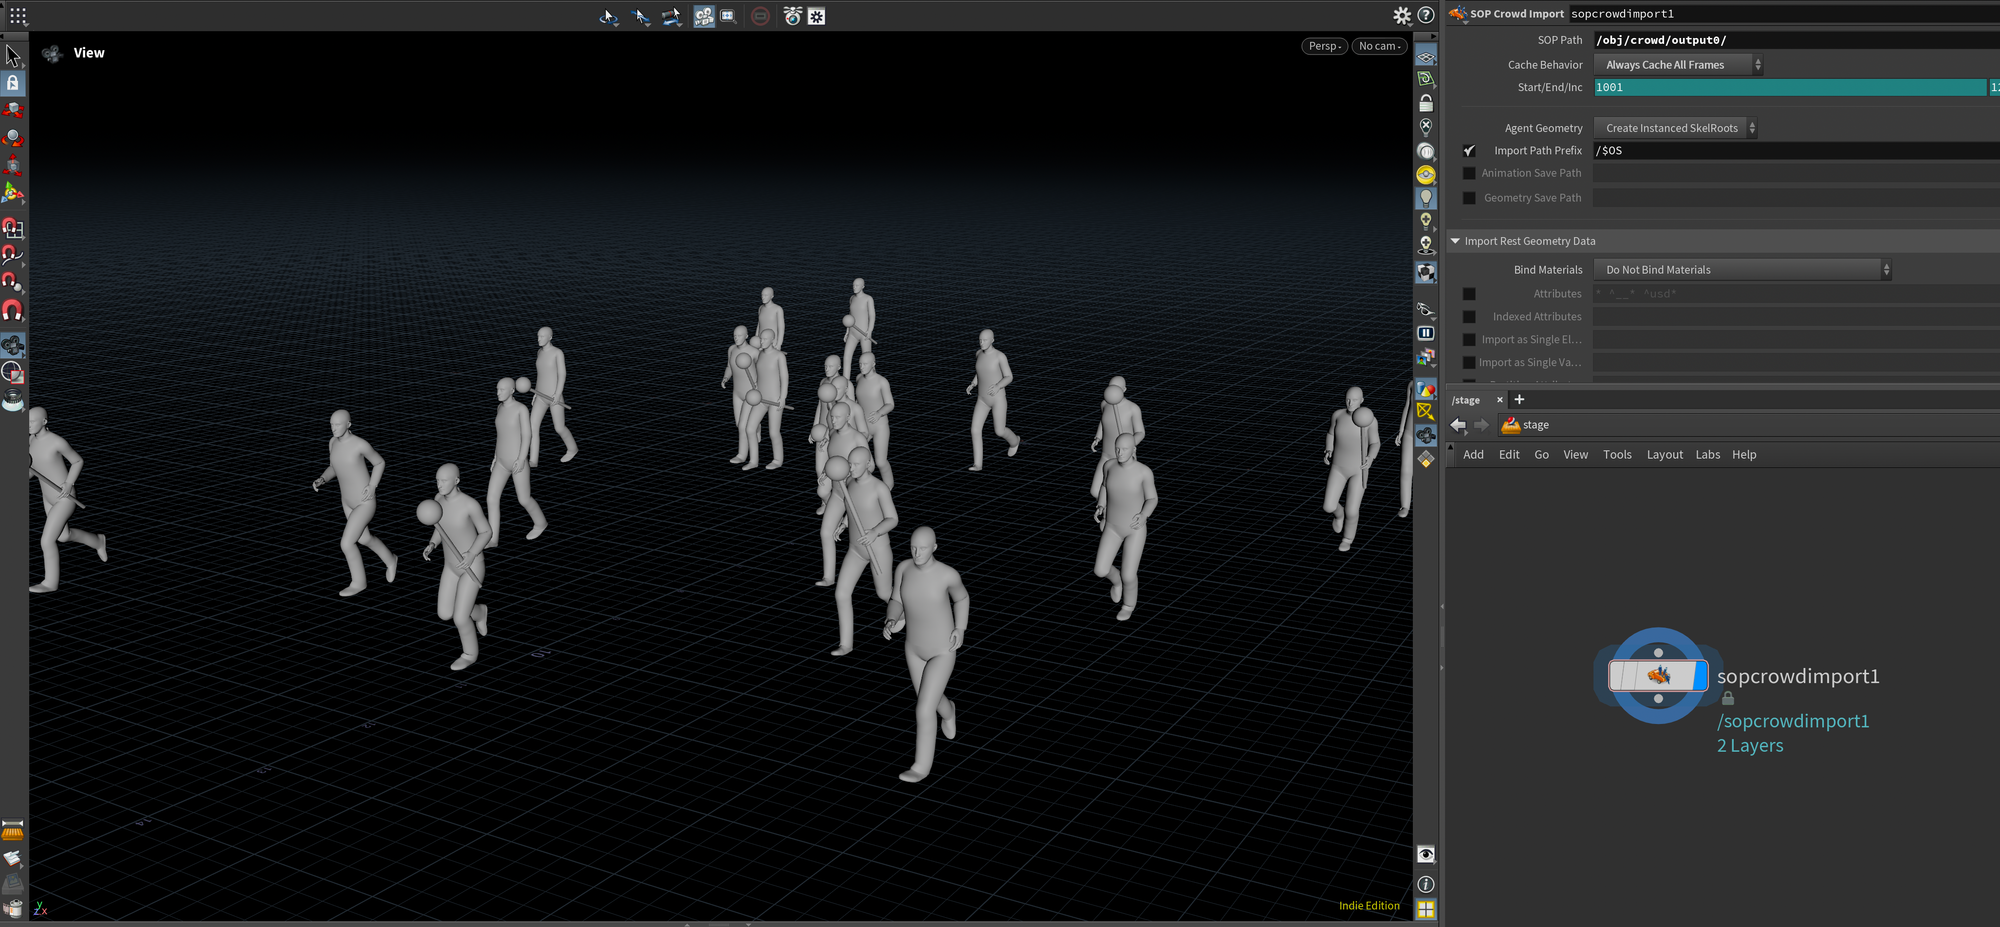
Exporting with SOP Crowd Import
With all that covered, I'll explain how to load a Crowd into Solaris and export it as USD. Luckily Houdini makes it very easy for us as most of the things above are taken care of automatically.
Houdini ships with a node called SOP Crowd Import . In this node, you simply insert the path to your crowd in SOP Path and you're good to go.
I also recommend setting the Cache Behaviour to Always Cache All Frames to make sure you get time samples (and avoid time dependency) as well as enabling Animation Save Path and Geometry Save Path - otherwise, a potential USD Rop will complain that it has to autogenerate these paths.
Conclusion
And there you have it! MotionPath Crowds in Houdini. I hope you liked this article and found it useful. Crowds are super fun to play with and I learned a lot myself in the writing of this article.
Let me know what you think in the comments below and let me know if there are any topics you'd like me to cover in the future!
As always, if you found this article interesting and would like to read more please feel free to subscribe to my newsletter below to get my posts directly to your inbox!