Live Position Reference (pRef) in Solaris
What is a Position Reference pass?
In the production of VFX and other computer-generated imagery, it is often useful to be able to create specialized masks for further adjustments in compositing. One option is to utilize a Point Position pass. This pass stores the vector positions of every pixel in the render in world space and allows the compositor to select a specific area of the render without the need to request extra masks from lighting. It's great, but if we're dealing with deforming geometry we run into an issue.
For example, if we were to use the aPMatte gizmo on the Point Position (pWorld) pass in Nuke, we may expect it to stay on the selected area for the entirety of the shot. This doesn't happen though.
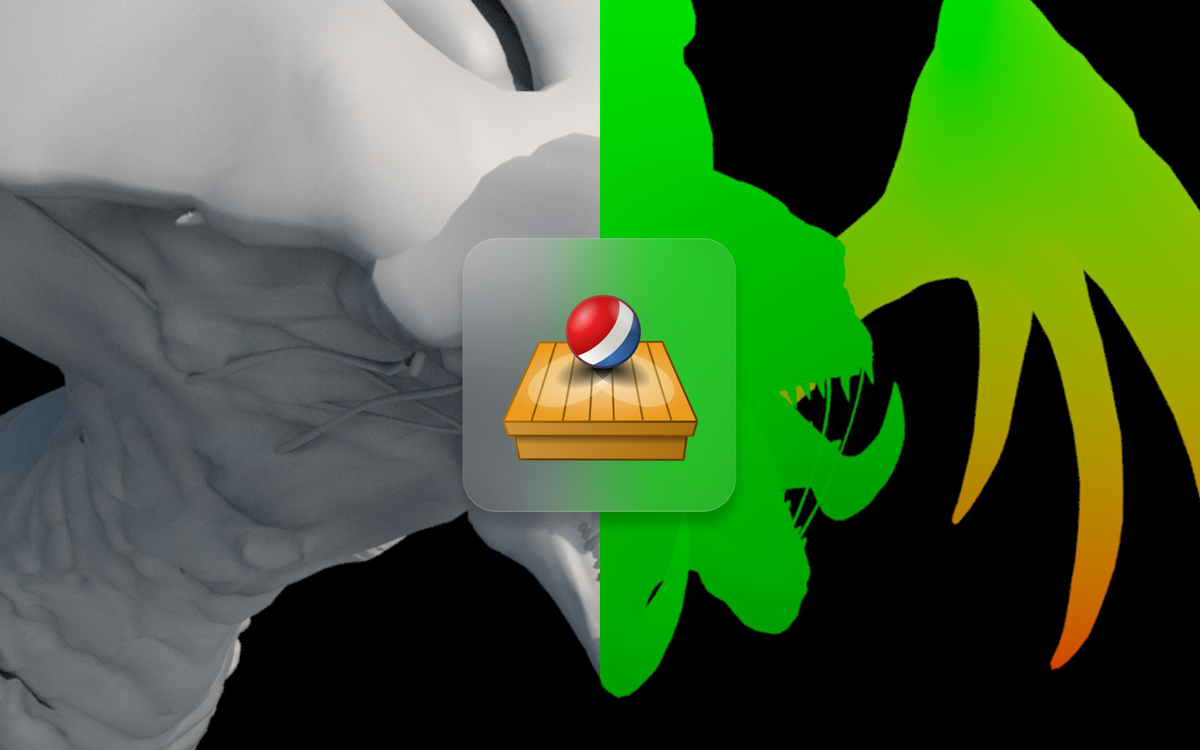
Render of pWorld pass
aPMatte of head - notice how the mask doesn't stick to the creature
The reasoning behind this is that the points in our scene are not static. The Point Position pass simply stores the world position of each point in our scene. So when we are selecting an area in the Point Position pass with our aPMatte gizmo we are just telling aPMatte to create a mask for that specified area in our world. It's not constrained to any geometry.
For a lot of cases you can get an Object Position (pObject) pass that stores the position of each point in object space. This is usually a quicker solution, but in the example above we have a deforming mesh, so this won't work.
So what do we do if we want to mask out the head of the above creature and have it stick for the entire shot? This is where the Position Reference pass comes in!
A Position Reference pass is quite simple, it stores the point positions at a specific frame and keeps those values available no matter how the mesh deforms. In SOPs in Houdini, you would usually create a rest attribute for this purpose. It's the same idea.
With a pass like this, we are suddenly able to have our mask stick for the entire sequence. Pretty neat!
Render of pRef pass (Position Reference pass)
Render of pRef pass (Position Reference pass)
How to make a Position Reference pass in Solaris
Now to the more practical part of this post. Most of the solutions I've seen for creating position references in Solaris involve either baking point-attribute in a previous pipeline step or generating it through a SOP modify.
The cleanest of these two approaches is having the attribute already baked in on the geometry you're rendering, but this is not always an option.
The second option, involving using a SOP modify or similar to generate a rest attribute, can be quite taxing on performance, and SOP modify is generally still a bit unstable to work with as I'm writing this post.
Therefore I propose a different solution. Using the Python script I wrote below you can generate a Position Reference pass on the fly directly in LOPs. It's very performant as all it does is copy the point-positions of the specified source frame into a new primvar called pRef.
To use this code all you have to do is create a Python node in LOPs, add this code, and change the primpattern, sourceframe, and primvarname attributes to your liking.
- primpattern = The primitives you want to generate Position Reference on (accepts prim patterns like "/hyralisk/**".
- sourceframe = The source frame to base the Position Reference pass on.
- primvarname = Name of the primvar to store the Position Reference on.
As icing on the cake, this should work in all render-engines that support Solaris.
Please note that the code below requires Houdini 19.5+
node = hou.pwd()
stage = node.editableStage()
from pxr import Sdf, Usd, UsdGeom
import loputils

# Get Parameters - Replace these with your own values!
primpattern = "/hydralisk/**"
sourceframe = 140
primvarname = "pRef"

# Parse Primpattern
ls = hou.LopSelectionRule()
ls.setPathPattern(primpattern + ' & %type:Mesh')
paths = ls.expandedPaths(stage=stage)

# Compute Point Reference
for prim in paths:
    prim = stage.GetPrimAtPath(prim)
    primvarsapi = UsdGeom.PrimvarsAPI(prim)
    points = prim.GetAttribute('points')
    points_values = points.Get(sourceframe)
    primvar = primvarsapi.CreatePrimvar(primvarname, Sdf.ValueTypeNames.Color3fArray, UsdGeom.Tokens.vertex)
    primvar.Set(points_values)
I hope this comes in useful! Thank you for reading.
Bonus: Adding pRef as a custom AOV in Karma
I had a few people ask about how you go about adding your Position Reference Primvar as an AOV in Karma. So wanted to share how to do it here:
In Karma Render Settings you can go to the bottom of the Image Output tab and open the Extra Render Vars panel. Then, add a new one by clicking the "+" icon.
In the newly generated field, you can specify a name for the AOV in the "Name" parameter as well as the Data Type and Source Name of your Primvar.
In our case, if you kept the defaults in my script, you'll just need to type it like in the screenshot below:
Name: pRef
Format: color3f
Data Type: color3f
Source Name: pRef
Source Type: Primvar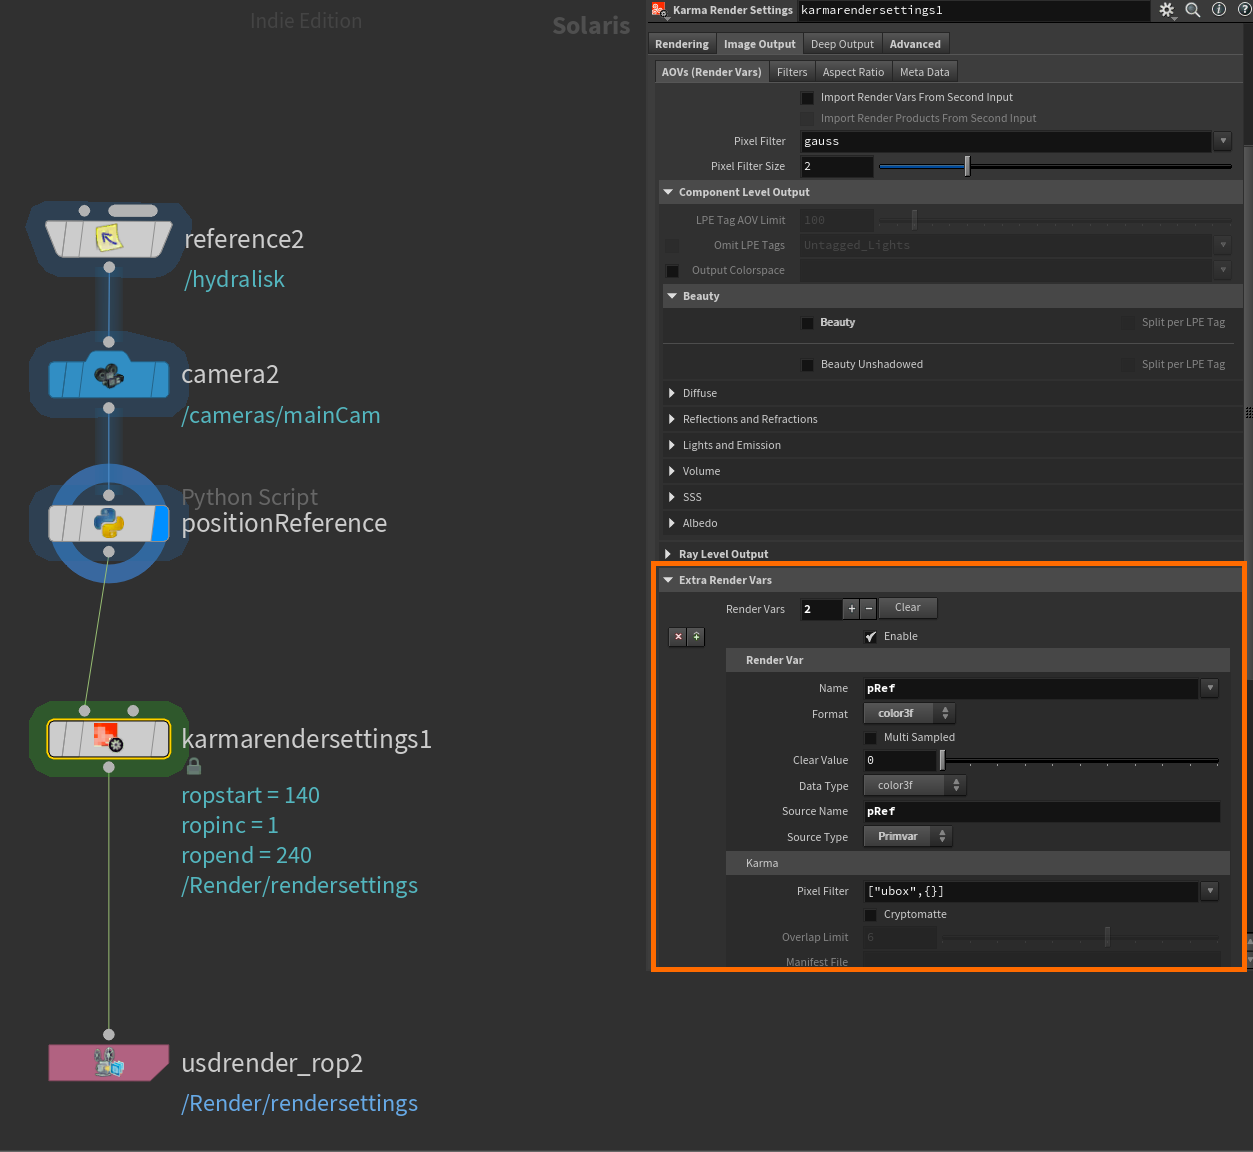
Also, If you aren't familiar with Primvars I recommend reading about them in the excellent USD Survival Guide by Luca Scheller: https://lucascheller.github.io/VFX-UsdSurvivalGuide/core/elements/property.html#attributePrimvars
Essentially it's a special attribute namespace that ensures an attribute is exported to rendering. It is useful for adding attributes that need to be accessed by shaders and AOVs in USD.